What is vSAN?
Before we dive into the nitty-gritty of setting up vSAN, I’d first like to give a brief introduction of what vSAN is all about.
VSAN, short for VMware Virtual SAN, has been around since March 2014 and is VMware’s take on hyper-convergence or the abstraction of storage from the underlying hardware. Additionally, a single pane of glass, the vSphere client, is used to manage all your storage and virtualized resources. The main concept behind vSAN is to pool local hard drives on ESXi hosts and present them as a single shared datastore mimicking shared storage. If this isn’t neat, I don’t know what is!
In practical terms, this means you now have the option to choose between an often complicated and expensive shared storage solution – think SAN, NAS and all the hybrids in between – and a one-stop-shop for all your storage, compute and virtualization needs.
Nested Virtualization
In this tutorial, I’ll be using a nested environment. I’ll briefly explain what nested virtualization is just in case this is all new to you. Simply put, we’re talking about virtualizing hypervisors, meaning that a hypervisor – such as ESXi – is installed on a virtual machine as opposed to a physical machine. Confused? Don’t be.
At the highest level, you’ll find one or more physical servers running ESXi – the hypervisor. We call these level 0 (L0) hypervisors. In Figure 1 the physical ESXi server, labelled L0, has the IP address 192.168.0.1 assigned to it.
One or more virtual machines are created on the L0 hypervisor. This is where our virtualized or nested ESXi hosts will reside. These are called level 1 (L1) guest hypervisors which are labelled L1 in Figure 1.
Any virtual machine created on an L1 hypervisor is referred to as level 2 (L2) guest.
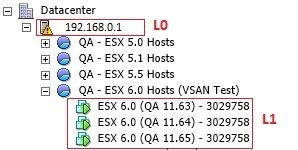
Figure 1 – Nested Hypervisors
In theory, you can keep going on but I cannot really justify any real-world use case. It is important to stress that this setup is unsupported by VMware and is subject to a number of requirements in order to make it work. The moral of this story is “do not use this for your production environments“.
So why bother, I hear you ask? Well, if you lack the financial resources, which in practice translates to less hardware to play with, you will find that nested virtualization provides an excellent alternative to say setting up a home lab. Likewise, you can cheaply set up test environments for QA or similar purposes with relative ease. These can be quickly disposed of when no longer need or rebuilt as required.
The Testing Environment
The setup used for this tutorial consists of a 3-node cluster running ESXi 6.0 U1 nested servers managed by a virtualized vCenter 6.0 server. Figure 2 shows the virtual machines on which I installed the nested ESXi hosts (L1) these in turn hosted on a physical ESXi 5.5 server (L0).
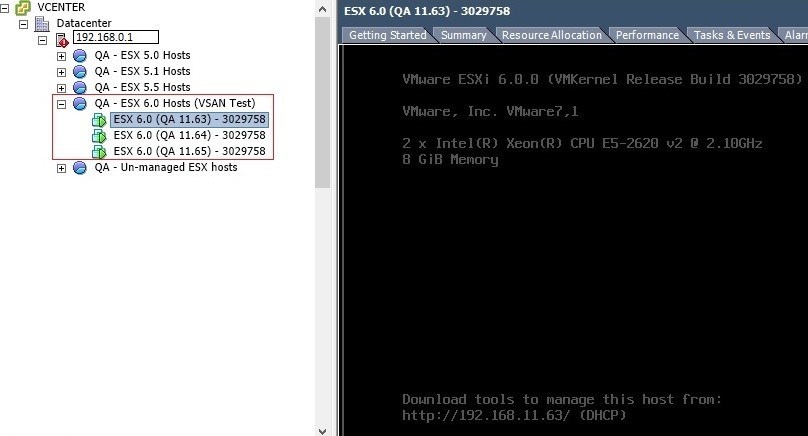
Figure 2 – Nested Hypervisors
After installing vCenter Server, I created a cluster and added the 3 nested ESXi hosts to it as shown in Figure 3.
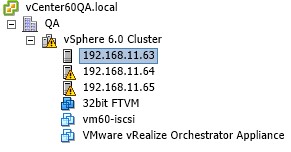
Figure 3 – A 3-node nested ESXi Cluster
vSAN Requirements
Following VMware’s VSAN requirements, a cluster must contain a minimum of 3 ESXi hosts each with at least one SSD drive for caching per host. On each ESXi host, I applied the settings as per Figure 4.
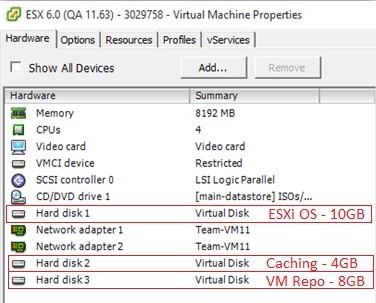
Figure 4 – VSAN ESXi Host Requirements
There’s a nifty trick you can use to emulate an SSD hard drive when creating a virtual machine. Just add the line scsi0:1.virtualSSD = “1” to the Configuration Parameters list for all three virtual machines running ESXi. As shown in Figure 5, I’ve set the type for the 2nd drive on controller 0 (0:1) as SSD.
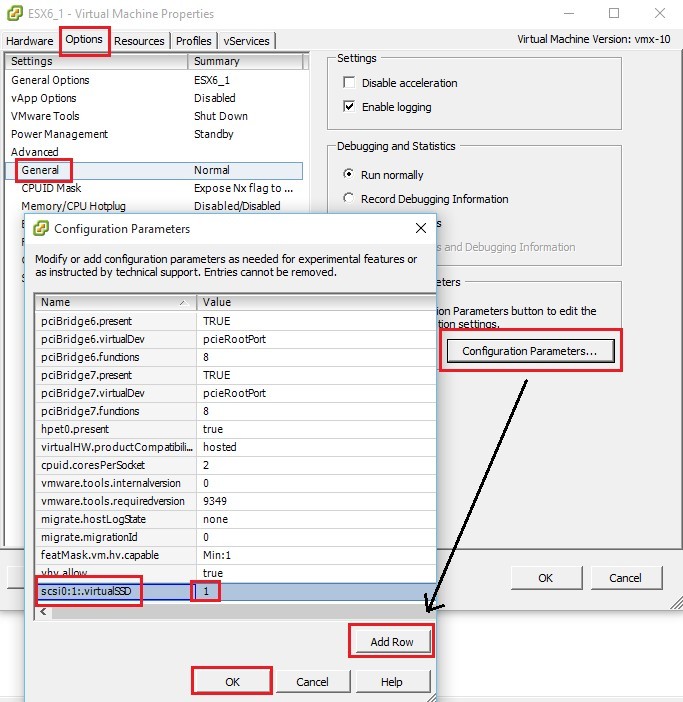
Figure 5 – Emulating an SSD drive
Every ESXi host has a total of 3 drives, one for the OS, a second for caching and a third on which the shared datastore will be created. The hard drive capacities chosen here are all arbitrary and purely for testing purposes.
Enabling vSAN
There is one final setting that needs to be set on all hosts before we provisioning VSAN. Basically we must configure an existing or newly created VMkernel adapter to handle vSAN traffic. To do so, connect to the vCenter server using the vSphere Web Client (Figure 6).
Once logged in, you’ll need to configure a VMkernel adapter for vSAN traffic on all ESXi hosts. In the right-hand pane, select the Manage tab and click on Networking. Click on VMkernel adapters and edit an existing VMkernel or just go ahead and create a new one. Either way, make sure you tick on the Virtual SAN traffic option as shown in Figure 7.
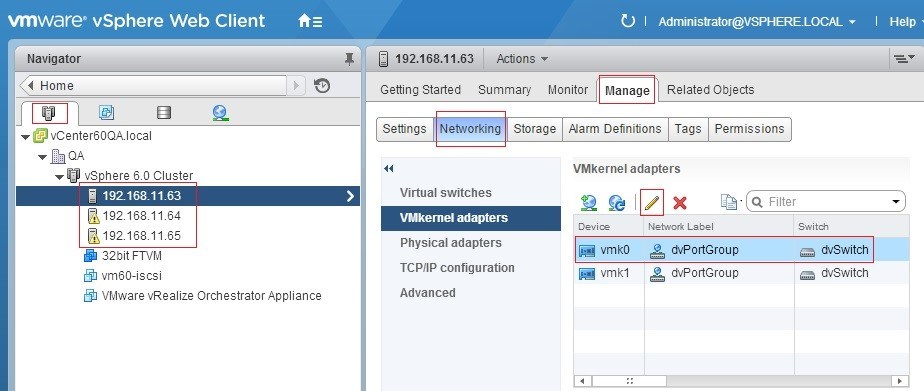
Figure 6 – VMkernel settings
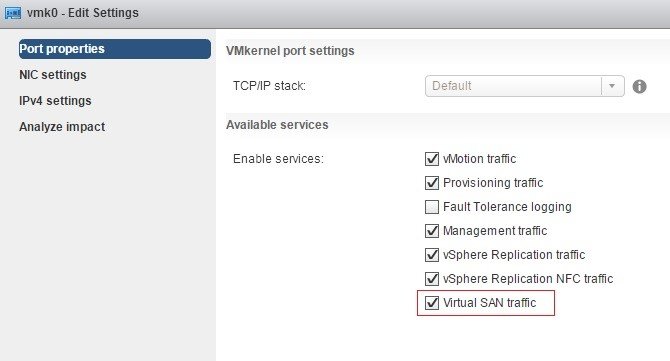
Figure 7 – Configuring a VMkernel adapter for VSAN traffic
It’s important to emphasize that for production environments a dedicated VMkernel adapter for VSAN traffic is highly advised. At the very least, each host should have a dedicated Gbit NIC for VSAN. VSAN also requires a private Gbit network preferably 10-Gbit for optimum performance. However, for testing purposes, our environment will work just fine.
Now that we have all of our ESXi hosts set up, we can proceed to enable VSAN. Surprisingly, this is as easy as ticking a checkbox.
Note: If DRS and HA are enabled, they must be turned off first before enabling VSAN. Both can be turned back on once VSAN provisioning completes.
Without further ado, let’s enable VSAN.
Locate the cluster name from the Navigator pane using the vSphere Web Client. Click on the cluster name and select the Manage tab. Under Settings, select General from Virtual SAN options. Click on the Edit button as shown in Figure 8.
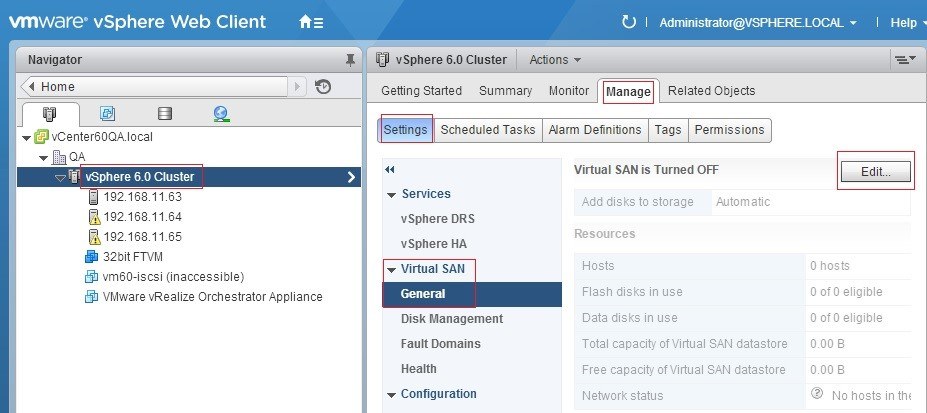
Figure 8 – Provisioning VSAN
Tick on the Turn ON Virtual SAN checkbox. The Add disks to storage option can be left set to “Automatic” as per the default setting. In a production environment, you will probably want to choose which unassigned disks on the ESXi hosts you want to be assigned to VSAN datastore (Figure 9).
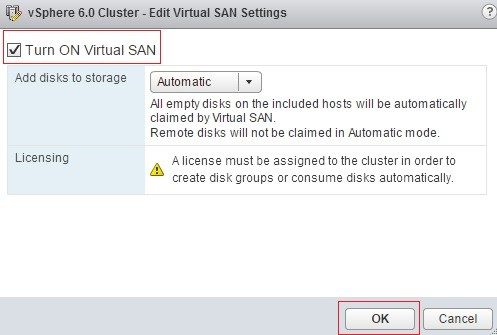
Figure 9 – Turning on VSAN (at last!)
Assuming all the requirements have been met, the provisioning process should process seamlessly. Once complete, you will find a new datastore called vsanDatatore as per Figure 10.
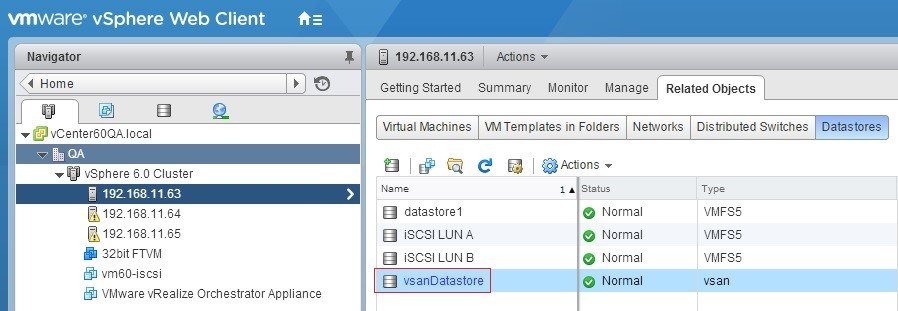
Figure 10 – VSAN datastore
Once finished setting up VSAN, you can switch back on DRS and HA on the cluster. Basically, that’s all there is to it.
I’ve also included a 6 step video outlining the VSAN provisioning process I just reviewed.
- Check that “Virtual SAN Traffic” is enabled on a VMkernel on each ESXi host
- Turn ON Virtual SAN
- Verify that the vsanDatastore has been created
- Re-enable DRS and HA on the cluster
- Migrate a VM to the new VSAN datastore
- Browse the VSAN datastore and locate the folder of the VM just migrated
I hope you found this post interesting and useful. If you have any comments, do not hesitate to use the comments section below.
After you enable vSAN, you will also want to review your storage policies, which I’ll probably cover in a future post, so please stay tuned!
More in this category


About the Author
Jason Fenech

