Table of contents
Do you work with HP Proliant hardware? This guide will make ESXi deployments a breeze.
Sections in this Article:
- How does this work?
- Building the Web Server
- Get the latest Service Pack for Proliant
- Install the HP iLO PowerShell Cmdlets
<Skip to part 2 in the series: RAID configuration ISOs and ESXi install ISO>
We are going to run through how to configure bare metal deployment automation with HP Proliant Servers and ESXi with NO PXE booting, NO 3rd party applications, just pure raw PowerShell and some HP configuration tools. I’ve successfully used this process to build many HP Proliant servers and have saved thousands of hours in the process. Hopefully, I can do the same for you and your company by explaining and demonstrating step-by-step on how to set this up. I’ve only ever done this with HP Proliant hardware, also the PowerShell cmdlets that HP has released for the iLO has made this all possible.
Essentially, once everything is set up, the steps for deploying servers will be as follows:
– Plug the HP Proliant Server into network, write down the default ilo name and password from the service tag
– Register iLO Advanced key and obtain license key
– Verify server is pingable by ilo name
– Run PowerShell script, take a break
– Come back to a fully updated HP Proliant server with ESXi completely configured to your standards
In order to configure this, there are some requirements that are necessary to fulfill all the moving parts involved. But don’t worry, I will run through step by step how to configure and set up each piece. Below are the following items you will need:
– A Web Server to store all of the ISOs for the Server Build
– Windows ADK for Windows 10
– ESXi vSphere ISO
– HP Proliant Server G8 or higher
-The latest HP Service Pack for Proliant
-HP iLO PowerShell cmdlets
How Does This Work?
The deployment script will first use the HP iLO cmdlets to initiate communication to the server, it will then use the default credentials to configure the iLo. Once the iLO is configured, the server will boot to the HP Service Pack for Proliants and run through the automated firmware update process. Afterward, the server will be booted into a WinPE image and the HP array configuration tool will automatically deploy. I have the RAID configuration set up for the most common scenario which is RAID 5 with 1 Hot Spare and splitting up into a 50GB partition for the ESXi install. The 2nd partition will use up all the rest of the available drive space. If you need to change this, I will show you how. After the RAID configuration is complete, ESXi will then be installed and configured automatically:

Building the Web Server
We will need a web server in order to host all of our ISO files. The iLO allows you to mount ISO files via HTTP. So, that is the method that works best for automating the mounting of the various ISOs during the build process. If you already have a web server available, you can skip this step. I will run through a quick set up and configure of IIS with a Windows Server, I’ll be using Windows Server Core, however, you can use the full GUI version and you will install it the same. Also note, I will not be going through how to properly secure IIS as that is beyond the scope of this article. Once you have tested and are successful at automating your HP builds, be sure to circle back and try to lock down your IIS server as securely as possible.
First, lets install the IIS role. Open up an administrative PowerShell console on the server that you would like to turn into a Web Server and type the following syntax:
Install-WindowsFeature Web-Server
The IIS role will start installing:

Once installed, run the following syntax to create a new virtual directory. We need to create a directory called “Deployment” to use for our deployment ISOs. So first, lets create the folder:
mkdir c:\inetpub\deployment
Now we will create the virtual directory:
New-WebVirtualDirectory -Site "Default Web Site" -Name Deployment -PhysicalPath c:\inetpub\deployment

Now enable directory browsing on the directory with the following syntax:
Set-WebConfigurationProperty -filter /system.webServer/directoryBrowse -name enabled -PSPath 'IIS:\Sites\Default Web Site\deployment' -Value True
![]()
Then we have to make sure that our .CFG and .ISO files are able to be downloaded. So type in the following two commands:
& "c:\windows\system32\inetsrv\appcmd.exe" set config /section:staticContent /+"[fileExtension='.iso',mimeType='application/octet-stream']"
& "c:\windows\system32\inetsrv\appcmd.exe" set config /section:staticContent /+"[fileExtension='.cfg',mimeType='application/octet-stream']"
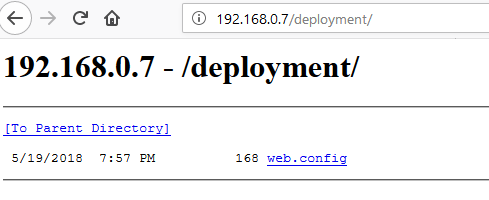
Now we can test, I can browse to the directory and see my files:
Get the Latest HP Service Pack for Proliant
We will need the HP Service Pack for Proliant to automate our firmware updates. It’s important for every server build that it is up to date on firmware before it is placed in production. So down the line we will need to do our homework and make sure this ISO is kept up to date. You can download the latest version of the HP Service Pack for Proliant here. It will require signing into HP’s website and you will need to fulfill their requirement of being “Entitled” to download the Service Pack. This means you just need to have an active support/warranty linked to your HP Passport account. Once we have the HP SPP downloaded we will save it to the C:\inetpub\deployment directory on the web server.
Install the HP iLO PowerShell cmdlets
We will need to install the HP ILO cmdlets on the device that we are planning on running the deployment script from. In this demo, this is going to be our Windows 10 machine. Get the HPilo cmdlets from the PowerShell Gallery by opening up an administrative PowerShell console and typing in the following syntax:

Now, we have the necessary cmdlets to allow us to configure and communicate with the iLO. The next steps are to build the RAID configuration ISOs and then the ESXi installation ISO. Read part 2 here.
[the_ad id=”4738″][thrive_leads id=’18673′]
More in this category


About the Author

Luke Orellana

