So you decided to build a lab, now what?
Building a VMware home lab is one of the best ways to learn about VMware. I’ve been a huge advocate of “whitebox” home labs. Some of my most popular posts are my ones based on home lab builds. A home lab allows you to gain hands-on experience without disrupting a production environment. We all try to avoid those RGEs (Resume Generating Events) right? There’s nothing like a place you can start a fire and not have to worry about putting it out!
A VMware lab can come in many forms, such as full rackmount servers running ESXi to small PCs running hosted hypervisors. You can even run nested ESXi inside VMware Workstation. The trouble is finding a sweet spot between, cost and functionality. Nobody wants to run a full blown rack of servers anymore. Or maybe they do? I remember the good old pre-virtualization days with a full 42U rack of servers in my basement. Nowadays I tend to go for the low power stuff. Something with what I call a high WAF (Wife Acceptance Factor).
Before we go any further you have to realize that what we are doing is in no way shape or form supported by VMware! None, zero, zilch. You cannot expect them to support home lab hardware. Their partner ecosystem ensures that everything has been tested and will be fully supported. The good news though is that there is a great community and support. If you’re stuck it won’t be for long. The trick here is to find hardware that works with ESXi. It can be hard though as the only hardware VMware lists is typically server grade hardware. My home lab has some serious uptime, so it is indeed possible to find hardware that is perfectly stable!
For the most part, the general rule of thumb is to stick with Intel based boards. I don’t want to fully rule out AMD setups either, but generally Intel boards have Intel based NICs and you will have far better luck with out of the box driver support with Intel NICs. Generally with AMD labs (and any lab setups with Realtek network adapters) you will have to inject what they call a VIB into your image. A VIB is a driver or piece of software for ESXi. It’s not a hard process at all and is well documented over here at v-front.de. Below is a great video to watch. It covers the process in good detail.
To keep our builds as simple as possible I will walk you through a couple different builds and link to hardware that works well as an ESXi lab. We’ll start first with an Intel NUC lab. One of the reasons the Intel NUCs are popular is they are ridiculously small and pack a lot of power. The next best reason people love the NUCs is the fact that you can install the vanilla ESXi install and the drivers work with vSphere 6.5. You do not have to inject any vib files into the installer. Download ESXi from VMware and install it, that is as long you’re using the 5th and 6th generation NUCs!
To keep these builds simple we will only be building a single host in the parts lists below.
The Intel NUC Lab
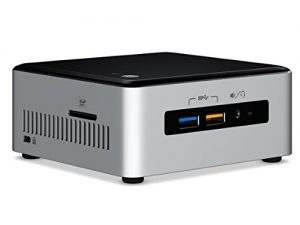
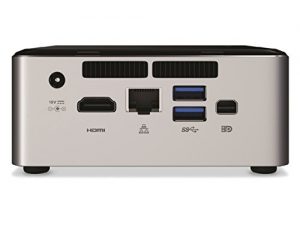
The NUC is a fantastic little box. Small enough that you can take it in your airplane carry on baggage if you had to. Low power also helps the electric bill out as well. The biggest downside is only a single NIC. Although there are some reports that have gotten the Startech USB network adapter to work, I have not tested it.
So if you choose to go with a NUC, you’ll want to pick up a switch that’s capable of vLANS since you’ll need them!
Parts List:
- 1 x Intel NUC 6th Gen NUC6i3SYH (Intel i3) or 1x Intel NUC 6th Gen NUC6i5SYH (Intel i5)
- Be sure to update to at least BIOS v44. NVMe devices can be used after the BIOS has been updated. Anything prior to that and you’ll wonder why they disappeared or are unavailable.
- 2 x 16GB DDR4 Modules (for a total of 32GB memory)
- 1x Samsung NVMe 128GB SSD (for a vSAN build, this can be used as a cache disk.)
- 1x Samsung 500GB SSD (for a vSAN build this will be used for vSAN capacity disk.)
- 1x Cisco SG300-10 Port Managed Gigabit Switch
- Because the NUC only has a single network adapter with no real way of expanding or adding additional adapters, you’ll want to ideally setup a few vLANs to segment your network traffic. This switch works great.
The Shuttle DS87 Lab
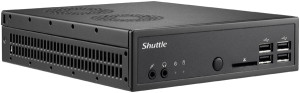
These Shuttle boxes are small (nowhere near the biggest host you can build) but I recommend these for two huge reasons, small size and low power. They have dual gigabit network connections as well built in so no need for any additional cards! All of these things equate to what I call a highwife acceptance factor so that’s a plus. These boxes consume a fraction of the power that a full desktop uses. My kilowatt measures about 44 watts around 75% usage. Running at least two of them is what I recommend so you can create a cluster.
Parts List:
The Host/Processor
We have to start our build with the Shuttle DS87.
For this build you have two options, to go all out or to keep it simple and cheap. My opinion it to keep the costs down and buy more hosts instead of put a lot of money into getting just 1 or 2 large hosts. I’d rather have 3 medium sized hosts for a lab any day of the week. Maybe you save a bit of money with an i5 over an i7.
- The all out option (will get you a total of 8 cores per host with hyper threading enabled): Intel Core i7 i7-4770S 3.10 GHz Processor – Socket H3 LGA-1150 – Quad-core (4 Core)
- The keep it simple and cheap option (will get you a total of 4 cores per host with hyper threading enabled): Core i3 (2 Core) 3.70 GHz Processor
The biggest difference in price from above is a quad core vs a dual core. When you enable Hyperthreading it will double it as well. The i7 has 4 cores with hyperthreading so you’ll get 8 cores total.
The Memory
In terms of memory, you really need to max out the host here. They are capable of doing 16GB of ram across the entire host. The system has 2x 204pin memory slots that support DDR-1333/1600 with maximum of 8GB per DIMM. This also seems to be a good price point these days. 2 sticks of 8GB memory is one of the cheapest options out there now. Whatever you do, don’t go below 8GB total.
- Crucial 16GB Kit (8GBx2) DDR3-1600 MT/s (PC3-12800) 204-Pin SODIMM Notebook Memory
- G.Skill Ripjaws Series Laptop Memory F3-1600C9D-16GRSL 16GB (2 x 8G) DDR3 SO-DIMM
- If you want to do 8GB memory per host: Corsair Vengeance 8GB (2x4GB) DDR3 1600 MHz (PC3 12800) Laptop Memory (Again, memory is important so think twice before only doing 8GB!)
The Disk
You will install ESXi 6.5 to the integrated SD slot using the SD card, your 1TB 7200 SATA disk will be used as a capacity disk in vSAN and the 128GB mSATA drive will be used for caching. If you’re looking to not use vSAN, you really only need the USB stick.
- HGST Travelstar 7K1000 2.5-Inch 1TB 7200 RPM SATA III 32MB Cache (for vSAN capacity)
- Transcend 128 GB SATA III 6Gb/s MSA370 mSATA SSD (for vSAN cache)
- Samsung 32GB USB Stick (or any other USB stick with 8GB or so you have laying in the drawer. We seem to have a pile laying around these days.)
Additional VIBs
With the Shuttle DS87, the 2 built in network adapters do not work with ESXi 6.x, you will have to use the ESXi Customizer script above to inject this VIB to your ESXI image before you install ESXi.
To wrap up…
You’ll want to remember that VMware has a free 60 day evaluation license. They also have a great option for home labs called the VMUG EVAL Experience which is similar to what Microsoft technet used to be in it’s heyday. You basically pay $200/yr for a key that allows you to run solely for lab purposes.
The two lab setups above are just a place to start, there is a lot of hardware out there that works with ESXi. The NUC, you can use 32GB of memory which is a big positive but you only get 1 network adapter. The Shuttle builds max out at 16GB of memory per host but give you two network adapters out of the box.
It’s time to get building!
[the_ad id=”4738″][the_ad id=”4796″]
More in this category


About the Author
Ryan Birk

