
Table of contents
Forgetting passwords is something that unfortunately happens to everyone, and resetting the ESXi root password requires a bit of attention from your side. And that’s why password managers exist. No, it’s not ok to write them down on yellow sticky notes stuck to your monitor unless you want to give your security guys a heart attack. I guess, given this post’s title, you know where I’m going with this if you forgot your ESXi root password.
It’s 10 in the evening. You get a call and start troubleshooting right away. You figure that a management services restart will fix the issue. Your host is connected to a remote KVM switch, so you press F2 and type in the password. No dice. Maybe, it’s a typo maybe not. You try again, and again and end up locking yourself out because of a forgotten root password. You did save the ESXi password but along the way, you changed it and forgot to update it in your password manager. According to VMware, the only supported fix is to re-install ESXi unless you’re still running ESX which is highly unlikely.
In pre-ESXi era, the hypervisor had a service console that enabled you to boot in single-user mode. This allowed you to change the password from bash. Incidentally, this method can still be used nowadays to change the root password of a vCenter Server appliance. No such thing for ESXi.
In today’s post, I’ll show you how you can use a Live Linux CD/DVD, to change the root password on your ESXi host. VMware does not support this method citing complexity, but I don’t buy this – there is nothing really complex about it. ESXi saves the root password encrypted in /etc/shadow as is standard with Linux.

An invalid password typed in at the console
How it all works
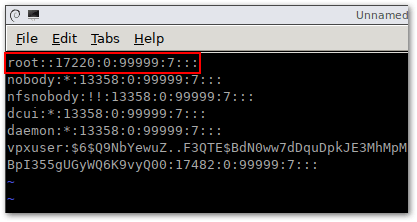
First off, SSH to your host and have a look at /etc/shadow. You should see something like this.

This is from a test ESXi host I use, so be my guest and try to reverse hash the password. Good luck with that. The string boxed in red is what we’re after. Deleting it will reset the password to null. Of course, if you can’t root to your host, there’s no way you can do this, hence why we use a live CD. Booting off a Linux Live CD/DVD allows us to access and change the file. The trick is knowing which file to change. Changing the one that’s accessible when SSH’ed to the host is of no use since the changes are overwritten once you boot up the host.
As you probably know, ESXi uses several disk partitions. One, in particular, is called bootbank. This partition contains the hypervisor core files and the host’s configuration which is what ends up being loaded into memory. The partition, by default, is called /dev/sda5.
The /etc/shadow file we’re after is found in a compressed archive called state.tgz which is found under /dev/sda5. So, here’s what we need to do.
-
- Download a Live Linux CD/DVD. Take your pick from this list. I chose the Gparted LiveCD one.
-
- Burn a USB or CD/DVD with the Live CD/DVD and boot your host off it.
-
- Mount /dev/sda5 and copy state.tgz to a temp folder.
-
- Uncompress state.tgz and edit the shadow file.
-
- Recompress the archive and overwrite state.tgz with it
-
- Unmount and reboot the host.
How to reset ESXi root password
The following procedure documents how one would go about resetting the password for root on ESXi 6.5 host. This should work on earlier versions of ESXi though I only tested it on 6.x. It also makes no difference whatsoever if the host is physical or nested.
It is of utmost importance to note that you will not be able to ‘deceive’ ESXi’s security and change the node’s root password without powering it off. Meaning you need to evacuate the VMs to other hosts in the cluster or shut them down to place the host in maintenance mode.
For this post, in order to reset the ESXi root password, I’m using a nested host for convenience’s sake alone. And, yes, I carried out this same procedure a number of times on physical ESXi hosts. Note also, that the host must be powered down for this to work so unless migrated, all hosted VMs will obviously stop working.
Step 1 – Insert the bootable Live CD, make sure your server can boot off CD/DVD or USB and power it up. If you’re using the Gparted LiveCD, just follow the on-screen instructions as it is loading.

Booting off the GParted LiveCD
 Step 2 – Locate the 2 partitions sized 250MB. As mentioned, /dev/sda5 is what we’re after assuming you installed ESXi on the first available disk. This may differ if, for instance, you installed ESXi on a USB device.
GParted listing the ESXi partitions found on the primary disk. Your mileage may vary according to the size of the boot drive and the medium (SD, USB, drive…).
|
ID |
Name |
Description |
Size |
|
1 |
System boot |
Used to boot the OS. |
4MB |
|
2 |
Scratch |
Persistent storage of VMware support bundles. Created if media is larger than 8.5GB. |
4GB (Dynamic) |
|
3 |
VMFS datastore |
Any remaining unallocated space is used to create a local datastore. Created if media is larger than 8.5GB. |
Remaining space. (Dynamic) |
|
5 |
Bootbank (bootbank 0) |
Store the current ESXi image. |
250MB |
|
6 |
Altbootbank (bootbank 1) |
Stores the previous ESXi image after an upgrade. Used for rollback operations. |
250MB |
|
7 |
vmkDiagnostic (small core-dump) |
Capture the output of a purple diagnostic screen in case of ESXi crash. |
110MB |
|
8 |
Store (locker) |
Storage of ISOs for VMware tools. |
286MB |
|
9 |
2nd diagnostic partition (large core-dump) |
Additional space for coredumps to avoid logs truncation. Created if media is larger than 3.4GB. |
2.5GB |
“vSphere 6.x partitions layout.”
Note that the partition layout changed dramatically in vSphere 7 compared to vSphere 6.x. It is now consolidated in fewer partitions leveraging dynamic sizing and VMFS-L.

vSphere 6.x vs vSphere 7 partitions layout
Step 3 – Open a terminal window and run the following commands in the exact order as listed.
sudo su
mkdir /boot /temp
mount /dev/sda5 /boot
cd /boot
cp state.tgz /temp
cd /temp
tar -xf state.tgz
tar -xf local.tgz
rm *.tgz
cd etc

The first batch of commands that need to be run to get to the shadow password file
We’re going to use vi to edit the shadow password file. Just move to the line starting with the root and delete the string between the first 2 colons. Use the [Delete] key. When done press [:] and type wq followed by [Enter].
Delete the encrypted root password to reset it to null i.e. the root account will not have a set password
Continue by running the following batch of commands.
cd ..
tar -cf local.tgz etc/
tar -cf state.tgz local.tgz
mv state.tgz /boot
umount /boot
reboot
Step 4 – Once the ESXi host is back online, try logging in as root either from the DCUI (console) or via SSH using putty or similar. You should be able to log in without keying in a password although you will be reminded to set one which is what you should do.
How do I recover my root password?
Here’s a video demonstrating how to carry out the password recovery procedure from start to finish and reset the root password.
:0
Conclusion
There isn’t really much more to add other than to urge you to get into a habit of saving your passwords using a reliable password manager. While unsupported by VMware, the procedure of resetting a default ESXi root password outlined today works every time, at least on ESXi 6.x but it should also work with older releases. I have not come across any side-effects when using this hack for ESXi root recovery, understandably so, considering we’re simply zeroing out a hash value from a password file. Ever lost your password and was frozen out of ESXi? What did you do? Let me know in the comments below. And if you need any help about how to reset ESXi root password, I’m happy to help out.
Frequently Asked Questions
What is the default ESXi root password?
How do I reset my ESXi root password?
How do I change ESXi root password from Console?
How do I recover my root password?
More in this category


About the Author
Jason Fenech

