
You’re smack in the middle of a Windows 2016 server VM installation. Prompted to type in a product key to continue, you fire up one trusty spreadsheet containing all your product licenses. Keying in 25-digit license keys, was not exactly in your job description! After locating the correct key, you hit CTRL-C and proceed to paste it to your VM only to find that the darn thing does not work. Does this sound all too familiar?
The reason for this is that since vSphere 4.1, copying and pasting clipboard content to and from VMs has been disabled for security reasons. The main argument for this is that non-privileged users may intentionally or accidentally eavesdrop on clipboard content transfers. If you look at the latest vSphere security configuration guide, you’ll find a couple of settings in this regard.
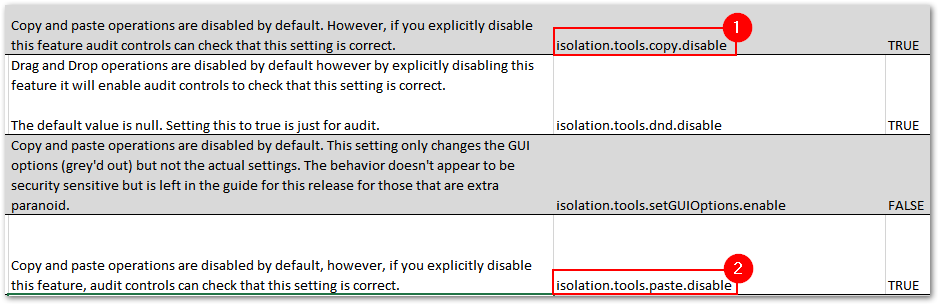
vSphere 6.5 Security Configuration guidelines (Source: VMware)
As it turns out, we just need to enable these 2 settings by adding them to a VM’s VMX file. Doing this will enable clipboard functionality. These settings WILL NOT WORK if you don’t have VMware Tools installed which makes it imperative for the tools to be installed and properly running.
Note: There’s a third setting, isolation.tools.dnd.disable, which should allow you to drag files over to the VM console but I did not manage to make it work. If you do succeed, please let me know by dropping a comment in the box below so I can amend this post as per your procedure or findings.
Enabling clipboard copy and paste for a single VM
Step 1 – Power off the VM
Step 2 – Right-click on the VM and select Edit Settings
Step 3 – Select the VM Options tab and expand Advanced. Click on Edit Configuration next to Configuration Parameters.
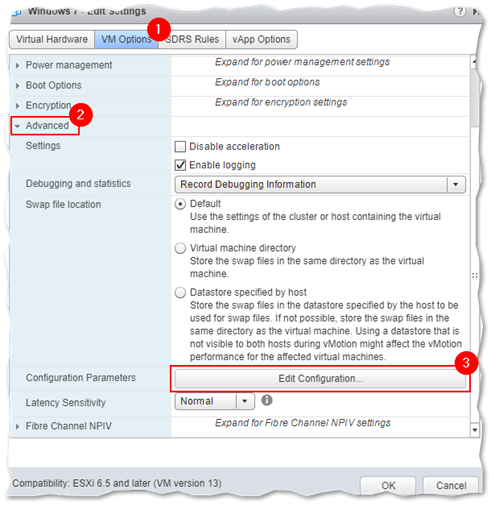
Editing a VM’s advanced configuration
Step 4 – Using the Name and Value fields at the bottom of the Configuration Parameters dialog box, add the following. Click on Add after each entry.
- Name: isolation.tools.copy.disable, Value: false
- Name: isolation.tools.paste.disable, Value: false
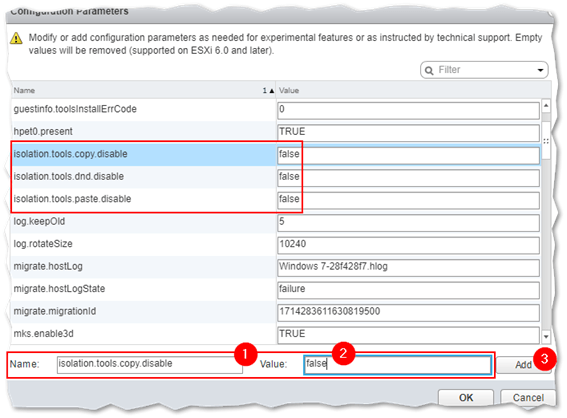
Adding the copy and paste settings to the VM’s configuration
Step 5 – Power on the VM. You should now be able to paste and copy content from the clipboard to the VM and vice-versa.
This next video, I demonstrate what I mean by copying content to a VM’s console window.
Enabling clipboard copy and paste globally
If security induced paranoia is not your thing, the above settings can be enabled globally. This means that the settings apply to any VM hosted on ESXi hosts where the clipboard settings have been applied. To do this, we need to edit the /etc/vmware/config file and add the two settings to it. Here’s how.
Step 1 – SSH to ESXi using putty or similar.
Step 2 – Run vi /etc/vmware/config and do the following:
- Press the [Insert] key on your keyboard and, using the arrows, go to the last line and press [Enter].
-
Type in the following.
vmx.fullpath = "/bin/vmx"
isolation.tools.copy.disable="FALSE"
isolation.tools.paste.disable="FALSE"
Step 3 – Save the file
- Press [ESC] followed by the [:] key. Type wq and press [Enter] to commit the changes to disk.
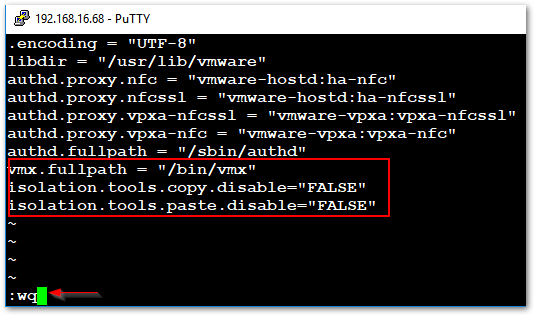
Adding the paste and copy settings to the ESXi config file
Any VM that is created on or migrated to the ESXi host where the settings have been applied, will inherit these settings. Note, that the changes made to the config file will not persist when carrying out ESXi upgrades so you’ll need to enable them a second time.
Conclusion
The ability to transfer clipboard content to and from VMs is something many admins cannot do without especially when network restrictions may prevent you from connecting remotely to a VM. Since vSphere 4.1, VMware has disabled clipboard functionality as a security precaution to prevent content eavesdropping. Regardless, the ability to copy and paste clipboard content is undoubtedly a useful feature. In today’s post, we’ve seen how you can enable clipboard functionality for a single VM or across the board.
For the latest VMware articles, do have a look at our blog hoping you’ll find something interesting.
[the_ad id=”4738″][the_ad id=”4796″]
More in this category


About the Author
Jason Fenech

