
Table of contents
- The VHDX “Shrink” Operation Means Something Different than “Compact”
- Practical Use for VHDX Shrink
- You Cannot Shrink a VHDX that Contains a Dynamic Logical Disk
- You Cannot Shrink a VHD
- How to Determine a VHDX’s Eligibility for Shrinking
- How to Prepare a Guest’s File System for Shrinking
- How to Shrink a VHDX
- Troubleshooting Unexpected Shrink Results
- Do Not Overuse Shrink
I have a standing recommendation for virtual machine resource allocation: start small. You can add or grow almost all virtual resources with very little, and sometimes no impact. On the other hand, you have more work to do if you need to take resources away. The most difficult resource to remove from a Hyper-V virtual machine is drive space. If need to remove an entire disk, you can do that easily. Making a virtual hard disk smaller requires a significant level of effort.
The VHDX “Shrink” Operation Means Something Different than “Compact”
Lots of people confuse “shrink” with “compact” for virtual hard disks. The “compact” operation squeezes the empty bits out of a dynamically expanding hard disk to reduce the amount of space that it consumes on physical disk. Compacting does not alter the maximum size of the disk, nor does it report anything different to the guest operating system. Furthermore, “compact” does not work on fixed VHDX at all. The “shrink” operation, the topic of this article, reduces the physical consumption of a VHDX and reduces the disk size reported to the guest OS.
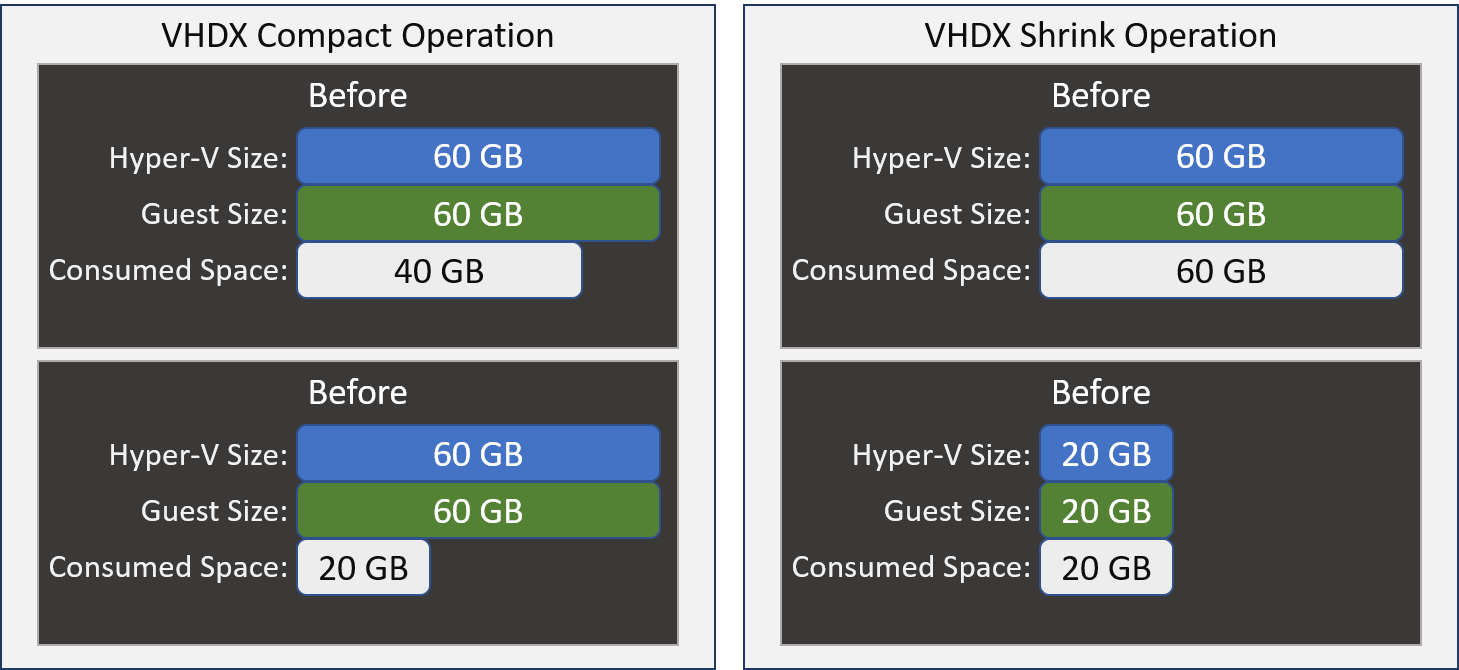
VHDX Compact vs Shrink
The above image shows a theoretical comparison to illustrate the differences. Shrinking a fixed VHDX always reduces its size on disk. Reducing a dynamically-expanding VHDX might, if it had expanded beyond the new shrink size.
What to remember: A compact operation reclaims the space from empty blocks. A shrink operation reclaims the space from unallocated blocks. We will make the distinction more obvious when we look at the shrink operation. If you want to know how to compact a dynamically-expanding VHDX, we have a different article for you.
Practical Use for VHDX Shrink
Let’s look at it from the perspective of a virtual machine:
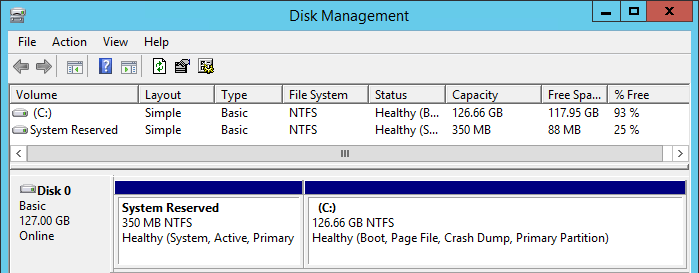
127 GB VHD
The above image represents a plausible scenario. Let’s say you’ve got a brand new systems administrator that created a new virtual machine using Hyper-V Manager’s wizard and just accepted all the defaults. If you’ve ever done that, then you know that this VM was born with a 127 GB virtual hard disk. That’s probably an excessive amount unless you also intend to install applications on its boot partition. You could just leave it alone. If that admin used defaults, then this disk is dynamically expanding. If it only has an operating system, it will probably never grow past 30 or 40 GB.
But, you have two potential issues: just because it probably won’t expand much doesn’t preclude the possibility that it might. If you set it to a more reasonable maximum, you’d worry less. Second, new administrators might believe everything that they read on the Internet, so they might convert the disk to fixed mode based on the plentiful FUD on the matter. That will leave you with 90GB or so of completely wasted space.
You will encounter other scenarios. What to remember: The shrink operation works best for a VHDX that was over-allocated at creation time.
You Cannot Shrink a VHDX that Contains a Dynamic Logical Disk
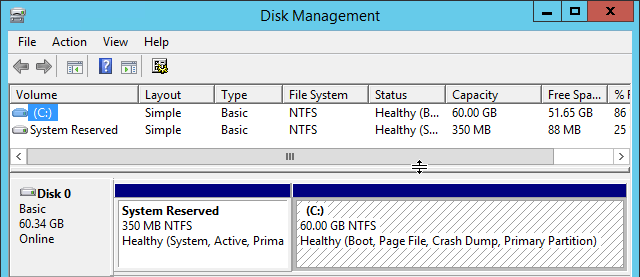
If the logical disk inside the VHDX that you’re working with is Dynamic, then you can’t shrink it. Do not confuse the Dynamic logical disk with dynamically expanding VHDX, as they are dramatically different things. The quick way to tell the difference is in the guest’s Disk Management display:
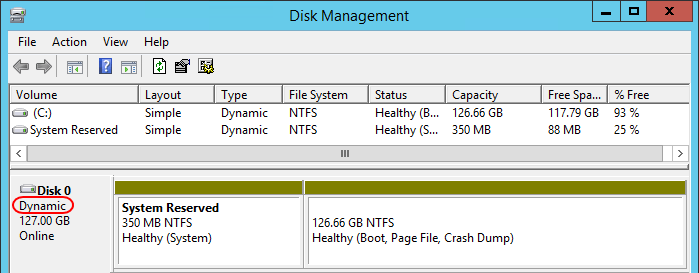
Dynamic Volume
The tell-tale signs are the word “Dynamic” in the Type column and in the disk descriptor field at the far left as well as the sickly yellow-green coloration of the volumes’ bars. The disk also won’t appear when you run PowerShell’s “Get-Disk”. Apparently, that was intentional. Diskpart will still work, though:
diskpart
select disk 0
list partition
Your output will display Dynamic Data for Type:

Diskpart for Dynamic Disks
The moral of the story: don’t use Dynamic logical disks. Hyper-V isn’t the only thing that doesn’t know what to do with them. Unfortunately, some products out there require Dynamic disks. Even at Microsoft, at least one team hasn’t yet gotten the memo to stop using Dynamic disks. So, the secondary moral: if you must use Dynamic logical disks, provision small because you can always grow them. If that sounds familiar, that’s because I gave you the same moral at the start of the article.
You Cannot Shrink a VHD
No official tool exists to shrink a VHD. I have seen a tool that would, but all of the links that I can find have gone stale. It never had official support.
How to Determine a VHDX’s Eligibility for Shrinking
You can find out very easily if you can shrink a virtual disk and, if so, just how much you can shrink it. Use Get-VHD on the target virtual disk file. Look for the Size and MinimumSize fields.
If the MinimumSize field is empty, as in the following screenshot, then the contained logical disk is likely Dynamic (again, not to be confused with dynamically expanding). Another possibility is that the file system is corrupt. This field also starts out as empty until an operating system has initialized the contained disk.
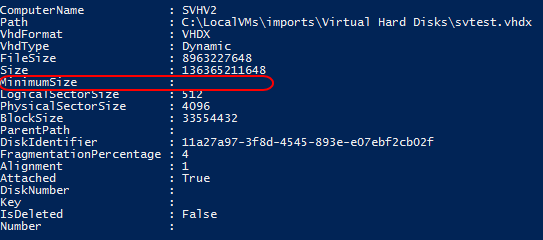
Get-VHD on a VHDX that Contains a Dynamic Disk
A more normal output looks like the following:
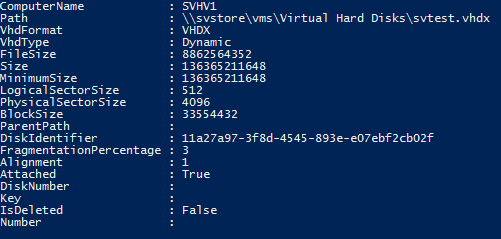
Get-VHD on a VHDX that Contains a Basic Disk
Notice that the VhdType here is Dynamic, for dynamically expanding. That won’t stop you from shrinking it. However, this disk is not eligible to be shrunk either, because its MinimumSize and Size are identical. This disk is almost entirely empty; just look at FileSize. Even that probably has a lot of empty blocks. The issue here is the difference between used and allocated. Inside the virtual machine, or, more accurately, inside the contained disk’s allocation table, all the space has been claimed (allocated) even though most of it is empty. To make this disk eligible for shrinking, the MinimumSize must be smaller than the Size.
How to Prepare a Guest’s File System for Shrinking
Before you can shrink the VHDX itself, you must de-allocate space on the guest’s logical disk. These instructions work for Windows only. You can shrink Linux file systems as well, but the tools and techniques vary based on the file system and distribution. Locate instructions that pertain to your setup (readers have supplied some in the comments below!), follow them, and then jump to the next sections here to shrink the VHDX itself.
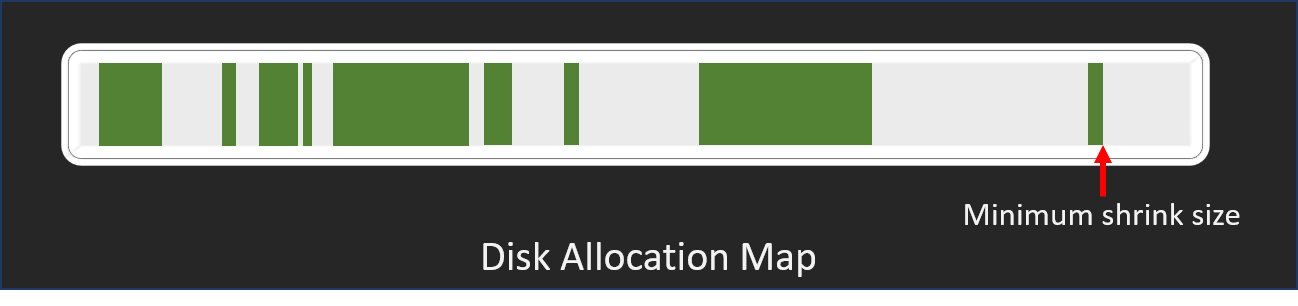
In order to shrink the VHDX, you must delete the partition or volume at the very end of a logical disk, or you must shrink it. Deleting a partition or volume is easy; these instructions will only show how to shrink them. Remember: Only the space at the END of a disk can be reclaimed by a shrink operation. Deleting or shrinking a partition or volume from the beginning or the middle will not give the shrink operation any space to work with.
As a general rule, you should always take a fresh backup before performing any operation on a disk.
How to Shrink a Volume with Disk Management
- In Disk Management inside the guest, right-click on the volume or partition at the end of the disk and click Shrink Volume.
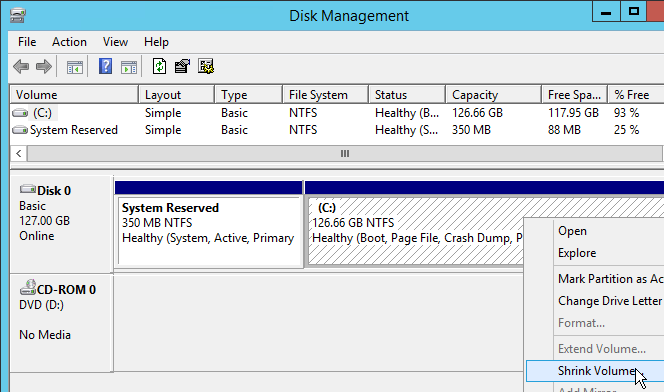
Shrink Volume in Disk Management
- The system will determine how much the the volume can shrink. How long this takes depends on disk activity and your hardware.
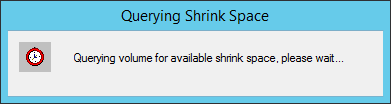
Querying for Shrink
- Pay attention! What you see now must surely rank highly on any list of the most confusing dialog boxes in history. The first field is the only one that’s straightforward: the current size of the volume. The second field isn’t too bad, but to be clear, it is telling you how much space can be taken away. It is not telling you the minimum size. The next two fields catch many people by surprise. The field that you can type in is not what you want the final size of the disk to be. It represents the amount of space that you want to remove. The bottom field auto-calculates as you change the number, showing you the projected final size of the disk. Some people that read the dialog figure it out from the wording, but they’re in the minority. Most people skip the reading part and just type in the desired final size and wind up with a disk of unexpected size. So, break out your calculator and subtract the amount that you want from the top number. Enter the result in the text field. In my case, I want the final volume to be 60GB in size, so:

Shrink Dialog
- After clicking Shrink and a brief delay, you should see something like this:
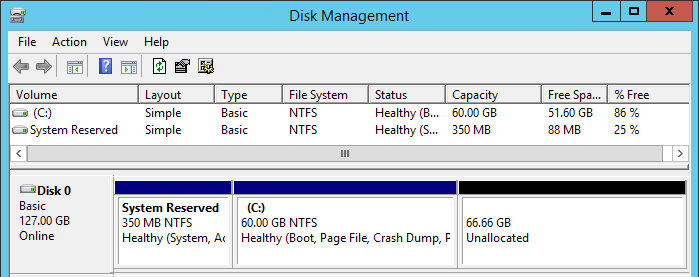
Shrunk Volume
The VHD will now have available space for shrinking, which you can verify with Get-VHD.
How to Shrink a Volume with PowerShell
The PowerShell procedure to shrink a volume is far quicker and easier than Disk Management.
- Find out how far you can shrink the volume with Get-PartitionSupportedSize. You can use Get-Help to discover all the ways that you can use this cmdlet, but Get-PartitionSupportedSize -DriveLetter is probably the easiest.

Volume Size in PowerShell
- Now just finish up with Resize-Partition and the Size parameter. In order to specify which partition you want, DriveLetter works again, but you can use all the same selectors that you had with Get-PartitionSupportedSize. Of course, you can use Get-Help to see them. You don’t have to do any math; let PowerShell do the heavy lifting with suffixes:

Resize-Partition
Verify your changes with Get-PartitionSupportedSize or Disk Management.
[thrive_leads id=’17165′]
How to Shrink a Volume with DISKPART
DISKPART is the hardest way of the three shown methods, so only use it on systems that don’t have Disk Management or PowerShell.
- At an elevated command prompt, type DISKPART and press [Enter] to start the interactive shell (you cannot do this in a remote PowerShell session).
- At the DISKPART prompt, type list disk and press [Enter].

DISKPART list disk
- In the Disk ### column, find the number of the disk you want to use. Select that disk number as follows: select disk 0.

DISKPART select disk
- Now run list volume.

DISKPART list volume
- You can identify the volume by letter, label, or size. Select it as you selected the disk, ex: select volume 2 (not shown).
- To determine how much you can shrink the volume, enter shrink querymax.

DISKPART querymax
- Actually shrinking the volume is much like it is in Disk Management. You have to do math to figure out how much you want to shrink it and use that with “shrink desired” and the number, in megabytes, that you want to remove. For mine, it’s shrink desired=68256. If you didn’t query it first and don’t know how much you’re allowed to remove, you’ll want to specify “minimum” as well or it might not give you all the space that you need. DISKPART will throw an error if it can’t satisfy the minimum. If minimum is not specified and it can’t shrink to the desired amount, it will get as close as it can.

DISKPART shrink
- Type exit to leave DISKPART.
You can now shrink the VHDX.
How to Shrink a VHDX
The good news: you did all the hard work. PowerShell is the only tool that you can use for this last part. Open an elevated PowerShell prompt on a Hyper-V host that has access to the VHDX file. A remote PowerShell session to a suitable host will also work. If the target volume is on an SMB share, be aware that a remote session to the host will be subjected to the double-hop issue. If you haven’t/don’t want to configure constrained delegation, run directly on the system that holds the target file.
- The VM must be in the Off state before you can proceed. Online resize is supported only for growth operations.
- Use Get-VHD as described above to verify that the MinimumSize is present and is smaller than the Size.
- Use Resize-VHD to finish up. Your best option is to use the -ToMinimumSize parameter, although you have other options, viewable in Get-Help .

Resize-VHD
Verify the results in the VM’s Disk Management tool or Get-Volume.
Post-Shrink
Troubleshooting Unexpected Shrink Results
I have never seen a catastrophic outcome from a shrink. However, shrink does not always work as expected. The cases that I’ve seen involve an insufficient level of shrinkage. This has two potential causes. The first cause: the disk has no unallocated space at the end. I will not rehash the parts about the reported minimum size; if you missed that part, scroll up and read it. The second cause: you cannot de-allocate as much space as you need. Use a defragmentation tool to address that.
Yes, I have a near fanatical opposition to defragmentation. No, this does not represent a change of my stance. Defragmentation has a handful of valid uses, including cleaning up volumes from shrinking. Try a standard Windows defrag pass first. Other tools might do a better job. You only want to move files from the end of the disk toward the front. You might need to delete some unneeded files to make room first. You have one goal here: clear as much space as possible from the end of the volume. A volume can only shrink to the last non-empty block, even if earlier blocks have no data.
If that doesn’t help, you might need to use a data-moving tool. Create a new VHDX of the desired size and use something like robocopy to transfer the contents of the old disk to the new. I would not use this for operating system volumes, but it works well for data-only volumes. In fact, you could take these steps:
- Turn off the owning VM
- Disconnect the VHDX
- Mount the old VHDX and the new in the management operating system
- Use robocopy or a similar tool to transfer the files
- Dismount both VHDXs from the management operating system
- Attach the new VHDX to the VM in place of the old
Robocopy has switches to copy ACLs and file descriptors. You will need to double-check that the operating system reconnects any shared folders, though.
Do Not Overuse Shrink
Do not treat shrink like a regular maintenance tool. It works best on disks that were dramatically over-allocated at the start.
More in this category


About the Author

Eric Siron

