
The use cases for a hypervisor on the desktop are quite different from those for hypervisors in the datacenter and can involve using high-performance graphics implementations made possible by technologies such as Hyper-V RemoteFX Windows 10. Datacenter virtual machines run around the clock, quietly providing services behind the scenes. They aren’t logged onto very often, and when they are it’s usually only for administrative purposes. If a virtual machine is running on the desktop at all, it’s also typically open in a window and seeing regular interaction. It’s reasonable to expect more from that experience than might be typical for server-side virtualization. However, even with data center workstations and power users using VDI desktops, high-performance video adapters may be needed. One of the technologies historically that could help Client Hyper-V to meet that expectation is Hyper-V RemoteFX Windows 10.
The server editions of Hyper-V also offer RemoteFX. It’s not used as frequently as Hyper-V RemoteFX Windows 10, is disabled by default, and has more requirements. The complete RemoteFX experience on the server requires the Remote Desktop Services stack to be employed, and server-class accelerated GPUs are quite expensive and uncommon, unlike Hyper-V RemoteFX Windows 10. It’s a different story for Hyper-V RemoteFX Windows 10 because desktops commonly contain accelerated graphics adapters. Beyond having such an adapter, there are no particular requirements for Client Hyper-V’s RemoteFX.
What is RemoteFX in Client Hyper-V?
I once undertook a journey to enumerate the features of RemoteFX, and gave up after a while. RemoteFX is an umbrella term for several technologies designed to enhance the Remote Desktop/VMConnect experience for Hyper-V guests. Most commonly, we think of video capability because that is the most obvious component, but it is not the only one. If you’re interested in the other RemoteFX technologies, I’ll leave you to perform your own quest. What we’re most concerned with is video. Hyper-V RemoteFX Windows 10 provides strong support for RemoteFX video, which mostly means 3D acceleration. It is available by default, but you must specifically configure a RemoteFX video adapter for each virtual machine that you intend to use it with. I would strongly recommend that you proceed with caution when adding this adapter to any virtual machine whose guest operating system is not explicitly supported by Hyper-V. This TechNet article shows the supported Windows guests and there are menu items at the left that will take you to the lists of supported Linux guests.
Note that Hyper-V RemoteFX Windows 10 video might not be required for a satisfactory Client Hyper-V experience. Some 2D acceleration is available without a RemoteFX adapter. It’s not great, but only your needs can determine if it is acceptable. Also note that RemoteFX video will not magically transform your Client Hyper-V guest into a video gaming powerhouse, regardless of the capabilities of your graphics adapter.
You usually do not need to take any particular steps to enable RemoteFX video for your hosting Windows 10 RemoteFX system. If your video adapter has a DirectX 11.1-compatible driver, it will almost certainly work. In Hyper-V Manager, access the properties of your Hyper-V RemoteFX Windows 10 system and look on the Physical GPUs tab for something like the following screenshot. If you can’t select Use this GPU with RemoteFX, then you have an adapter that won’t work. If your adapter is capable, Hyper-V will have already enabled it.

Basic Configuration – RemoteFX Adapter
Adding and Configuring a RemoteFX Video Adapter to a VM in Hyper-V Manager
It’s quick and simple to Hyper-V enable RemoteFX video adapter to a virtual machine with Hyper-V Manager. It does not matter what Generation the guest is. You just need to enable client Hyper-V and set up RemoteFX. These screenshots are for a Generation 1 virtual machine, but the instructions are the same for Generation 2 Windows 10 Hyper-V RemoteFX.
- In Hyper-V Manager, verify that the target virtual machine is Off. If it isn’t, you’ll need to get it into that state. If it’s online, shut it off. If it’s saved or paused, resume it and then shut it down.
- Right-click on the target virtual machine and click Settings...
- The Add Hardware tab should already be active. Highlight RemoteFX 3D Adapter and click Add. If the item is disabled, the virtual machine isn’t off or your adapter does not meet the requirements for RemoteFX.
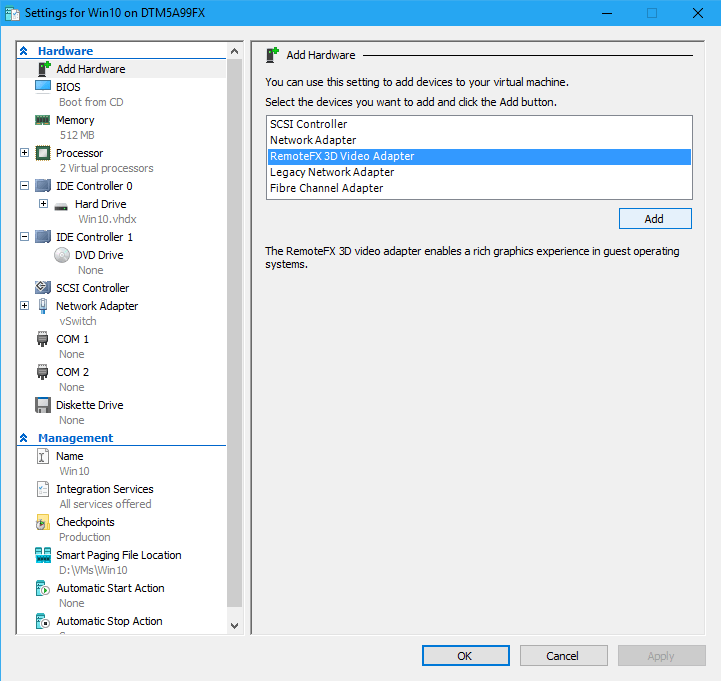
Adding a RemoteFX Adapter
4. A new tab will be added to the VM’s settings dialog named RemoteFX 3D Video Adapter. You can configure the settings as suits you.
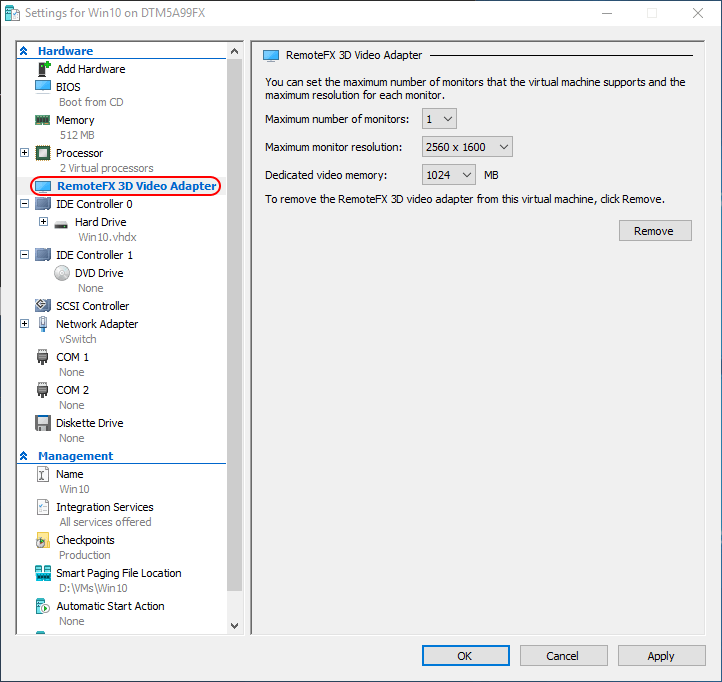
RemoteFX Adapter Settings
5. The adapter is not truly added until you click OK or Apply, but you can return to this dialog any time that the virtual machine is off to adjust the settings. You can also use the Remove button if you’d rather just use the 2D acceleration. There is a finite number of active virtual machines that your video card will support, so you may find that you need to remove it from some guests if you are running several simultaneously.
Adding and Configuring a RemoteFX Video Adapter to a VM in PowerShell
Adding a Microsoft RemoteFX adapter in PowerShell is trivial in Windows 10 client Hyper-V. Configuring it can be a bit tricky.
To add the RemoteFX adapter:
Add-VMRemoteFx3dVideoAdapter -VMName Win10
A -VM parameter is also available, and it will accept piped virtual machine objects or names for bulk operations.
To configure the adapter, use Set-VMRemoteFx3dVideoAdapter. You can use -VM or -VMName just as you did with Add-VMRemoteFx3dVideoAdapter. You can also pipe in the output from a Get-VMRemoteFx3dVideoAdapter run to select an adapter. The three parameters of interest are -MaximumResolution, -MonitorCount, and -VRamSizeBytes. As far as I can tell, there’s no way to know in advance what the valid options are (unless you look in Hyper-V Manager or something). So, you can just feed it some gibberish. The error messages will tell you what you can use:
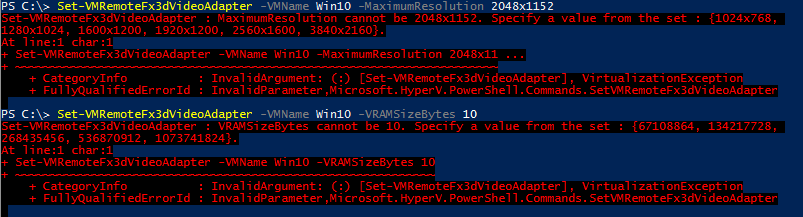
Set RemoteFX 3D Adapter Errors
With valid values (for my card):
Set-VMRemoteFx3dVideoAdapter -VMName Win10 -MaximumResolution 2560x1600 -VRAMSizeBytes 1073741824
Using the RemoteFX Video Adapter
As soon as you boot up the guest, the RemoteFX video adapter is ready to go. If it doesn’t boot or it won’t show a screen, then your guest operating system probably doesn’t support RemoteFX. Here’s a screen shot of the newly-installed Microsoft RemoteFX Graphics Device – WDDM from within a Windows 10 guest’s Device Manager:
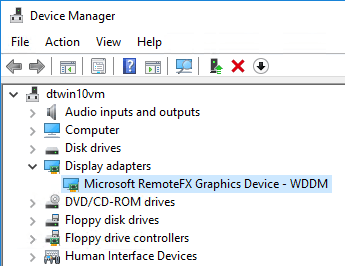
RemoteFX Adapter in Device Manager
I would not get excited that you can now start running a bunch of 3D games in Client Hyper-V. That’s not really what RemoteFX is for. A game might work, but it might not. More “run-of-the-mill” applications, like web browsers and operating system GUIs are incorporating 3D, and that’s where you’ll see the most differences with a RemoteFX adapter. As you can see in Device Manager, you’re not getting a direct projection of your video adapter, which means that you’re not going to be able to load the manufacturer’s specific hardware driver, which means that you cannot expose its full capabilities to the guest.
Hyper-V RemoteFX is now Deprecated
It is important to note, Hyper-V RemoteFX is now a deprecated technology. Microsoft started to deprecate the technology in July 2020, when the July 2020 security release effectively disabled the feature. The April 2021 security update removed the RemoteFX virtual hardware. Why has Microsoft removed the RemoteFX functionality?
Security vulnerabilities were discovered with the architecture, allowing an attacker to remotely execute code when Hyper-V RemoteFX vGPU on a host server fails to properly validate input from an authenticated user on a guest operating system. The path to exploit involves the attacker running a specially crafted application on a guest operating system that allows attacking third-party video drivers running on the Hyper-V host. It then leads to being able to execute arbitrary code. You can read more specific on the vulnerability here:
What technology is replacing the RemoteFX vGPU hardware? Starting with Windows Server 2016, you can now use Discrete Device Assignment, or DDA, to pass an entire PCIe video device through to a guest virtual machine running in a Hyper-V virtual machine. It is not limited to display adapters, but also includes passing high performance device access through to VMs such as NVMe storage or other high-performance devices. You can read the process to configure Discrete Device Assignment here:
Wrapping Up
There are many current use cases for users to have discrete hardware graphics and other high-performance devices passed through to virtual machines. Virtual Desktop Infrastructure (VDI) can provide a great platform to allow remote or hybrid workers to use discrete graphics resources, while still working in a virtual machine. Hyper-V RemoteFX Windows 10 was a technology early on that provided a great way to expose discrete hardware graphics devices in client Hyper-V and Hyper-V running in the data center.
However, with Hyper-V RemoteFX Windows 10 now deprecated along with RemoteFX in Windows Server versions due to security issues, newer technologies such as Discrete Device Assignment allow organizations and home users alike to still make use of passing through discrete hardware devices to virtual machines. With Hyper-V RemoteFX Windows 10 now part of the history books, the new modern technologies still allow taking advantage of all that client and server virtualization has to offer.
Frequently Asked Questions
What is RemoteFX?
Does Windows 10 support RemoteFX?
How do I enable RemoteFX in Windows 10?
How do I use RemoteFX Hyper-V?
What is replacing RemoteFX?
Is VirtualBox better than Hyper-V?
More in this category


About the Author

Eric Siron

