There are currently a lot of emerging technologies in the marketplace right now, and there are few that are more popular than the concept of nested virtualization. This capability has been a possibility in the vSphere ESXi stack for some time, but until recently, Microsoft had shown little interest in providing this same functionality. It could be, this was due to the fact that the only real use cases were lab environments and training. This has changed recently with the advent of cloud and container technologies as we continue to abstract more and more layers of our IT infrastructure.
Before we delve deeper into that topic, what is nested virtualization? Nested virtualization is simply the practice of running a hypervisor within a virtual machine as shown in the figure below. You essentially have two layers of virtualization happening and this can be useful for a number of reasons.
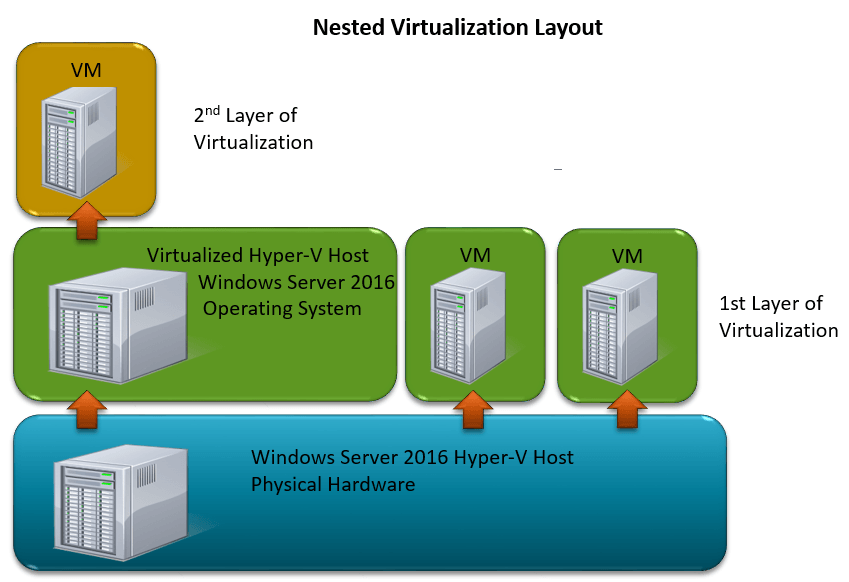 Figure 1-1: Logical Layout of Nested Virtualization
Test Environments: Hardware isn’t cheap, and many organizations struggle with a way for their IT staff to effectively train up on the newest virtualization technologies. Being able to nest Hyper-V now provides the ability for IT Pros to simulate entire virtualized environments, without the hefty price tag associated with dedicated equipment.
Containers: This is the real reason, why Microsoft took the time to create nested virtualization. If you haven’t heard of containers, I’m wondering what rock you’ve been living under for this past year. In the event you are still in the dark, think of a container as a type of mini virtual machine, simply with applications in mind. Instead of virtualizing the entire OS, a container focuses on providing an isolated environment for an application to reside in without the overhead of a full virtual machine. At any rate, Microsoft is providing us with two different types of containers.
Windows Server Containers
Windows Server containers aren’t really relevant to our conversation other than to see how they are different from Hyper-V containers, which DO apply to our discussion on nested virtualization. As you can see in figure 1-2 below containers run on top of the docker engine. This allows the Windows OS to host up applications in an isolated, almost VMish, type of manner. The big benefit here is the ability to host up an app without having to bring the operating system along with it.
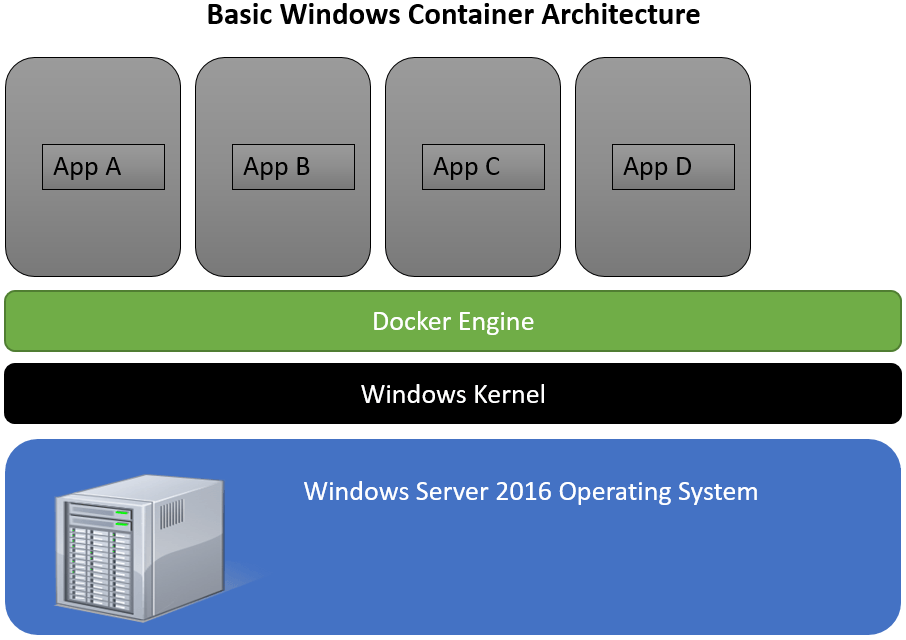
Figure 1-2: Basic Windows Container architecture
Windows containers, while amazing, do have one issue however, when it comes to security and system use. In order to remove the OS requirement, they all share the underlying Windows Kernel of the host operating system. Making them unusable for environments requiring higher levels of isolation. That is where Hyper-V Containers come in.
Hyper-V Containers
Hyper-V containers take pretty much the same approach, but add in a Hyper-V virtual machine element. As shown below in figure 1-3, we can see that things look very similar to figure 1-1 in that this technology is using the model of nested virtualization, with multiple layers of virtualization. The big difference between Windows Containers and Hyper-V containers is this added layer. The application is placed into a container within a virtual machine running on Hyper-V, OS and all. This provides that further level of isolation, and prevents shared use of the host kernel in those situations where the application can’t share the kernel, or you don’t want it too.
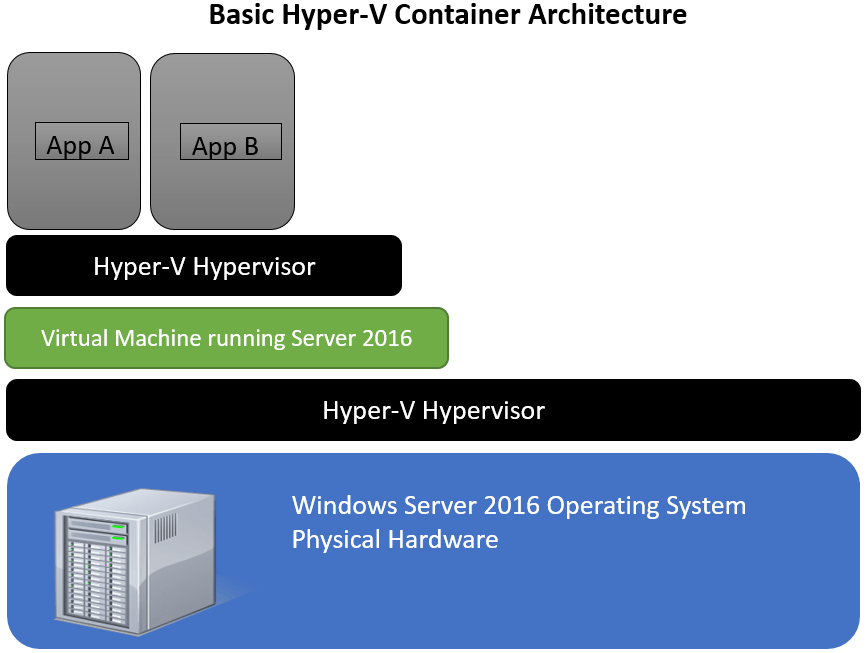
Figure 1-3: Basic Hyper-V Container Architecture
The next question you might ask is, “Why wouldn’t I run the Hyper-V Container directly from the host level? Why do I need to add in the extra virtual machine and run it from there?”
The answer is, you don’t. You could certainly run a Hyper-V container directly from the physical host, but Microsoft doesn’t want to lock you in at that layer. Think about Azure. Think about service providers and large hosters. Think about large enterprises. These entities are not going to want to give tenants access to the hypervisor running on the physical box in all cases. That could create problems depending on the hosting model.
Customers and organizations hosted within these datacenters are going to want access to this type of technology. Hyper-V containers and nested virtualization provide that ability, by allowing us to stand up Hyper-V containers on Hyper-V in a nested state.
What about App-V?
A lot of folks are going to look at this and say, “gee… that looks an awful lot like what App-V does”. Does this replace App-V. The answer is no. From my perspective, containers are intended to run in the datacenter, and primarily for stateless workloads at this point in time. They are designed to run on servers. App-V, virtualizes an application and packages it up for distribution to client end-points. The two essentially have different use cases, and I don’t see that changing in the near future, so there shouldn’t be any concerns for the App-V folks out there. Though, don’t let that stop you from learning about containers?
How to Enable and Use Nested Virtualization on Hyper-V in Windows Server 2016 TP4
With all of this in mind, you can see “Why” Microsoft finally decided to provide this functionality. Their primary concern was for containers. Now, how do we go about using it?
As of this writing, there are a couple of requirements needed to enable this functionality.
- Dynamic Memory MUST be disabled on the virtual machine containing the nested instance of Hyper-V
- VM must have more than 1 vCPU
- MAC address Spoofing must be enabled on the NIC attached to the virtual machine. This setting can be found in the advanced settings under the NIC in the virtual machine’s properties.
- Virtualization Extensions need to be exposed to the VM as seen below.
The current setting of the virtualization extensions can be seen by running:
Get-VMProcessor -VMName <Target VM’s name> | FL *
The setting you’re looking for in the output is: ExposeVirtualizationExtensions = True. By default this setting is disabled. To enable it simply run:
Set-VMProcessor -VMName <Target VM’s Name> -ExposeVirtualizationExtensions $true
That’s all there really is too it. Once these steps are followed for the target VM, you can simply install Server 2016 TP4 within the VM, install the Hyper-V Role, and away you go! Nest away!
All of these items are displayed in the video below:
https://youtu.be/o0U2DvOYFQA
What Doesn’t Work? (as of this writing)
Needless to say, THIS IS NOT FOR PRODUCTION USE! This functionality is still in early testing phases, so there are some things that don’t currently work.
- Running OS MUST be Server 2016 TP4 Build 10565 or newer
- Live Memory Resize will not work
- Checkpoints will not work
- Live Migration does not work
- Save/Restore will not work
- Does not work on AMD chips currently.
Wrap-Up
So today we’ve shown you how to enable and nest Hyper-V inside of a virtual machine using Windows Server 2016 Technical Preview 4. In Future posts we’ll talk more about containers and how they can be deployed and used alongside this technology, but for now, enjoy building your new nested Hyper-V labs!
Thanks for reading!
More in this category


About the Author
Andy Syrewicze

