Microsoft ships Windows Server Hyper-V 2012 in two versions; Windows Server 2012 with Hyper-V as a role and Hyper-V Server 2012 version. The Hyper-V Server 2012 is a free version and offers almost all the components and features that are available in Windows Server 2012 with Hyper-V as a role version. It contains only Hyper-V role installed and it has to be installed on local hard disk like any other Windows installation. What if you need to make Hyper-V Server 2012 available on a USB stick; booting Hyper-V Server 2012 from a USB Stick and make it available for your testing? This is where this article comes handy; explaining the process involved in creating a bootable USB Stick with Hyper-V Server 2012 installed onto it.
The complete process to create the bootable USB Stick is done via command-line tools (mkdir, diskpart, ImageX, BOOTSect, BCDBoot, and REG.EXE) as shown in an example screenshot below:
Throughout the process, you need to have the following items available:
Requirements
- 8 GB of space on flash drive.
- A computer supporting boot from a USB Stick
- Hyper-V Server prerequisites
- Install.WIM file from Hyper-V Server Source folder
- Windows 7 or newer Operating System
- Windows Automated Installation Kit (WAIK) for Windows 7 or newer
- Microsoft Hyper-V Server 2012 ISO from Microsoft web site
- Available drive letters on local computers; Z: and R:
As an overview to the process, you will be performing the following steps:
- Creating and mounting a VHD file as a Primary Partition on local computer
- Formatting as NTFS and assigning a disk label
- Applying Install.WIM to VHD file using ImageX tool
- Using DISKPART to prepare the USB flash drive
- Using BOOTSect and BCDBoot tool to add the boot configuration to USB flash drive.
- Removing paging file using the REG command
These are the steps you’ll need to take:
1. Creating, mounting, and formatting a VHD File
Create the following folders on your local computer:
- C:WIMFile – used to store the WIM file
- C:HyperVBoot – used to store VHD file
Open the Hyper-V Server 2012 ISO file, navigate to the Sources folder, and copy the Install.WIM file to C:WIMFile folder you created in the first step.
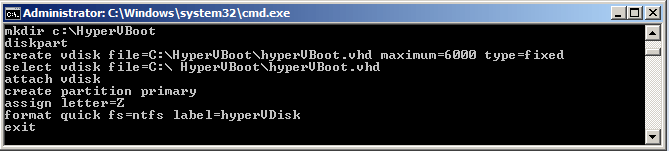
Next, open the command prompt under local administrator credentials and run the following command to create the VHD file which has a 6 GB capacity. The last three commands except “exit” will mount the VHD file as the drive letter Z:
mkdir c:HyperVBoot
diskpart
create vdisk file=C:HyperVBoothyperVBoot.vhd maximum=6000 type=fixed
select vdisk file=C:HyperVBoothyperVBoot.vhd
attach vdisk
create partition primary
assign letter=Z
format quick fs=ntfs label=hyperVDisk
exit
2. Applying Install.WIM image and detaching the VHD file
Once the VHD file is created in the previous step, your next step is to apply Install.WIM file. Please execute the following commands:
cd /d "C:program filesWindows AIKtoolsAMD64"
ImageX /apply C:WIMFileInstall.WIM 1 Z:
And using DISKPART tool you detach the virtual disk from your computer:
diskpart
select vdisk file=C:HyperVBoothyperVBoot.vhd
detach vdisk
exit
3. Preparing your USB Stick
The next step is to prepare the USB Stick you will be using to install the Hyper-V Windows Server 2012 version. As part of the USB Stick preparation process, you will be using DISKPART tool to format the USB drive and copying the VHD File you created in earlier steps to the USB drive. Execute the following commands to get the USB disk number
diskpart
list disk
Note: Note down the disk number for USB disk
And the following commands to create and format a new partition and assign the letter T: to the USB stick. Replace <USB Disk number> with the number identified in the previous step.
select disk (USB Disk number)
clean
create partition primary
select partition 1
active
format quick fs=ntfs
assign letter=T
exit
Copy the VHD file C:HyperVBoothyperVBoot.vhd to the USB drive letter assigned as T:
4. Using BOOTSECT tool to update the MBR code
BOOTSect tool allows you to update the MBR record on the disk (USB Stick in thiscase) so you can boot Hyper-V Windows Server 2012 from USB Stick.
Run the following BOOTSect command to update the MBR
cd /d "C:program filesWindows AIKtoolsPEToolsAMD64"
BOOTSect /nt60 T: /force /MBR
and the DISKPART command to attach the VHD file to the T drive.
diskpart
select vdisk file=T:HyperVBoot.vhd
attach vdisk
exit
5. Using BCDBOOT tool
Use the BCDBOOT tool to copy the necessary boot files so that you can boot your USB stick. Run the following command:
BCDBOOT Z:windows /s /ALL T:
6. Removing Paging file from USB flash drive
Since you are installing Hyper-V Windows Server 2012, you must remove the Pagefile requirement. Use the following command to load the registry from the VHD file and then remove the page file value and entry from the registry:
REG load HKLMHyperVRegistry Z:windowssystem32configsystem
REG add "HKLMHyperVRegistryControlSet001ControlSession ManagerMemory Management" /v PagingFiles /t REG_MULTI_SZ /d "" /f
REG delete "HKLMHyperVRegistryControlSet001ControlSession ManagerMemory Management" /v ExistingPageFiles /f
REG unload HKLMHyperVRegistry
Finally the following commands to detach the VHD file from the T drive:
Diskpart
select vdisk file=T:HyperVBoot.vhd
detach vdisk
exit
Remove the USB stick from this computer and attach it to a computer which supports all Hyper-V prerequisites to boot Hyper-V Windows Server 2012 from a USB Stick. Please make sure to change the boot order in computer BIOS in order to boot from the USB Stick.
Required software can be downloaded from below links:
Hyper-V 2012 Server Core Free edition:
http://aka.ms/dlhv2012
WAIK for Windows 7:
http://www.microsoft.com/en-in/download/details.aspx?id=5753


