Table of contents
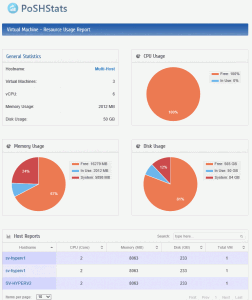
Yusuf Ozturk has designed an elaborate PowerShell script that allows you to visually meter the resource utilization of your Hyper-V 2012 virtual machines in a web browser. This tool works even if your hosts are running Hyper-V Server, as it relies on PoSHServer instead of IIS.
Metering vs. Monitoring
I’m not entirely certain if there’s a lot of industry standardization around these two terms, but this tool reads the metering counters. It tells you what resources your virtual machines are using. Monitoring is probably more appropriate to a real-time tool that checks things like availability, response, and uptime statistics.
Acquisition and Installation
First, obtain PoSHServer. Extract the .msi file to your Hyper-V host and run it. Accept the defaults.
Next, obtain PoSHStats itself. As with PoSHServer, extract its .msi file to your Hyper-V host and run it, accepting the defaults.
Once both of these packages have been installed, open a PowerShell prompt. In a GUI installation of Windows Server 2012, right-click on the PowerShell icon on the task bar or from the Start screen and click “Run as administrator”. In a core or Hyper-V Server 2012 installation, just type POWERSHELL at a command prompt and hit [Enter]. Once in PowerShell, type:
Start-PoSHStats -Hostname sv-hyperv1 -Port 8080
The documentation indicates using “localhost” for the host name. This will work, but you’ll only be able to view the website using a browser on the local system. That would be a bit tough if you’re using a GUI-less system. Whatever you enter for the name will be the name that the server responds to from remote requests. So, the above will enable the system to respond to http://sv-hyperv1:8080, but it will give a 400 error on http://sv-hyperv1.mydomain.local. If you like, you can enter this command again with alternate host names. The only negative to this that I can see is that for each entry you make, you get another Scheduled Task that runs all the time. Task Manager shows that these sit at 0% CPU, so it’s up to you if that’s a problem or not.
You can choose most anything you like for the port number instead of 8080. 8080 is the common port number for web sites that don’t run on the standard http port of 80. There are a few other parameters you can modify if you like, such as where to place the data files. After the port number, type a hyphen and then use [TAB] to cycle through the other options.
Upon running the command for the first time, you’ll get an informational screen. I advise that you read through it, but all you need to do here is tell it how to handle your virtual machines. You can either have it automatically gather statistics for all current virtual machines by pressing [1] or you can select the VMs you want later by pressing [2].
PoSHStats pulls its data from the same location as the built-in metering tool, so to enable a specific VM to watch and run the built-in cmdlet:
Get-VM -VMName svdc1 | Enable-VMResourceMetering
Of course, if you don’t enter a specific VM name, it will enable monitoring for all on the local host.
If the host is in a cluster, it will automatically look at the other members. If you selected option 2 above, to enable metering of a VM that is not on your current host, run the following cmdlet:
Get-VM -VMName svdc2 -ComputerName sv-hyperv2 | Enable-VMResourceMetering
If you’ve left the firewall active on your Hyper-V host, make a hole for request to PoSHServer to get through:
New-NetFirewallRule -Name "PoSHServer" -DisplayName "PoSHServer" -Direction Inbound -Protocol TCP -LocalPort 8080 -Action Allow -Enabled True
Of course, if you used a different port number, that will be the one you need to open.
Advanced Usage
You can run PoSHStats to monitor Hyper-V from another machine, but it must be in the same domain as the system to meter. Open the following file in Notepad (Notepad is included in Hyper-V Server 2012 and Windows Server 2012 Core; just type “notepad” and press [Enter]): C:\Windows\System32\WindowsPowerShell\v1.0\Modules\PoSHStats\config\hosts.ini. Add the host name(s) of your Hyper-V system(s), one per line. You’ll also need to do this if you’re operating in a cluster and it doesn’t pick up other members.
The documentation mentions that to gather stats from another system, you’ll have to change the account that the scheduled task runs under. I did not need to do this to manage the other host in my cluster, but that’s likely due to the fairly unique security configuration of cluster hosts. The Scheduled Task runs under the local system account (basically, the computer account), and that account usually doesn’t have permissions to do anything on any other system. If you’re running PoSHStats on a GUI installation, open up Task Scheduler and change the properties of the running task so that it is using a domain account with admin-level privileges on the target Hyper-V host(s). To perform this from PowerShell:
Get-ScheduledTask posh* | Set-ScheduledTask -User domain\appadmin -Password P@ssw0rd
Don’t use a regular logon account for these or you’ll have some odd issues. In fact, you might have some odd issues running under a domain account anyway. After a reboot, I had to stop and start the tasks in Task Scheduler before I could get the pages to load at all.
Results
Wait! Don’t get impatient! It took about an hour for my guests to start showing up. This is expected for VM metering.
I may have done something wrong while I was fiddling, but my primary host shows up twice in the report. I managed to break my installation in a few ways, mostly through repeated uninstallations and deletions of the containing folders. For instance, one of my hostnames no longer works (http://sv-hyperv1). I always get a blank screen. Other hostnames I use work fine (localhost and sv-hyperv1.siron.local). I don’t even know if the problem is in PoSHStats or PoSHServer. For the 99% of you who will install and walk away from it, you’re going to be just fine. If you’re a fiddler like me, your mileage may vary.
Another thing to note, if you connect using IE 10, it will prompt you to install Adobe Flash each time. It’s built in to IE 10 so you can’t actually update it. Just ignore the prompt or use a different browser.


