It’s great to see so many people trying out Hyper-V! I’ve long known that the virtual switch poses a conceptual hurdle. That’s why I wrote my earlier article to explain the virtual switch itself. I avoided talking about teaming in that post because mixing two difficult concepts usually ends badly. We had our longer series about Hyper-V and networking, which included a piece on teaming. However, that series requires a fair bit of reading, which no one wants to do when they’re anxious to get started on a new project. Unfortunately, not knowing several facts often results in a confused, frustrated administrator.
If you’re setting up a new Hyper-V virtual switch and you’re using a team of network adapters to host it and something doesn’t seem right, this article is for you.
Common “Problems” Reported for Hyper-V Virtual Switches and Network Teams
Here are a few different “problems” that people have found:
- The Hyper-V virtual switch’s adapter reports that it is only 1 gigabit (or 10 gigabit), even though it’s bound to a team of multiple gigabit (or 10 gigabit) adapters
- File copies over a Hyper-V virtual switch are only 1 gigabit, same configuration as the first bullet
- The dedicated IP address for the team is gone or not working as expected
If any of these things have happened to you, nothing is wrong. This behavior is expected, normal, and fully conforms to every applicable networking standard.
Vital Concepts for Hyper-V Virtual Switches and Network Teaming
The two articles linked from the first paragraph are important reading. You need to go through them, or an equivalent, at some point. If you already have a team/switch built and you just want some answers, this article will get you up-to-speed quickly so that you can make sense of what you’re seeing.
I want to begin by spelling out the most important points.
1. The Hyper-V Virtual Switch is a Switch
Many people start by telling me the way their system worked initially, then how its behavior changed after creating a virtual switch. They’ll say, “I only added a virtual switch!” [emphasis mine] That statement does a fair job indicating someone new to the world of virtualization. Just because you might not be able to touch a see a thing does not make its existence trivial. The Hyper-V virtual switch is a frame-slinging, VLAN tagging, QoSing, machine-connecting powerhouse — just like a real switch. The only difference: it’s virtual. You’d never say, “My network didn’t change at all except that I added a new Cisco Catalyst between the core switch and the new servers.” At least, I hope you wouldn’t.
2. The Hyper-V Virtual Switch Does Not Have an IP
You cannot assign an IP address to the Hyper-V virtual switch. It has no layer 3 presence of any kind. You might see some things that make you think otherwise, but I promise you that this is the absolute truth.
3. The Hyper-V Virtual Switch Is Not Represented by a Network Adapter
You can bind the Hyper-V virtual switch to a physical adapter, but there isn’t a any adapter that is the Hyper-V virtual switch. In many cases, a virtual adapter will be created that has the same name as the Hyper-V virtual switch, but it is not the switch.
4. Network Adapter Teaming Does not Aggregate Bandwidth
Lots of people struggle mightily with this concept. They make a team on four gigabit adapters, see that link speed report of 4 gigabits, and believe that they’ve just made a great big 4 gigabit pipe. No! They have made a link aggregation of four gigabit adapters that act as a logical unit. If you want more explanation, try this article.
When multiple physical paths are available, some technologies can make use of that to increase transmission speed. However, adapter teaming does not inherently grant that capability. Some, such as MPIO and SMB multichannel, work better when you leave adapters unteamed.
We do not create adapter teams for bandwidth aggregation. To blatantly steal Microsoft’s acronym, we use them for load-balancing and failover. If you’re not familiar with the acronym that I’m referencing, all of the related PowerShell cmdlets contain “LBFO” and you invoke the graphical applet with lbfoadmin.exe.
Network Team Load Balancing
Load balancing is the closest that a team of network adapters ever comes to bandwidth aggregation. When a network application starts communicating with a remote system, the logical link group will choose a single member to carry that traffic. The next time that any application starts communicating, the group may choose a different member. With a Microsoft team, the load balancing algorithm makes that determination. Surprisingly enough, we have an article that covers the algorithms and how to choose one.
I want you to take away one thing from this point: a single communication stream can use exactly one physical pathway. It’s already computationally expensive to break data apart for network transmission and reassemble it at the destination. If all traffic needed to be broken apart and tracked over an arbitrary number of interconnects, network performance would degrade, not improve.
Failover
With adapter teams, we can prevent a failed NIC from isolating a host. If we extend that with stacked physical switches or separate physical switches with switch-independent adapter teams, we can ensure that a Hyper-V host has no single point for network failures.
Even though physical switch and NIC failures are rare, you can still get quite a bit of mileage from this feature. Your networking teams can update switch firmware without scheduling complete downtime. Physical switches can be attached to separate power supplies, partially shielding your traffic from electrical outages.
Examining The Network Adapter Team and Virtual Switch Package
Let’s walk through a team/switch combination and look at all of the parts.
Create a Network Adapter Team
You need to start this whole thing by building a team. It is possible to create the virtual switch first, but that’s just makes all of this even more confusing. My intent with this article is to explain the concepts, so these are some brief instructions, not an exhaustive explanation.
In PowerShell, use New-NetLbfoTeam:
New-NetLbfoTeam -Name vSwitchTeam -TeamMembers 'PTL - vSwitch', 'PBL - vSwitch' -TeamingMode SwitchIndependent -LoadBalancingAlgorithm Dynamic
I used a similar line to the above to create my team, so I need to give you a couple of notes. First, I named my real team “vSwitch”. I changed it to “vSwitchTeam” in the above so that it would be a little less confusing. The name can be just about anything that you want. I called mine “vSwitch” because I understand that it’s still a team and I prefer short names because I already type a lot. The “TeamMembers” use names of network adapters that I had already renamed. Use Get-NetAdapter to see what yours are (and Rename-NetAdapter if you don’t like them). The “PTL” and “PBL” in my names refer to the location on the physical server. “P” is for “PCI slot” (as opposed to onboard). “BL” means “bottom left” when viewing the server’s rear panel; “TL” means “top left”.
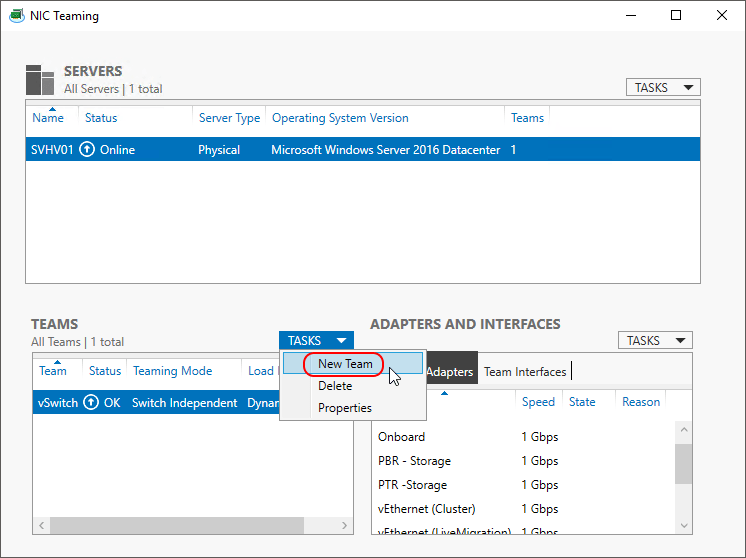
Graphics version of Windows Server provide a GUI for team creation. You can invoke it with LBFOadmin.exe or from Server Manager. On the Local Server tab, find the NIC Teaming line. It will have a blue link set to Disabled or Enabled, depending on the server’s current status. Click that link to open the NIC Teaming applet. You’ll find the New Team link under the Tasks drop-down in the Teams section:
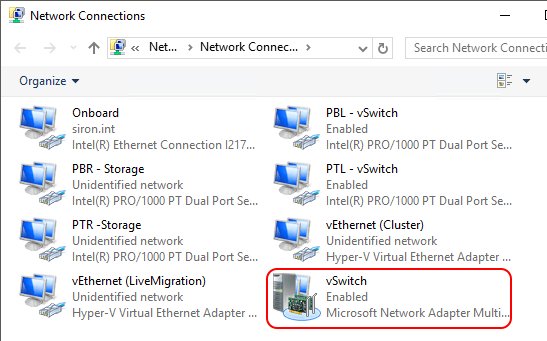
Once your team has been created, it will also have a “team NIC”. The team NIC is a logical adapter. It gives the operating system something to bind things to, like IP addresses or a Hyper-V virtual switch:
The distinction is a bit clearer in PowerShell:
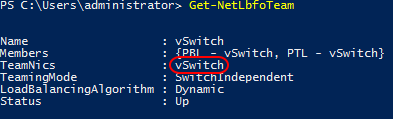
If we look at the properties for that team NIC, we’ll see that it reports a speed that is an aggregate of the speed of all constituent adapters:

If you only remember a single thing from this article, I want it to be this: these numbers are nothing more than a display. It’s not a promise, nothing has been done to prove it, and you may or may not ever be able to achieve it. For physical adapters, it’s the detected or overridden speed. For virtual adapters, the system performed an O(ax + an) until it ran out of adapters and showed you the result.
This is where a lot of people start doing pre-switch performance testing. That’s fine to do; I have no reason to stop you.
Create a Virtual Switch
I only use PowerShell to create virtual switches because the GUI annoys me. The GUI location is in Hyper-V Manager under the Virtual Switch Manager links, if that’s what you want to use. If you’ve never seen it before, it won’t take long to understand why it annoys me.
In PowerShell, use New-VMSwitch:
New-VMSwitch -Name vSwitch -NetAdapterName vSwitchTeam
If you’ve been looking at my pictures, there’s a mismatch between the above cmdlet and the “vSwitchTeam” item. That’s again because my personal team is named “vSwitch”. I’m using “vSwitchTeam” to draw a distinction between the virtual switch and the network team. The NetAdapterName parameter expects the name of the network adapter that you’re binding the virtual switch to. It’s name will be found in Get-NetAdapter.
For my long-time readers, you’ll also probably notice that I excluded the “AllowManagementOS” parameter. On my virtual switch, I would include that and set it to false so that I can take ownership of the virtual NIC creation process. However, I’m guessing that most of you found your way here because you used the “allow” option and currently have a virtual adapter named after your virtual switch. There’s nothing in the world wrong with that; it’s just not what I do.
In order for the rest of this article to make any sense, you must have at least one virtual NIC created for the management operating system.
Examining the Management Operating System’s Virtual Adapter
This is where all of your hard work has left you: You’ve got a brand new team and a brand new switch and now it appears that something isn’t right.
What I usually see is someone testing network speeds using file copy. Stop. Seriously, stop. If I’m interviewing you for an IT job and I ask you what you use to test network speed and you say “file copy”, there won’t be a call back. If you’re working for me and I catch you using file copy to test network speed, it would not be in your best interests to use me as a professional reference when you’re looking for your next job. Now, if file copies make you suspect a network speed problem, that’s fine, if and only if you verify it with an actual network speed testing tool.
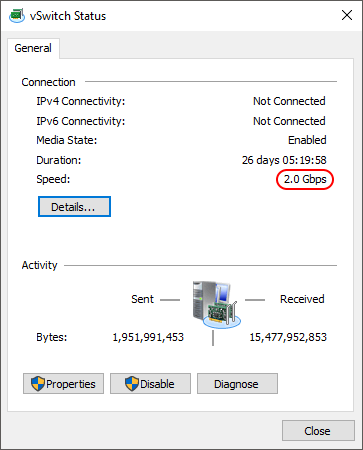
But, with that out of the way, let’s say that this is what you saw that bothered you:

The adapter that I’ve shown you here is named “vEthernet (Cluster)” because I don’t use the default vNIC that’s named after the switch. If your virtual switch is called “vSwitch” and you left defaults, then yours will be called “vEthernet (vSwitch)”. The name doesn’t matter, really, this is just explanatory. What we’re looking here is the speed. What people tend to say to me is:
If the virtual switch is connected to a team, why does its adapter only show 1 gigabit?
They ask me that because they don’t realize that this adapter does not connect to the team. It connects to the virtual switch. The virtual switch connects to the team. To make it even more interesting, I’ve seen different numbers for these virtual adapters. Sometimes it’s 10 Gbps (most common on 2012 R2 and earlier). I’ve even had mine report the team’s aggregate speed on occasion. First, remember that this number does not mean anything. Depending on your load balancing algorithm, 1 Gbps might be as fast as it will ever go, or it might be able to transmit across all team members. This readout cannot tell you that.
This is what adding a virtual switch does to your teamed system:
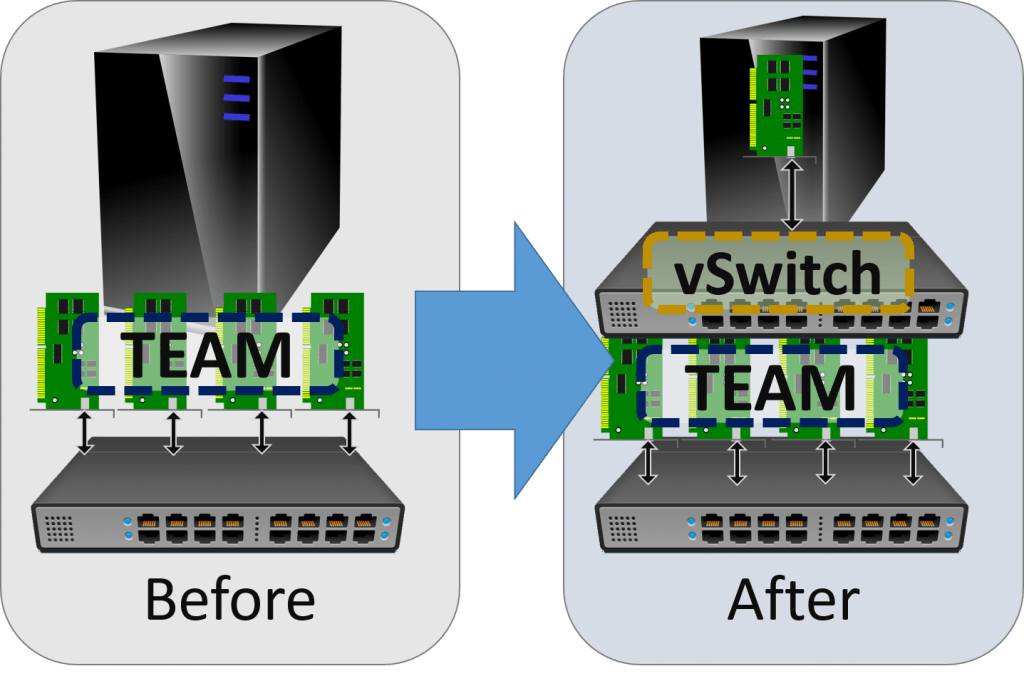
When you have a team without a virtual switch, then the “connection” between your physical system and the physical network is the team. It’s the first pathway that any outbound traffic will take. The host’s IP address is assigned to the logical NIC that represents the team. That’s the “before”.
When you add a Hyper-V virtual switch, you’re adding a switch. Sure, you can’t see or touch it, but it’s there. If you opted to “share” the physical network team with the virtual switch, then it created a virtual network adapter named after the virtual switch. The IP address of the host was transferred to that virtual adapter. That adapter has only a single “connection” to your switch. That’s the “after”.
The End Effect
Hopefully, the picture helps explain why you only see 1 Gbps (or 10 Gbps, depending on your hardware) for the management operating system’s vNICs. Hopefully, it also helps explain why you “lost” performance (for you file copiers). If you chose your load balancing algorithm wisely and set up network tests appropriately, you’ll see balancing from within the management operating system.
On to the big question: have you lost performance? The answer: NO!
- The purpose of employing a hypervisor is hosting virtual machines. You need to balance traffic across multiple guests. The transfer speed of the management operating system is not your top concern.
- By design, some of the accelerations and other network enhancements don’t work as well in the management operating system. Things are better in 2016, but that doesn’t matter. You should build your management operating system to play second fiddle to the guest operating systems because it is the management operating system for a hypervisor.
- Because of the virtual switch’s operation, the switch can slow transfer speeds down. You will only see it with 10 Gbps or greater adapters. VMQ is designed to alleviate the problem but might not eliminate it. It’s not related to teaming or aggregation, though.
To really see the benefits of network adapter teaming with Hyper-V, build a few guests and run transfer speed tests from all of them simultaneously. You’ll find that load balancing works just fine.
More in this category


About the Author

Eric Siron

