Table of contents
Hyper-V Replica is a new feature introduced in Windows Server 2012. It is a disaster recovery solution designed for small and medium sized businesses. Using Hyper-V Replica, the virtualized workloads can be replicated from the Production to disaster recovery site. In case of any disaster, the virtualized workloads can be brought online at Replica Server which is running in a disaster recovery site. In Windows Server 2012 R2, Microsoft enhanced Hyper-V Replica feature to replicate virtualized workloads to a second disaster recovery site but I’m not going to talk about this here.
Replication Tracker (RT), a component of a Replication Engine, tracks changes to the virtual machine’s VHD files and replicate the changed contents to the Replica Virtual Machine running on the Replica Server. Not all the data on a virtual machine you would want to replicate but you would always want to see important data being replicated.
For example, you would always like to replicate the contents of a VHD file where the database files reside. Similarly, you must replicate VHD file where Operating System files reside and any changed content, as part of the virtual machine patching, must also be replicated. There are a few files which you never want to replicate. For example, replicating a paging file to the Replica Virtual Machine makes no sense. The paging file is huge in size and will eat up more bandwidth over a slow WAN if selected for replication. This is also a burden for Replication Tracker (RT) to replicate the paging file contents every 5 minutes.
I wrote an article if you want to understand how Hyper-V Replica components work together to implement the replication technology in Hyper-V.
Note: By default, changed contents in Hyper-V Replica are replicated every 5 minutes and this interval is not configurable.
As part of the best practice items, you must exclude Operating System paging file from Hyper-V Replication. To do so, you must relocate paging file on a separate VHD file which is explained in below steps:
1. Shut down the virtual machine for which you want to enable the replication.
2. Right Click on the virtual machine and open Settings Page.
3. Create a new VHD file and attach it to an IDE controller.
Note: Please make sure to attach new VHD to an IDE Controller. Relocating the paging file to a VHD connected SCSI controller is not supported.
4. Restart the virtual machine, let the Operating System initialize the new VHD, format it and assign a drive letter.
5. Go to System’s property and relocate the paging file to new VHD drive.
6. By doing Right Click on the virtual machine, enable Hyper-V replication for the virtual machine.
7. Select all the VHD files including the VHD file where the paging file resides.
8. Finish and let Hyper-V do the initial replication for the virtual machine.
Note: During the initial replication, the Hyper-V will replicate the contents of VHD files (including the paging file VHD) to the Replica Virtual Machine.
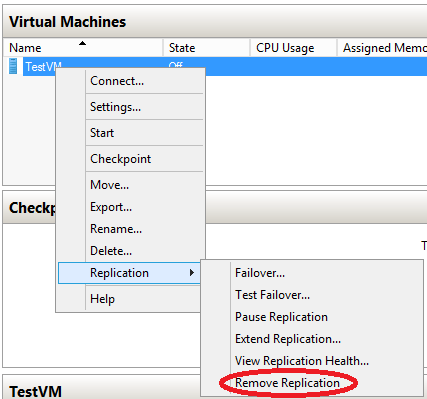
9. Once the initial replication is over, break the replication for virtual machine by selecting “Remove Replication” from the Right Click context menu of the virtual machine as shown in the below screenshot:
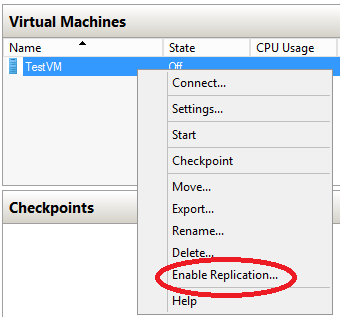
10. Once replication is removed for the virtual machine, Right Click on Virtual Machine to re-enable the replication as shown in the below screenshot:
11. At the “VHD File Selection” configuration page, “do not” select the VHD file where the paging file resides.
12. Click on “Finish” button in the wizard for Hyper-V to finish enabling the replication for this virtual machine.
From this point onward, since paging file VHD is excluded from the replication, Replication Tracker (RT) is not going to track changes to the paging VHD file.


