Table of contents
The other day I ran into one of the most common issues IT pros have to face, file corruption. Out of the blue, one of our clients called in reporting issues printing from their Windows Server 2008 terminal server. This was a VM, which was being hosted on a Server 2008 R2 Hyper-V Cluster. Users were not receiving their redirected printers at logon. It turned out multiple remote desktop services were repeatedly crashing. A read only Check Disk on the system volume reported evidence of corrupt system files. In order to repair the corrupt files, a Check Disk repair had to be run on the system volume which required the server to be offline. This process ended up taking over 6 hours to fully complete the repair resulting in unwanted downtime and lost productivity for the client.
Fortunately, Microsoft has made some improvements to the Check Disk utility in Windows Server 2012 reducing the downtime for offline volume repairs to seconds instead of hours. The Check Disk repair process can now also be ran through Windows PowerShell using the Repair-Volume Cmdlet.
Using the Repair-Volume Cmdlet
Windows PowerShell 4.0 introduced the Repair-Volume Cmdlet. This cmdlet is built upon the Check Disk repair feature and allows repairs to be done on volumes through PowerShell.
In order to scan the volume for corruption without attempting to repair it, open up PowerShell on the VM you’d like to scan and type the following commands. In this example we will use the C volume to scan:
Repair-Volume –driveletter c –scan
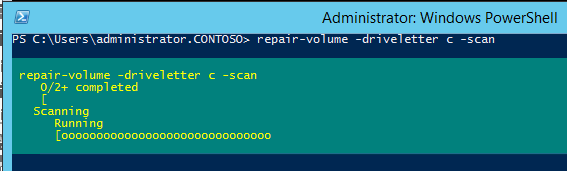
Once the scan has completed, PowerShell will report whether or not errors were found on the volume. If there were errors found on the volume, an offline scan and fix will need to be ran in order to fix the errors. This will take the volume offline, scan for errors, and fix any errors that it finds. This will also make the volume inaccessible during the scan, so this needs to be taken into account when planning an offline scan and fix. Also, performing a scan with the –scan parameter is not needed before running an offline scan and fix. You would use the –scan parameter on a volume that you’d want to check for corruption when you can’t take it offline at the moment. In order to perform an offline scan and fix, open up PowerShell and type the following commands:
Repair-Volume –driveletter E -offlinescanandfix

Once the scan and repair is complete, the volume will automatically come back online and will once again be accessible.
Running an Offline Scan and Fix on the System Volume of a Running VM
If you try to run an offline scan and fix on the system volume of a running Windows OS, you will be presented with the following message:

This is because the system volume is being used to run the Windows OS and cannot be taken offline unless the OS is shut down and that volume is no longer in use. This message can be deceiving because unlike the Check Disk repair utility which gives the option to run the offline repair at the next OS boot; the repair-volume cmdlet does not give the user a choice and will automatically flag the OS to run the Scan at next boot.
Using the Spotfix Parameter
Windows Server 2012 introduced an awesome feature called Check Disk spot fix. This feature allows you to do an online scan on a volume and logs any issues to a file called $corrupt. You can then issue a spot fix repair that will reference that file and repair the logged issues without needing to scan the entire volume again. This considerably speeds up the repair process taking only seconds to take a volume offline and repair, preventing the need to hassle with long outages.
To run a spot fix repair on a volume, first run an online scan on the volume to search for any errors with the following command, in this example we will use the system volume:
Repair-volume –driveletter c –scan
After the scan is run, any issues are automatically logged in the background. You can now initiate a scan using the –Spotfix parameter:
Repair-volume –driveletter c –spotfix

Since this is a system volume, just like the example above, the “failed” message will show. However, once a reboot of the OS is done, the spot fix repair will automatically initiate and repair any issues that were logged from the online scan.
Disk Repair on Multiple VMs
The repair-volume cmdlet also allows for multiple VM’s to be scanned for file system issues with just a single line. In the example below I will perform an online scan of the System volume of 3 servers using the –cimsession parameter:
Repair-Volume –driverletter c -scan –cimsession dc01,fs02,fw
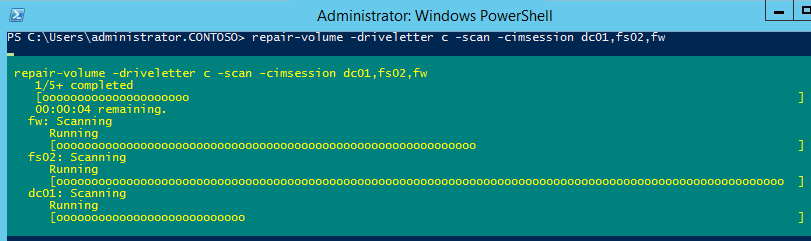
The online scan will run on each server and the progress of each scan will be displayed.

At the end of the scans the results of each server will be displayed. You can also scan multiple drives of multiple servers by listing all the possible drives you would like to scan.
Repair-Volume –driverletter C,D,E -scan –cimsession dc01,fs02,fw
There are many scenarios where being able to scan multiple servers at once can be beneficial. One example would be if a SAN went down hard because of a power or hardware issue. Once it was back up and fully functional, a good procedure would be to run a repair-volume scan on all the VMs residing on that storage target to check for any instances of file corruption. The repair-volume cmdlet not only allows us to be efficient, but also proactive.
More in this category


About the Author

Luke Orellana

