Configuring auto start on VMs is very important, especially for smaller companies that don’t have the budget for a power-outage-proof solution. I’ve seen it a few times when a power outage occurred over the weekend and the IT admin was scrambling to get all the VMs powered back on. Configuring auto start on each VM can easily be overlooked, but with a little PowerShell know how, managing and configuring this setting is a breeze.
How to Find Out which VMs are not Configured for Auto Start
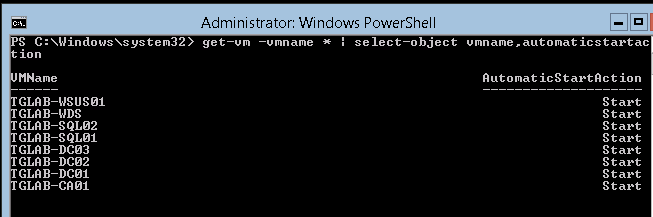
PowerShell can allow you to see how auto start is configured for each VM within seconds. Instead of right-clicking on each and every VM to see their settings, just open up PowerShell on the Hyper-V host and use the Get-VM cmdlet piped to Select-Object:
Get-VM –VMname * | Select-Object VMname,AutomaticStartAction

This will display an easy-to-view list of all VMs on the host and show what their automatic start action is set for. In our example we see all the VMs are configured with the automatic start action of “nothing”. Meaning, they will stay powered off once the Hyper-V host is powered back on. But, thanks to the auto start feature, we can easily choose and configure which VMs we want to start up automatically.
How to Configure Automatic Start
Now that we know how each VM is configured, we can use PowerShell to modify the setting [as necessary]. The syntax is pretty simple. We use the Get-VM cmdlet and pipe it to Set-VM and use the –AutomaticStartAction parameter. With this parameter, there are three possible values:
- Nothing – This one is pretty obvious. When the host is powered on, the VM will do nothing.
- StartIfRunning – This setting will start the VM only if it was running when the host was stopped.
- Start – This will cause the VM to always start up automatically no matter what state the VM was in previously.
In this example we will configure all VMs to always start up automatically so we will use the “Start” value:
Get-VM –VMname * | Set-VM –AutomaticStartAction Start

Now we can run the previous command to verify the configuration has changed on all VMs.
How to Configure the Automatic Start Delay
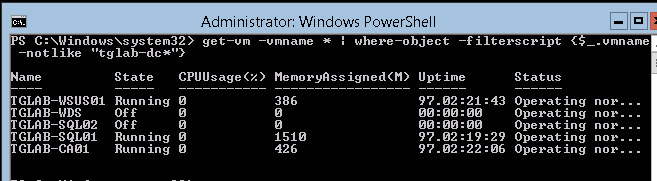
In a windows environment, it is a best practice to have domain controllers start up first before the other VMs. This allows for fewer hiccups with VMs running AD-sensitive applications, such as Exchange. In this example, we will configure our VMs that are not domain controllers to start up after 120 seconds. The domain controllers are conveniently named with a format that allows us to distinguish them (TGLAB-DC01,TGLAB,DC02, and TGLAB-DC03). So, in order to tell PowerShell to only select the non domain controller servers, we will simply use the Where-Object cmdlet along with the –FilterScript parameter to filter our list by the VMNAME property. This allows us to narrow the list to VMs that don’t follow our domain controller naming scheme:
Get-VM –VMname * | Where-Object –FilterScript {$.VMname –notlike “tglab-dc*”}
The result should be a list of all non-domain controller VMs on our host.
Now comes the easy part. We just pipe all this information we obtained to Set-VM and use the –AutomaticStartDelay parameter followed by how many seconds we want the VMs to wait before powering on. In this example, we will set the delay to 120 seconds:
Get-VM –VMname * | Where-object –FilterScript {$_.vmname –notlike “tglab-dc*”} | Set-VM –AutomaticStartDelay 120

Now run the following command to view both the automatic start action and start delay of each VM:
Get-VM –VMname * | Select-Object VMname,AutomaticStartAction,AutomaticStartDelay

We now have our DCs powering on instantly with all other VMs waiting 120 seconds to power on.
How to Configure Auto Start with Multiple Hyper-V Hosts
When working with multiple Hyper-V hosts, you would just incorporate the –ComputerName parameter when using the Get-VM cmdlet. For example, if I had two hosts (TGLAB-HV01 and TGLAB-HV02) and I wanted to list the automatic start information for both hosts, I would use the following syntax:
Get-VM –computername tglab-hv01,tglab-hv02 –VMname * | Select-Object VMname,AutomaticStartAction,AutomaticStartDelay

If you have a long list of Hyper-V hosts, you can use splatting to make it easier to specify all hosts. Simply create a hash table with the –ComputerName parameter as the key and the Hyper-V hosts you’d like to check as the values:
$hosts = @{ComputerName = "tglab-hv01","tglab-hv02"}
Next, when using Get-VM, instead of using the –ComputerName parameter, use the “@” symbol followed by the variable name used for the hash table (@hosts). This will pass the -ComputerName parameter along to the Get-VM command and include all Hyper-V hosts listed:
Get-VM @hosts –VMname * | Set-VM –AutomaticStartAction start

Get-VM @hosts –vmname * | Select-Object VMname,AutomaticStartAction,AutomaticStartDelay
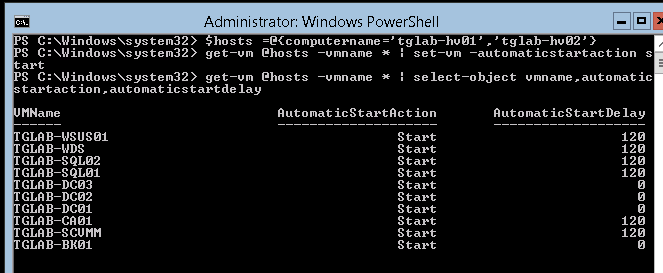
In just three simple lines we can modify the auto start action for all VMs on all hosts.
More in this category


About the Author

Luke Orellana

