
It is possible to connect the host’s physical optical drive directly to a virtual machine for the purpose of loading operating systems and software, but, unless the host is right next to you, it’s not very practical. The obvious solution is to use images of the necessary discs. Hyper-V makes some of that easy, but using it across a network connection can be somewhat more difficult. This post will examine your options.
How to Create ISO Images
There are multiple formats used to represent a CD or DVD as a file. For Windows, ISO is the standard. Hyper-V can natively parse this format and present it to virtual machines the same way that it presents VHD files to them as hard disks. That means that your first task is getting your software into that format, if the vendor doesn’t provide it for you. There are many software packages available to facilitate this task. I’ve been using ImgBurn for several years. It’s still available and functional, although it appears to have gone stale and has been tough to get through all of the advertisements. Wikipedia contains a list of applications. You should be able to find something that’s up to the task.
Simple ISO Usage in Hyper-V
The easiest way to use ISO images is directly from the Hyper-V host. Just place them in a folder on storage that’s local to the host. I typically use something very obvious on the root, like C:ISOs. Default permissions will be adequate. All of the methods that you use to connect an ISO in Hyper-V will run as the Local System account, which has administrator level access.
Even if you won’t ultimately be using ISOs locally, the overall procedure is the same no matter where they are. The following sections will cover the various ways that you attach an ISO.
Connecting ISOs Using Hyper-V Manager During VM Creation
The most common way to connect an ISO image to a virtual machine is during virtual machine creation. On the Installation Options screen, you’re asked what source you want to use to install the virtual machine’s operating system from. Select the Install an operating system from a bootable CD/DVD-ROM and then choose the sub-selection Image file (.iso). Finally, use the Browse button to locate the image file that you wish to use:
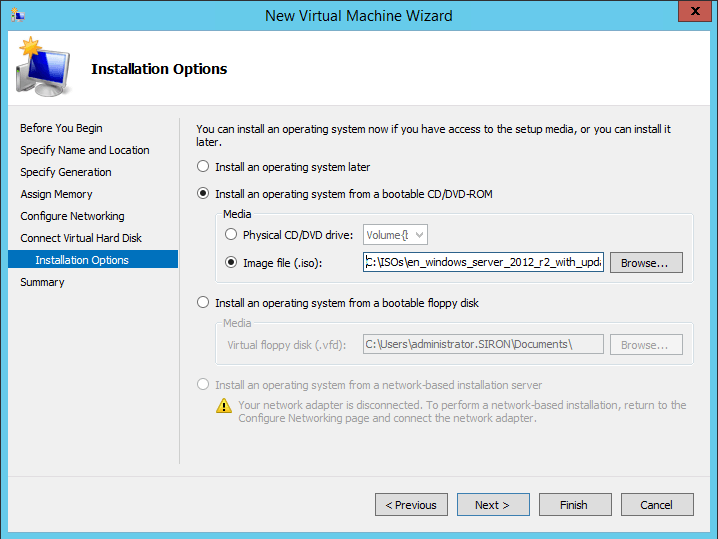
ISO Attachment During VM Creation
Connecting ISOs Using Hyper-V Manager After Deployment
Once a virtual machine has been deployed, you can change the contents of the virtual CD/DVD drive any time the VM is off or on (as opposed to saved or paused). These instructions are, as the title implies, for Hyper-V Manager. For clustered machines, you have to use Failover Cluster Manager. The only difference is that you start from the Roles tree node in that snap-in. For Hyper-V Manager, select the host that is running the virtual machine to be modified.
- In either tool, right-click the virtual machine and click Settings.
- In the left pane of the Settings dialog, select the DVD drive.
- In the center pane, choose the Image file selection item.
- Use the Browse button to locate the desired ISO.
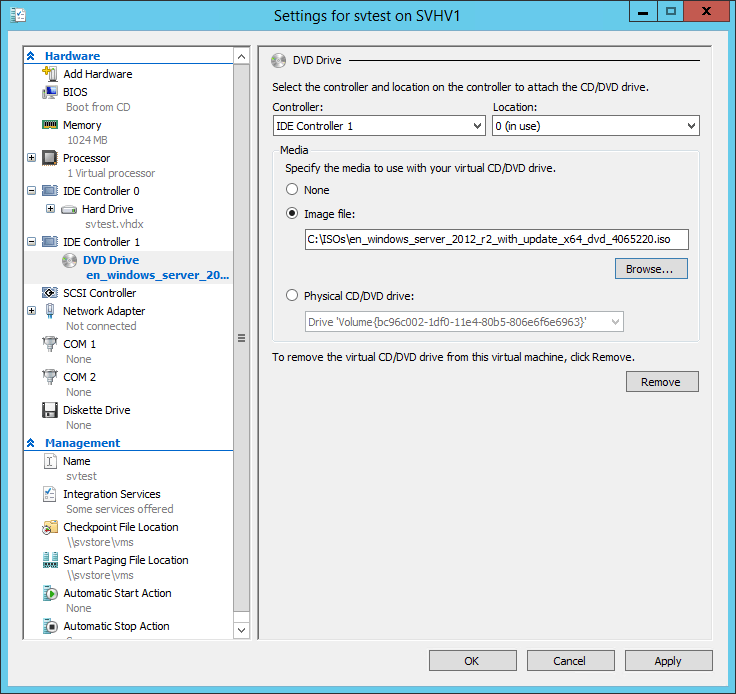
ISO Selection in VM Settings
Connecting ISOs Using PowerShell
Connecting an ISO using PowerShell is an activity that is somewhat less than straightforward. It can be done with a single cmdlet, Set-VMDvdDrive. Selecting the ISO to attach is easy; correctly placing it into the virtual drive can be a challenge for newcomers. Explaining the task so that it is fully understood would require more than a simple paragraph and would be a great way to explain one of the quirks of PowerShell, so watch this blog for an article in the Hyper-V and PowerShell series that will deal with the topic.
Connecting to ISOs on Remote Storage
Using ISOs on local storage is simple. For an environment with two or more hosts, it is impractical. Most of the ISOs eventually find themselves duplicated to the local drive of every Hyper-V host. Frustration can arise when an expected ISO isn’t present and must be tracked down. The best way to solve this issue is by using a common file share. As those who have attempted this quickly discover, it doesn’t operate as commonly expected. The first try almost always ends in an “Access Denied” error followed by exclamations of, “But I’m an administrator!” The explanation is: it isn’t you. Literally. When you instruct Hyper-V to attach an ISO, the instruction is carried out by the Virtual Machine Management Service (VMMS). This service does not use the credentials of the user that attempted the operation. It runs under the Local System account as mentioned earlier in this article. That means that it is the computer account of the Hyper-V host that owns the virtual machine, not your user account, that must be able to access the target location. Hyper-V will only use the SMB protocol (any version), so the destination must be reachable via the standard \serversharesubfolderfilename.iso UNC convention.

ISO on Remote Storage
To make this work, you’ll need to set up security on the system that hosts the share.
Configuring Share Security for ISO Files
The Hyper-V host and the system running the SMB share must be members of the same domain or domains that trust each other. Not using a domain? You’re out of luck. You’ll have to copy each ISO to a location local to each Hyper-V host. The SMB protocol does not have any way to authenticate computers without using a domain controller. But, as I always say, anyone that actively chooses the insecure micromanagement hell of a workgroup environment has no grounds for complaint when they find themselves in an insecure micromanagement hell. Playing tricks with the “Everyone” group won’t help; even members of “Everyone” must be authenticated. There is a registry setting that allows anonymous logins to be part of “Everyone”, but you cannot get a Hyper-V host to attempt to authenticate with an SMB target anonymously.
Start with share and NTFS security. If your ISOs are of the publicly-available type, you can use a simple security model with the Authenticated Users group:
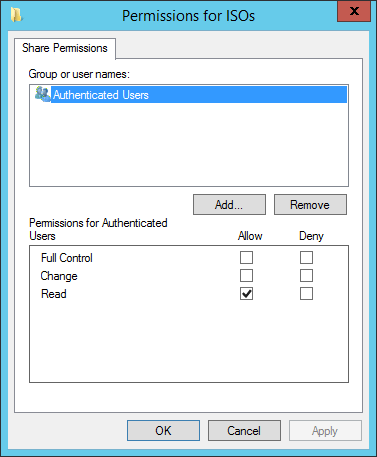
Share Restricted to Authenticated Users
Anyone who is a member of the domain or using an account that’s local to the file-serving host will be able to read the contents of the shared folder. This is a sufficient technique for things such as Windows install discs, since they’re freely downloadable and, depending on the media, either won’t work without a key or will only run in evaluation mode. Just remember not to leave the keys in the same folder. It’s not shown here, but don’t forget that the NTFS permissions must grant at least Read permissions to Authenticated Users as well or the above setting is useless.
If you want to be more restrictive, grant access only to the Hyper-V hosts. This is a tiny bit trickier, as the permissions dialog does not scope to computers by default. To set security to allow computer accounts:
- Click the Add button (see the previous screenshot; that’s for a share, although the dialog is nearly identical for NTFS).
- In the security dialog, click Object Types.
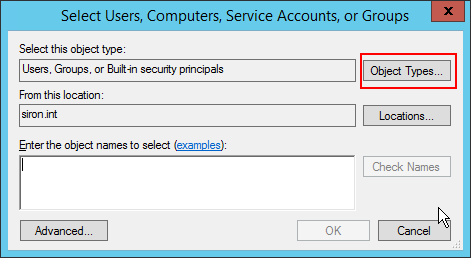
Change Object Types
- Check Computers to allow that type. Optionally, add or remove other types. Whatever you select here only sets the scope for objects that you can choose from at this moment. It will not impact any pre-existing or future permissions. Click OK when finished.
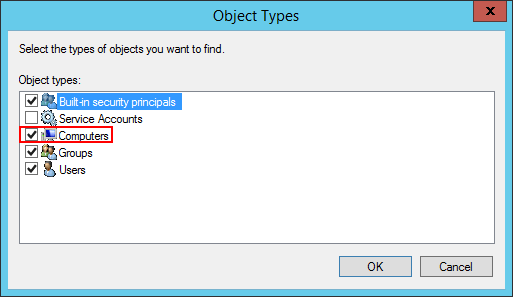
Computer Object Type Selection
- Back in the security dialog, use the Browse button or enter the name(s) of the system(s) to add. Computer accounts must have a dollar sign ($) appended to their names. You can add other account types as well. Each unique item must be separated by a semicolon (;). Click OK when complete.
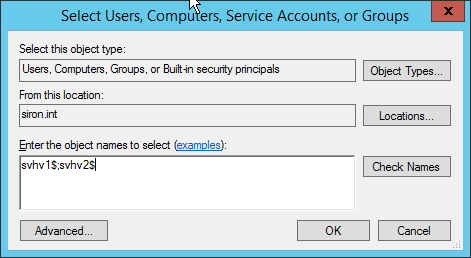
Computer Selections
- You’ll be back in the primary security settings dialog. Each account will, by default, be given Read permissions for a share and Read and Execute in NTFS. These are perfect for sharing an ISO with a Hyper-V host. Make certain to trim down other security as necessary. For instance, the dialog as I previously had it configured granted Read to Authenticated Users. If that’s left intact, then adding the individual host accounts has no purpose. Remove it. Don’t forget to adjust the permissions for both the share and NTFS. Also remember that whereas each list on its own follows the “least restrictive” rule, when they are combined, the “most restrictive” setting between the two applies. If this doesn’t make sense, do some tinkering or reading on the subject.
Notes:
- Just adding the computer accounts is technically sufficient, but the browse activity is carried out as your user account, so you must add users and/or groups accordingly.
- If taking the more restrictive approach, you may need to log off and back on to the Hyper-V host before your account will be able to browse the share.
Allowing the Second Hop
If you followed all the above settings, then you’ll have no problems connecting a virtual machine to an ISO — provided that you’re logged on directly to the Hyper-V host that owns the virtual machine in question. If you’re running Hyper-V Manager or PowerShell remotely, you might still get an access denied error such as the following:
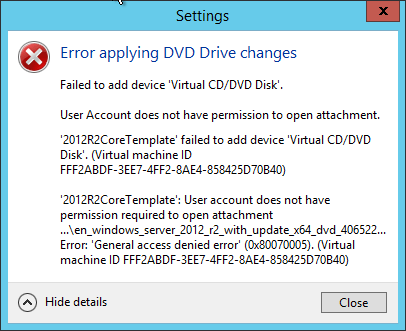
Second Hop Error
To set this up, you must configure delegation. Specifically, we’re going to set this up as constrained delegation. This fancy term means that we’re going to set up one computer to be allowed to pass credentials to another computer for some (but not all) tasks.
- Open Active Directory Users and Computers as a domain administrator.
- Locate the computer account of a Hyper-V host and open its Properties dialog. Switch to the Delegation tab.
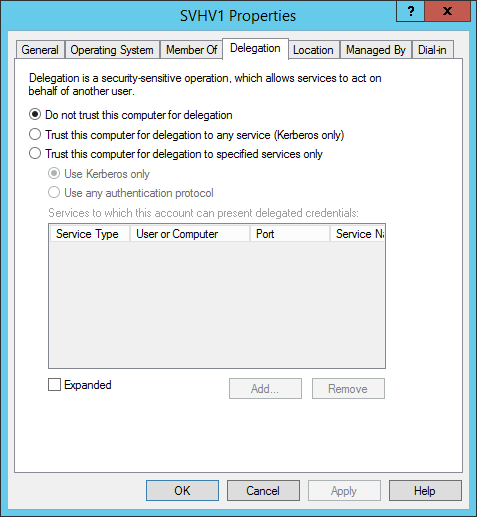
AD Delegation
- Select Trust this computer for delegation to specified services only. This will enable the lower half of the dialog. Leave Use Kerberos only selected.
- Click Add to open the Add Services dialog.
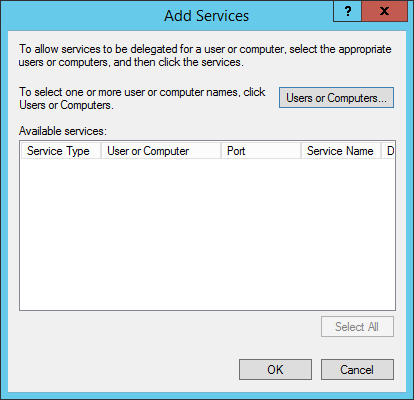
Add Services
- Click Users or Computers. This will bring up the normal security dialog that will allow you to type or browse to accounts in Active Directory. Locate the computer account(s) that contain ISO files. Click OK.
- You will be returned to the Add Services dialog from step 4, but it will now be populated with all of the services that can be delegated to the selected computer(s). Scroll down to cifs. Highlight each entry (one per computer account), and click OK.
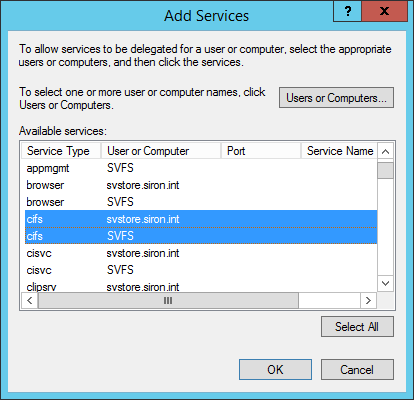
Delegation Services
- Click OK all the way out.
- Repeat for all other Hyper-V hosts that need to access ISOs on the destination.
Delegation can be a finicky thing. It almost always works perfectly, but occasionally it won’t work at all. After any changes to any of the involved computer objects, it may behave erratically or not at all. Over time, I’ve found that the best approach to delegation issues is to remove all delegation from a computer object (set it back to Do not trust this computer for delegation), OK to save the change, and then configure delegation again from scratch.
Alternative Option: Cluster Shared Volumes
When Cluster Shared Volumes (CSVs) were initially introduced with 2008 R2, they weren’t supported for anything other than Hyper-V virtual machines. Even plain file sharing was off the list. If you ever tried to directly open a file on a CSV from a non-owner node in 2008 R2, you probably know why. Microsoft has since opened up the CSV to be used with a much wider range of roles. In this context, that part is just trivia. What really matters is that the files on a CSV can be accessed quickly from any node without causing any undue havoc on anything else (within reason, of course). For something like ISO storage, they’d work just fine.
If you choose to take this route, I want to stress that you should only use these ISOs with virtual machines that are guests of nodes of the same cluster. Or, more directly, don’t share the contents of a CSV with non-cluster members. In order to share a CSV properly, you’d need to set up the scale-out file server role, and that’s really not something you want running alongside your clustered Hyper-V role if you can avoid it. Long-term, the CSV option isn’t as scalable as using a properly configured file share. It also violates a few administrative best practices, such as separation of roles. However, it neatly avoids all the issues with security and delegation, so it is a viable solution, especially in small environments.
More in this category


About the Author

Eric Siron

