Note: This article was originally published on May 2017. It has been fully updated to be current as of August 2019.
Microsoft continues turning greater attention to Linux. We can now run PowerShell on Linux, we can write .Net code for Linux, we can run MS SQL on Linux, Linux containers will run natively in Windows containers… the list just keeps growing. Linux-on-Hyper-V has featured prominently on that list for a while now, and the improvements continue to roll in.
Microsoft provides direct support for Hyper-V running several Linux distributions as well as FreeBSD. If you have an organizational need for a particular distribution, then someone already made your choice for you. If you don’t have such a mandate, you might need to make that decision yourself. I’m not a strong advocate for any particular distribution. I’ve written in the past about using Ubuntu Server as a guest. However, there are many other popular distributions available and I like to branch my knowledge.
Why Choose CentOS?
I’ve been using Red Hat’s products off and on for many years and have some degree of familiarity with them. At one time, there was simply “Red Hat Linux”. As a commercial venture attempting to remain profitable, Red Hat decided to create “Red Hat Enterprise Linux” (RHEL) which you must pay to use. With Red Hat being sensitive to the concept of free (as in what you normally think of when you hear “free”) being permanently attached to Linux in the collective conscience, they also make most of RHEL available to the CentOS Project.
One of the reasons that I chose Ubuntu was its ownership by a commercial entity. That guarantees that if you’re ever really stuck on something, there will be at least one professional organization that you can pay to assist you. CentOS doesn’t have that kind of direct backing. However, I also know from experience that relatively few administrators ever call for operating system support. The ones that will make such a call tend to work for bigger organizations that pay for RHEL or the like. The rest will call some sort of service provider, like a local IT outsourcer. With that particular need mitigated, CentOS has these strengths:
- CentOS is based on RHEL. This is not a distribution that someone assembles in their garage (not that I have any personal opposition to such an endeavor, but almost every organization places a premium on stability and longevity in their suppliers)
- CentOS has wide community support and familiarity. You can easily find help on the Internet. You will also not struggle to find support organizations that you can pay for help.
- CentOS has a great deal in common with other Linux distributions. Because “Linux” is really just a kernel, and an open-source one at that, it’s theoretically possible for a distribution to completely change everything about it and build a completely unique operating system and environment. In practice, no one does. That means that the bulk of knowledge you have about any other Linux distribution is applicable to CentOS.
That hits the major points that will assure most executives that you’re making a wise decision. In the scope of Hyper-V, Microsoft’s support list specifically names CentOS.
Stable, Yet Potentially Demanding
When you use Linux’s built-in tools to download and install software, you work from approved repositories. Essentially, that means that someone decided that a particular package adequately measured up to a standard. Otherwise, you’d need to go elsewhere to acquire that package.
The default CentOS repositories are not large when compared to some other distributions. They do not contain recent versions of many common packages, including the Linux kernel. However, the versions offered in the CentOS repositories are known to be solid and stable. If you want to use more recent versions, then you’ll need to be(come) comfortable manually adding repositories and/or acquiring, compiling, and installing software.
No GUIs Here
CentOS does make at least one GUI available, but I won’t cover it. I don’t know if CentOS’s GUI requires 3D acceleration the way that Ubuntu’s does. If it does, then the GUI experience under Hyper-V would be miserable. However, I didn’t even attempt to use any CentOS GUIs because they’re really not valuable for anything other than your primary use desktop. If you’re new to Linux and the idea of going GUI-free bothers you, then take heart: Linux is a lot easier than you think it is. I don’t feel that any of the Linux GUIs score highly enough in the usability department to meaningfully soften the blow of transition anyway.
If you’ve already read my Ubuntu article, then you’ve already more or less seen this bit. Linux is easy because pretty much everything is a file. There are only executables, data, and configuration files. Executables can be binaries or text-based script files. So, any time you need to do anything, your first goal is to figure out what executable to call. Configuration files are almost always text-based, so you only need to learn what to set in the configuration file. The Internet can always help out with that. So, really, the hardest part about using Linux is figuring out which executable(s) you need to solve whatever problem you’re facing. The Internet can help out with that as well. You’re currently reading some of that help.
Enough talk. Let’s get going with CentOS.
Downloading CentOS
You can download CentOS for free from www.centos.org. As the site was arranged on the day that I wrote this article, there was a “Get CentOS” link in the main menu at the top of the screen and a large orange button stamped “Get CentOS Now” after the introductory text. From either of those, you reach a page with a few packaging options. I chose “DVD ISO” and used it to write this article. I would say that if you have a Torrent application installed, choose that option. It took me quite a bit of hunting to find a fast mirror.
For reference, I downloaded CentOS-7-x86_x64-DVD-1810.iso.
 How to Build a Hyper-V Virtual Machine for CentOS
There’s no GUI and CentOS is small, so don’t create a large virtual machine. These are my guidelines:
- 2 vCPUs, no reservation. All modern operating systems work noticeably better when they can schedule two threads as opposed to one. You can turn it up later if you’re deployment needs more.
- Dynamic Memory on; 512MB startup memory, 256MB minimum memory, 1GB maximum memory. You can always adjust Dynamic Memory’s maximum upward, even when the VM is active. Start low.
- 40GB disk is probably much more than you’ll ever need. I use a dynamically expanding VHDX because there’s no reason not to. The published best practice is to create this with a forced 1 megabyte block size, which must be done in PowerShell. I didn’t do this on my first several Linux VMs and noticed that they do use several gigabytes more space, although still well under 10 apiece. I leave the choice to you.
- I had troubles using Generation 2 VMs with Ubuntu Server, but I’m having better luck with CentOS. If you use Generation 2 with your CentOS VMs on Hyper-V 2012 R2/8.1 or earlier, remember to disable Secure Boot. If using 2016, you can leave Secure Boot enabled as long as you select the “Microsoft Certification Authority”.
- If your Hyper-V host is a member of a failover cluster and the Linux VM will be HA, use a static MAC address. Linux doesn’t respond well when its MAC addresses change.
The following is a sample script that you can modify to create a Linux virtual machine in Hyper-V: You can find a more polished edition in my GitHub repository.
#function New-LinuxVM {
	#requires -Modules Hyper-V
	[CmdletBinding(SupportsShouldProcess=$true)]
	param
	(
		[Parameter(Mandatory=$true, Position=1)][String]$VMName,
		[Parameter()][String]$VHDXName = '',
		[Parameter()][String]$VMStoragePath = '',
		[Parameter()][String]$VHDStoragePath = '',
		[Parameter()][String]$InstallISOPath = '',
		[Parameter()][Switch]$Cluster,
		[Parameter()][String]$VMSwitchName = '',
		[Parameter()][Uint32]$StartupMemory = 512MB,
		[Parameter()][Uint32]$MinimumMemory = 256MB,
		[Parameter()][Uint32]$MaximumMemory = 1GB,
		[Parameter()][Uint64]$VHDXSizeBytes = 40GB
	)

	if([String]::IsNullOrEmpty($VHDXName))
	{
		$VHDXName = '{0}.vhdx' -f $VMName
	}
	if($VHDXName -notmatch '.vhdx$')
	{
		$VHDXName += '.vhdx'
	}
	if([String]::IsNullOrEmpty($VMStoragePath))
	{
		$VMStoragePath = (Get-VMHost).VirtualMachinePath
	}
	if(-not (Test-Path -Path $VMStoragePath))
	{
		Write-Error -Message ('VM path {0} does not exist.' -f $VMStoragePath)
		return
	}
	if([String]::IsNullOrEmpty($VHDStoragePath))
	{
		$VHDStoragePath = (Get-VMHost).VirtualHardDiskPath
	}
	if(-not (Test-Path -Path $VHDStoragePath))
	{
		Write-Error -Message ('Storage path {0} does not exist.' -f $VHDStoragePath)
		return
	}
	$VHDStoragePath = Join-Path -Path $VHDStoragePath -ChildPath $VHDXName
	if([String]::IsNullOrEmpty($InstallISOPath) -or -not (Test-Path -Path $InstallISOPath -PathType Leaf))
	{
		Write-Error -Message ('ISO {0} does not exist' -f $InstallISOPath)
		return
	}
	if([String]::IsNullOrEmpty($VMSwitchName))
	{
		$VMSwitchName = (Get-VMSwitch | ? SwitchType -eq 'External')[0].Name
	}
	if([String]::IsNullOrEmpty($VMSwitchName))
	{
		Write-Error -Message ('No virtual switch specified')
		return
	}

	$VM = New-VM -Name $VMName -MemoryStartupBytes $StartupMemory -SwitchName $VMSwitchName -Path $VMStoragePath -Generation 2 -NoVHD
	Set-VMMemory -VM $VM -DynamicMemoryEnabled $true -MinimumBytes $MinimumMemory -MaximumBytes $MaximumMemory
	Set-VMProcessor -VM $VM -Count 2
	Start-VM -VM $VM
	Stop-VM -VM $VM -Force
	New-VHD -Path $VHDStoragePath -SizeBytes $VHDXSizeBytes -Dynamic -BlockSizeBytes 1MB
	$VMVHD = Add-VMHardDiskDrive -VM $VM -ControllerType SCSI -ControllerNumber 0 -ControllerLocation 0 -Path $VHDStoragePath -Passthru
	$VMDVDDrive = Add-VMDvdDrive -VM $VM -ControllerNumber 0 -ControllerLocation 1 -Passthru
	$VMNetAdapter = Get-VMNetworkAdapter -VM $VM
	Set-VMNetworkAdapter -VMNetworkAdapter $VMNetAdapter -StaticMacAddress ($VMNetAdapter.MacAddress)
	Set-VMFirmware -VM $VM -BootOrder $VMDVDDrive, $VMVHD, $VMNetAdapter -EnableSecureBoot On -SecureBootTemplate 'MicrosoftUEFICertificateAuthority'
	Set-VMDvdDrive -VMDvdDrive $VMDVDDrive -Path $InstallISOPath
	if($Cluster)
	{
		Add-ClusterVirtualMachineRole -VMName $VMName
	}
#}
If you’re going to use this a lot, consider modifying the parameter defaults to your liking. For instance, you’re probably not going to move your install ISO often.
You could also use your first installation as the basis for a clone. Use a generic name for the VM/VHDX if that’s your plan.
A Walkthrough of CentOS Installation
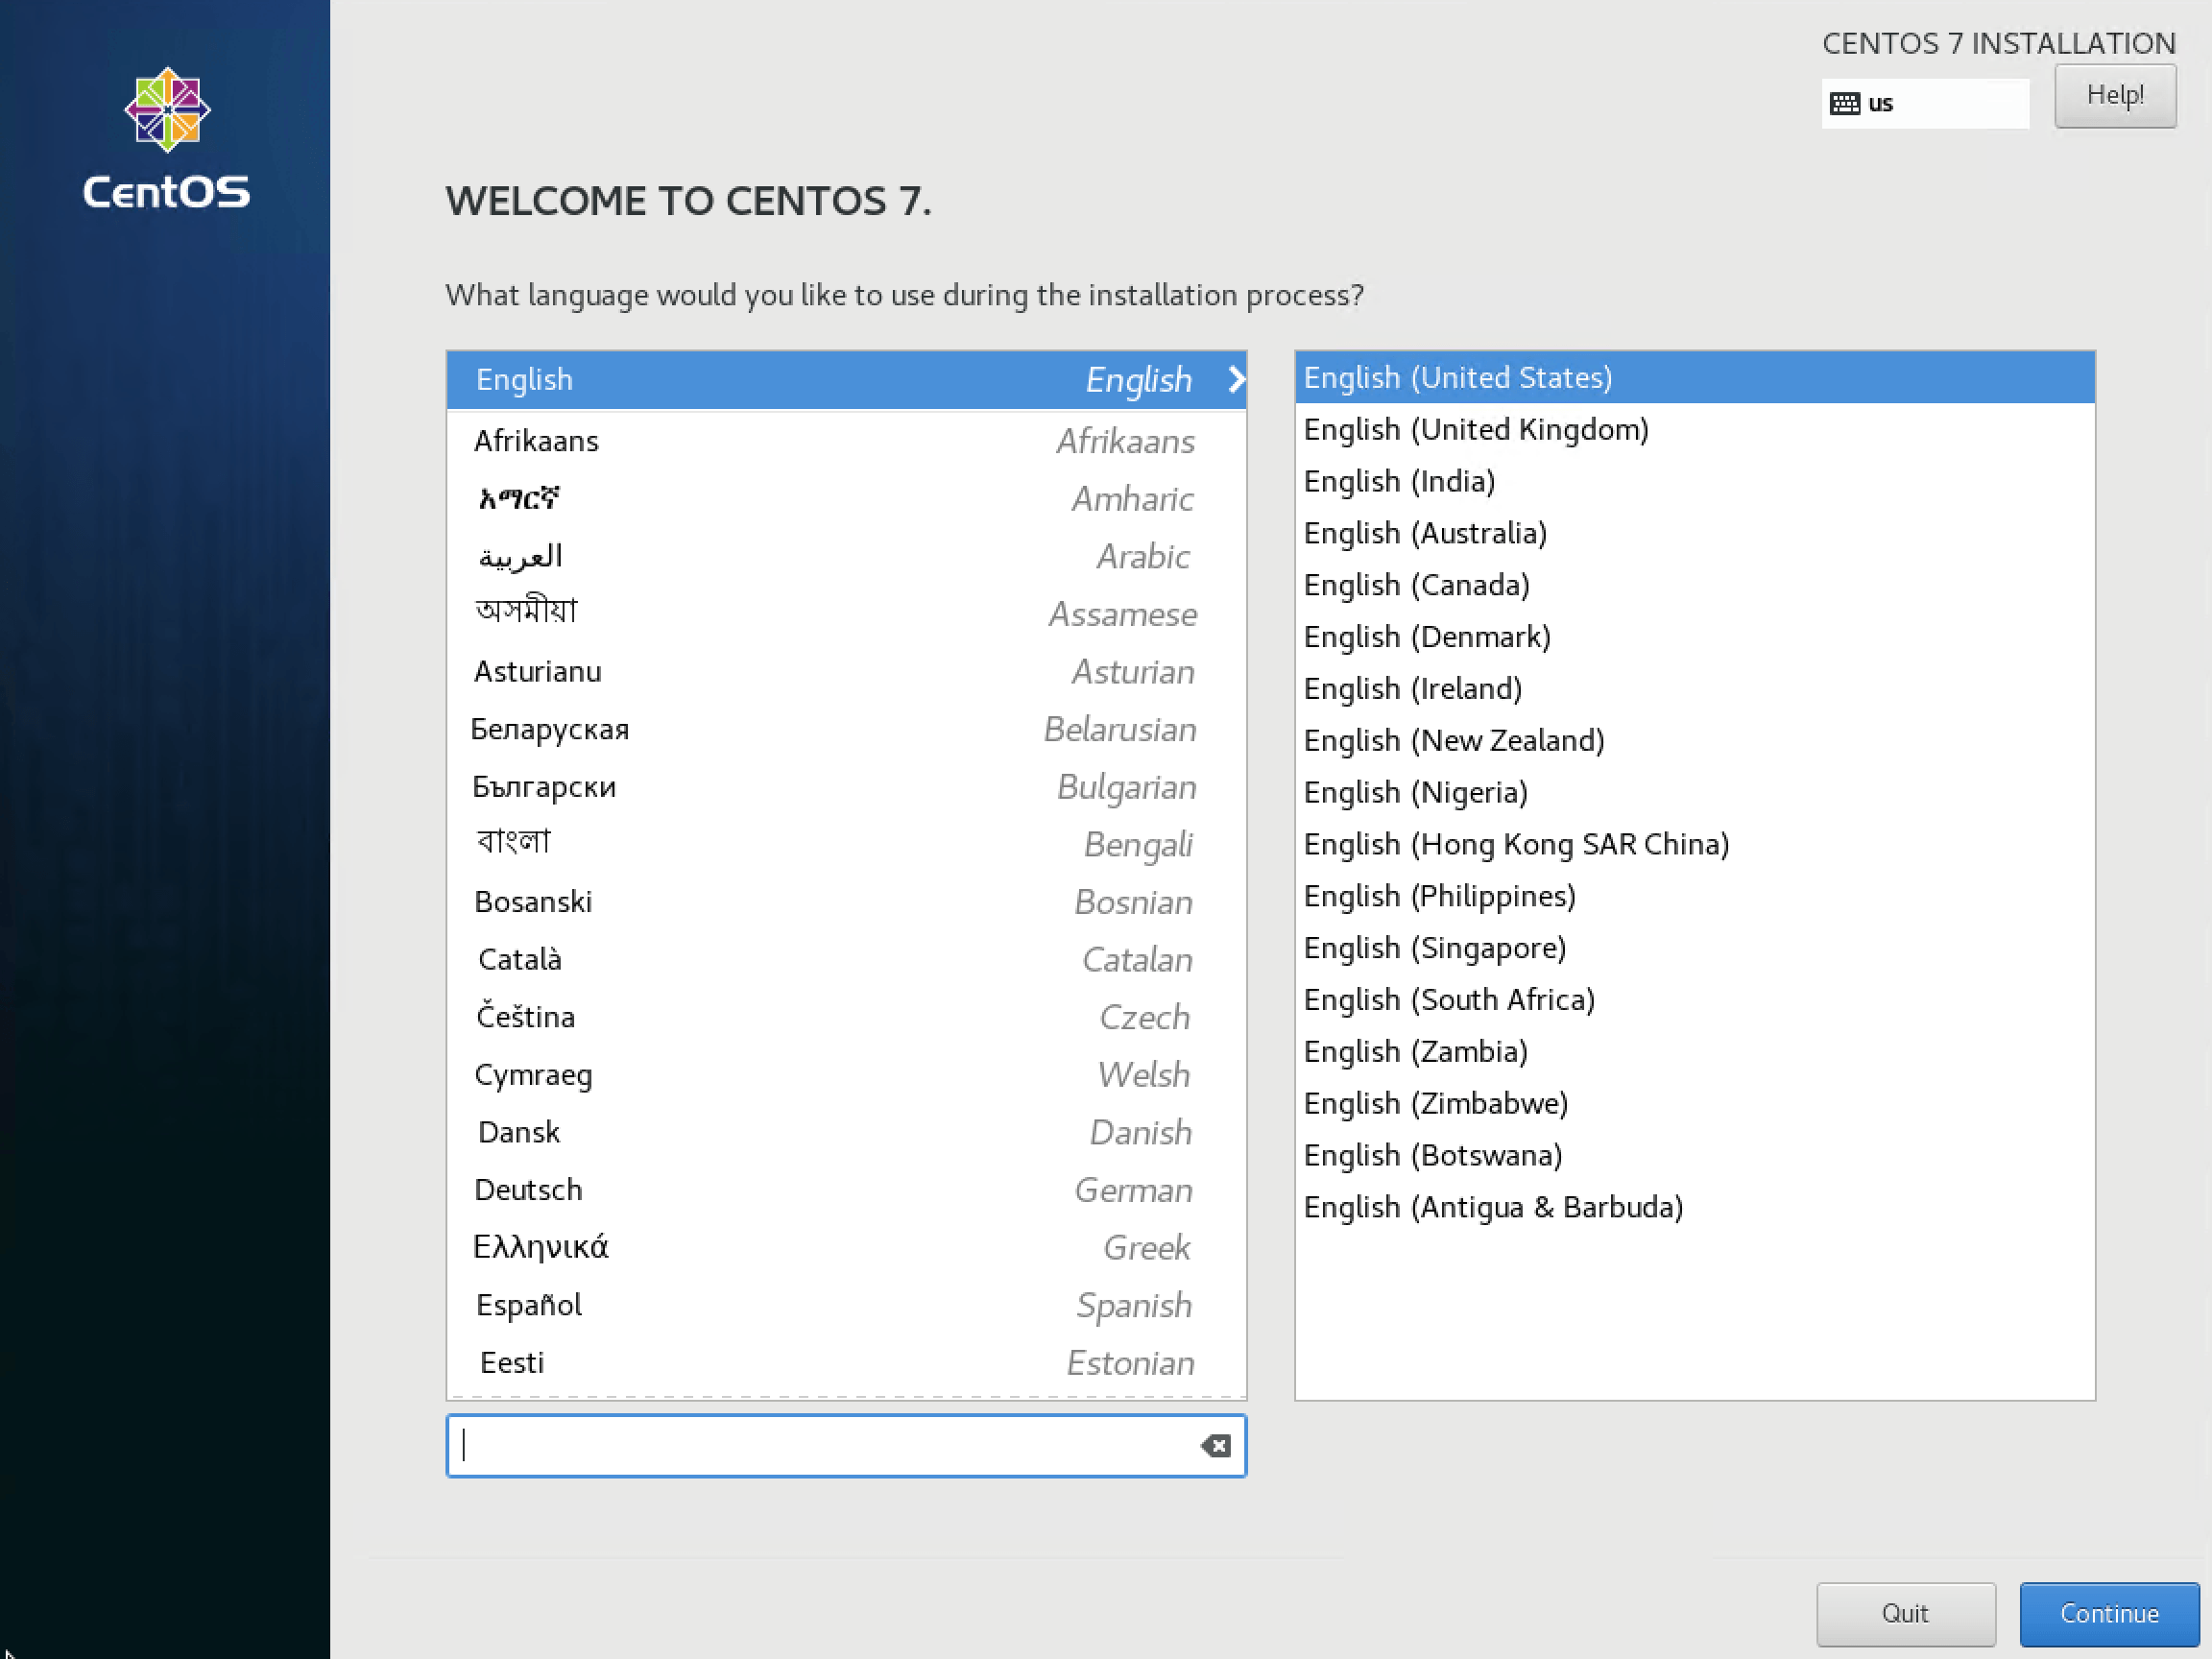
When you first boot, it will default to Test this media & install CentOS 7. I typically skip the media check and just Install CentOS Linux 7.

It will run through several startup items, then it will load the graphical installer. Choose your language:
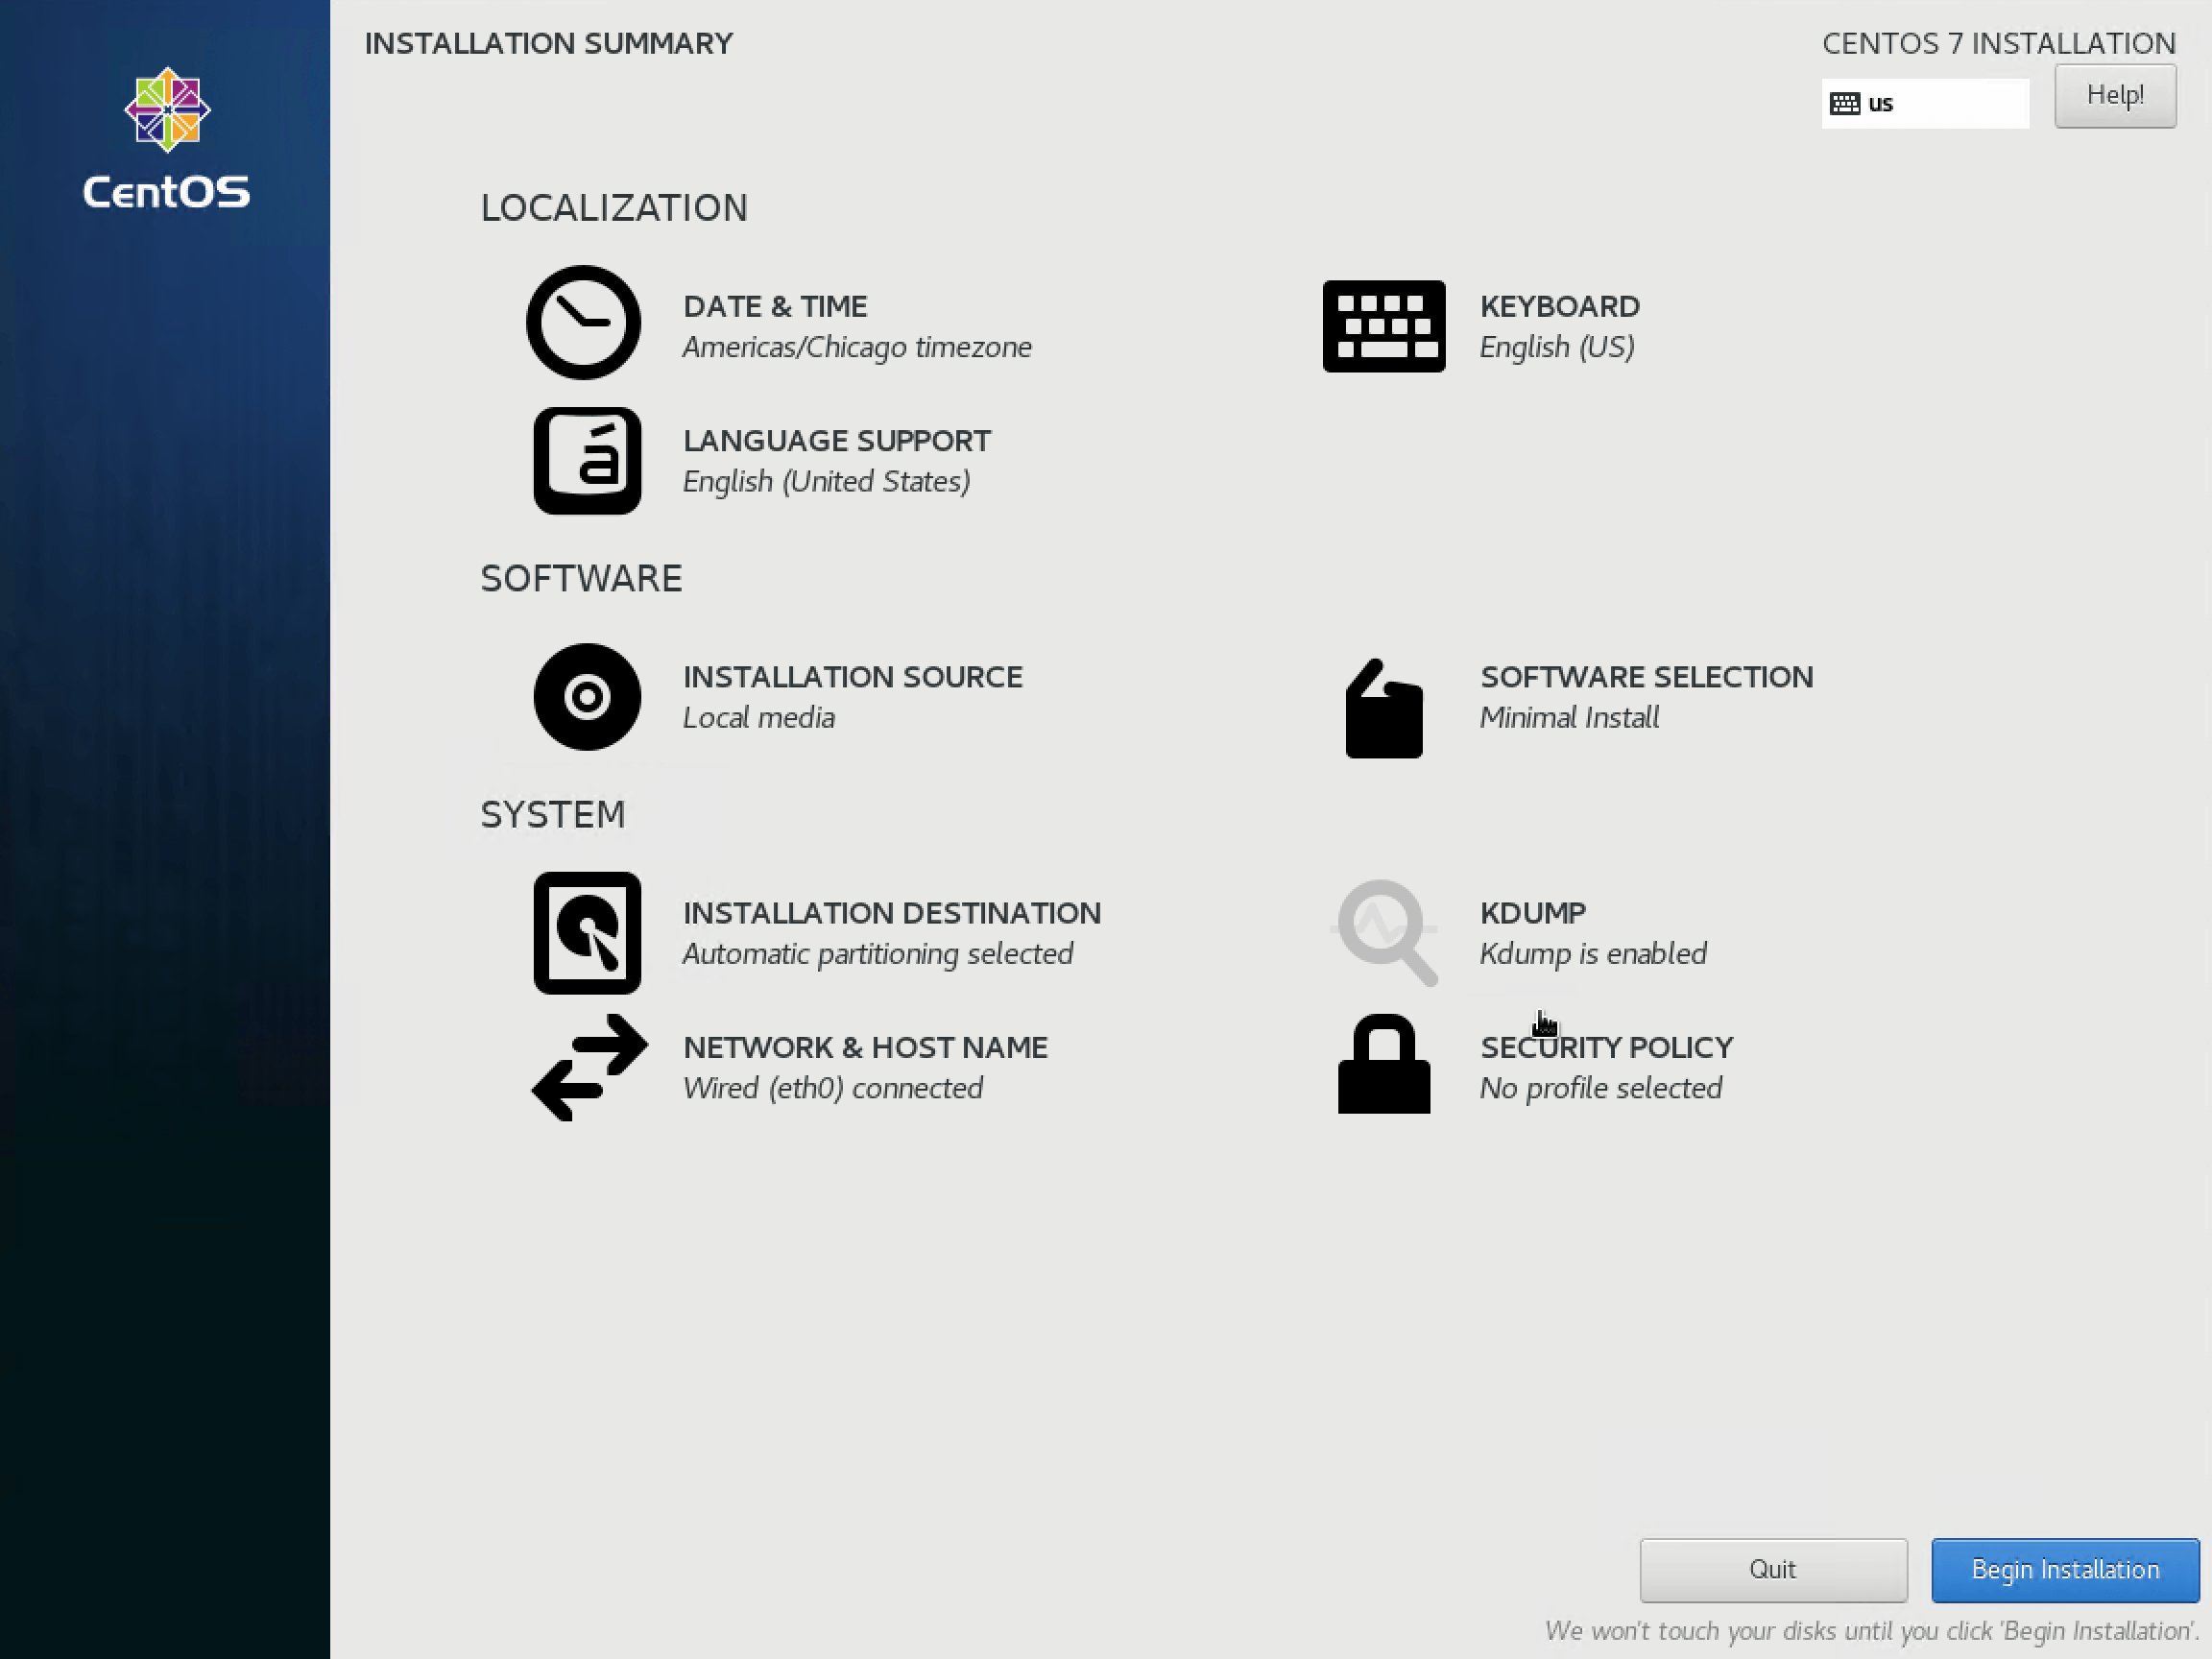
After selecting the language, you’ll be brought to the Installation Summary screen. Wait a moment for it to detect your environment. As an example, the screen initially shows Not Ready for the Security Policy. It will change to No profile selected once it has completed its checks.
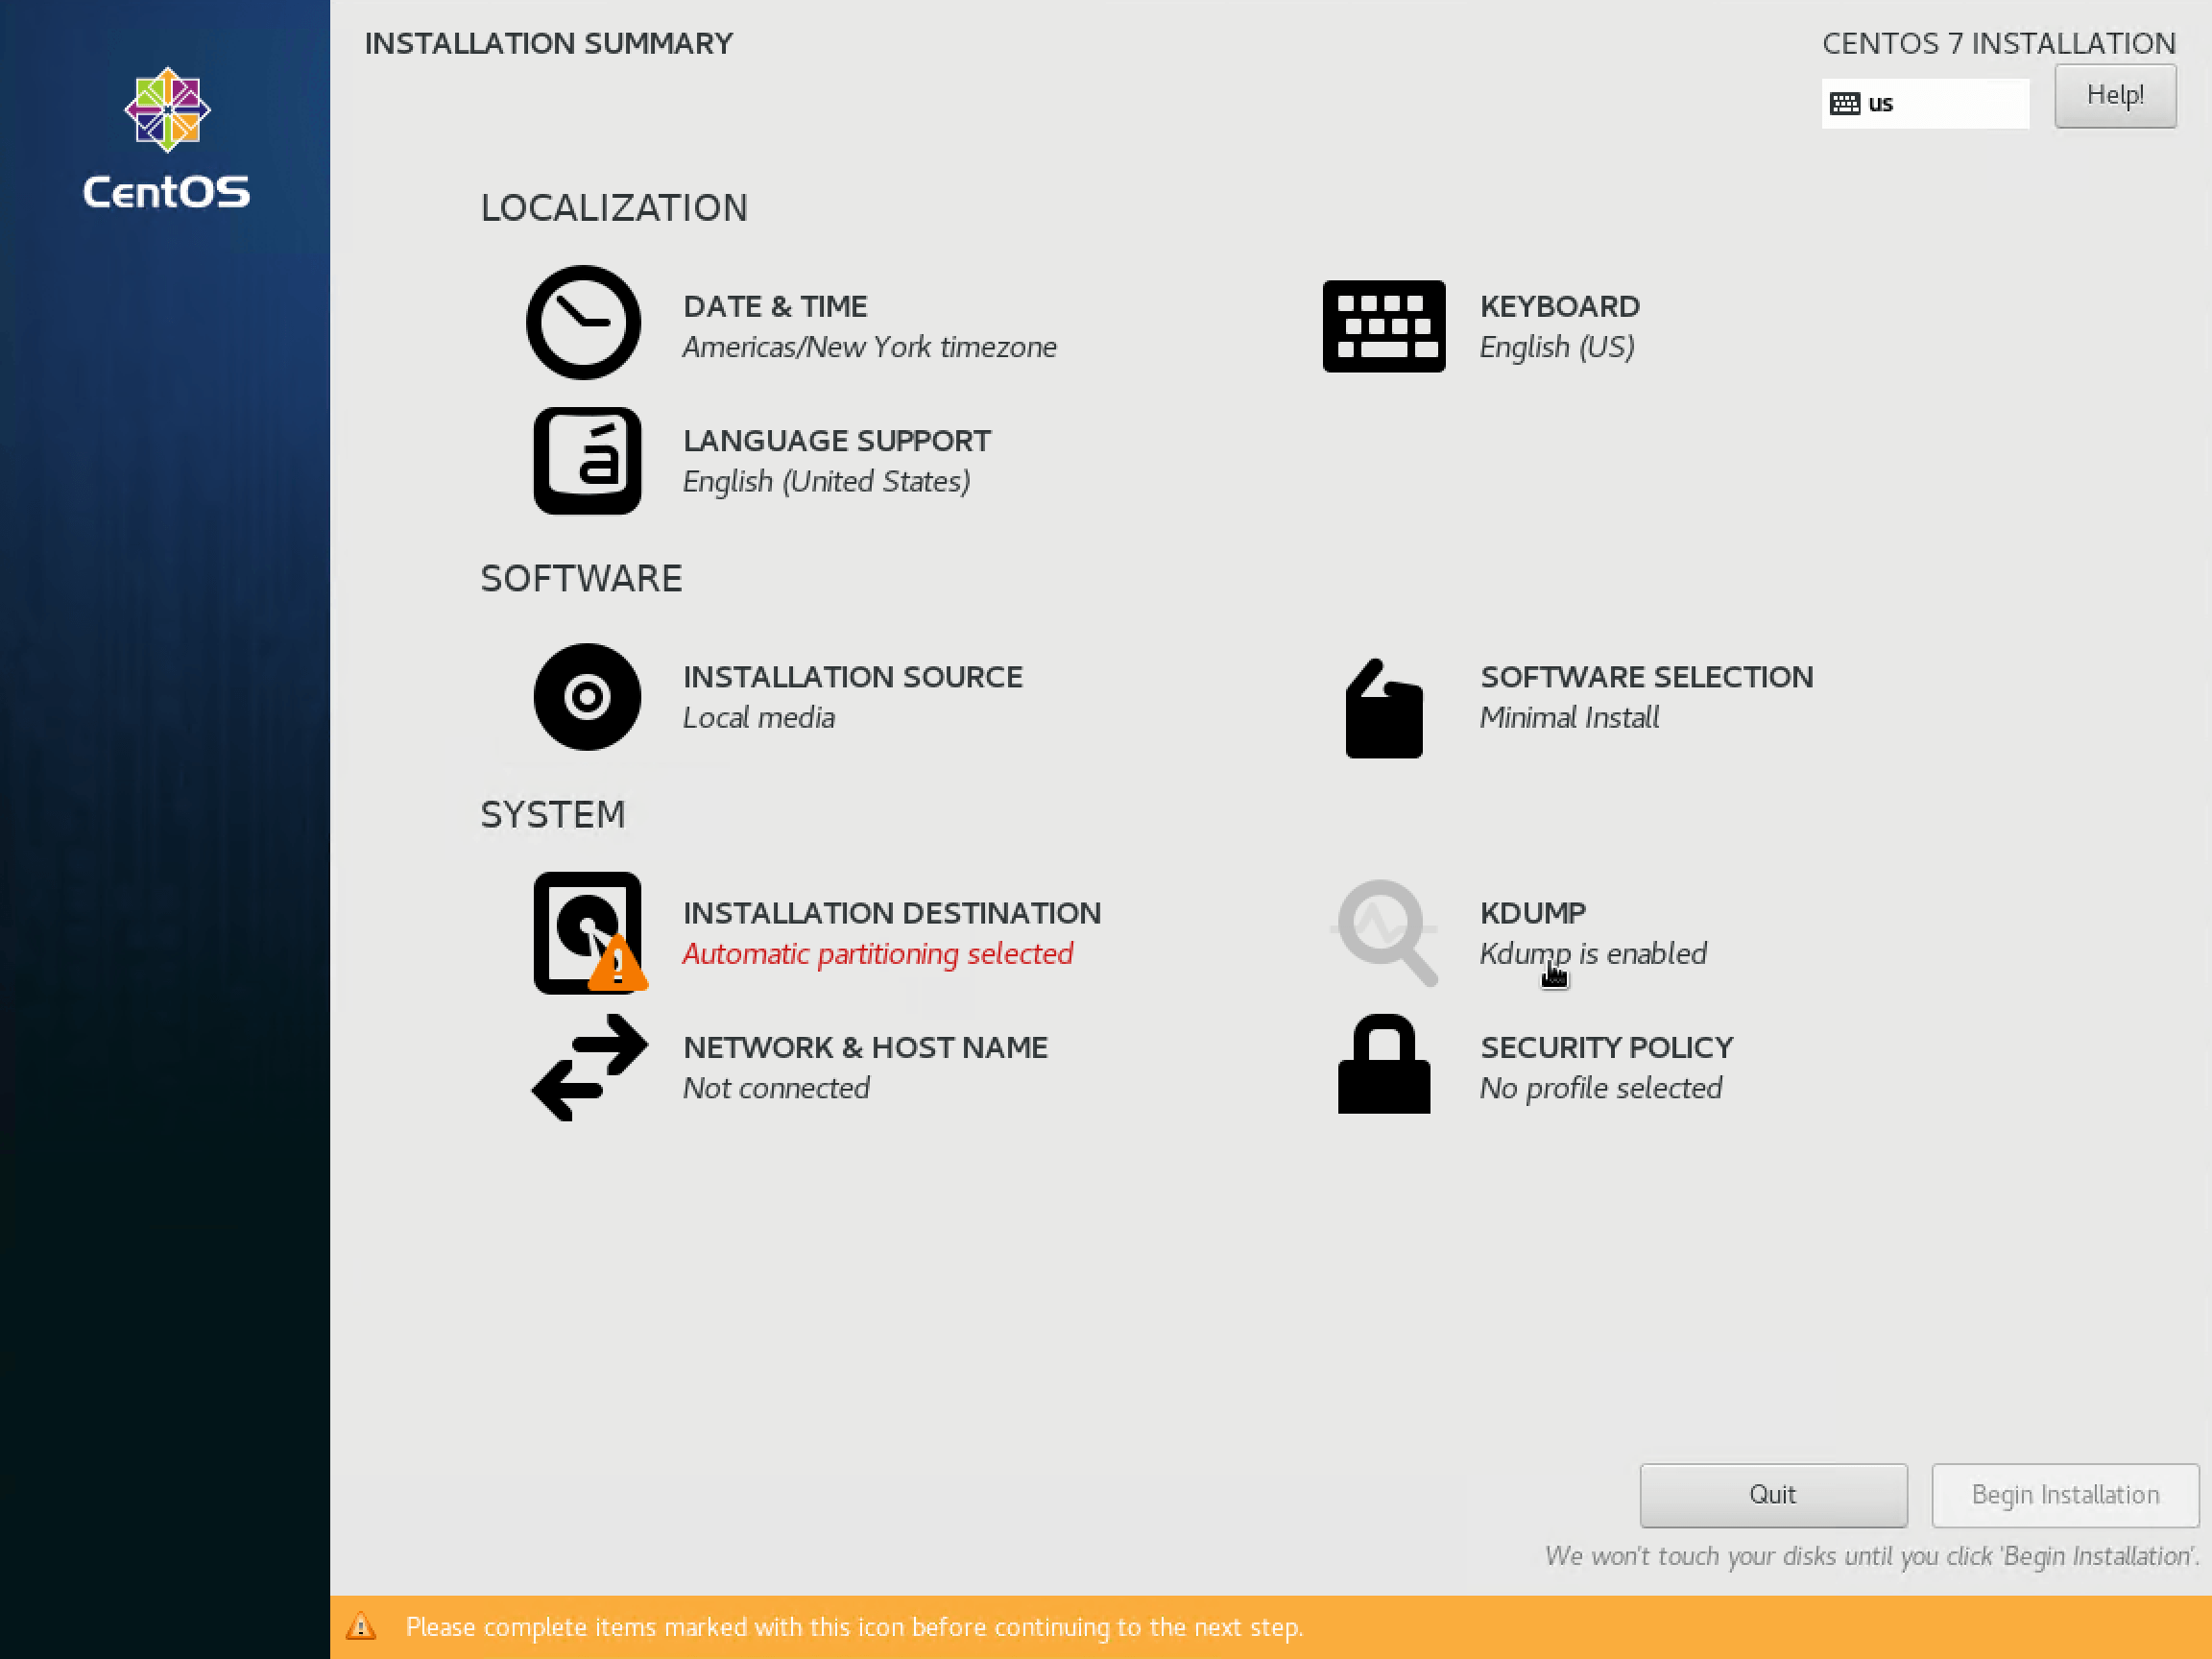
You can work through the items in any order. Anything without the warning triangle can be skipped entirely.
I start with the NETWORK & HOST NAME screen as that can have bearing on other items. When you first access the screen, it will show Disconnected because it hasn’t been configured yet. That’s different behavior from Windows, which will only show disconnected if the virtual network adapter is not connected to a virtual switch.
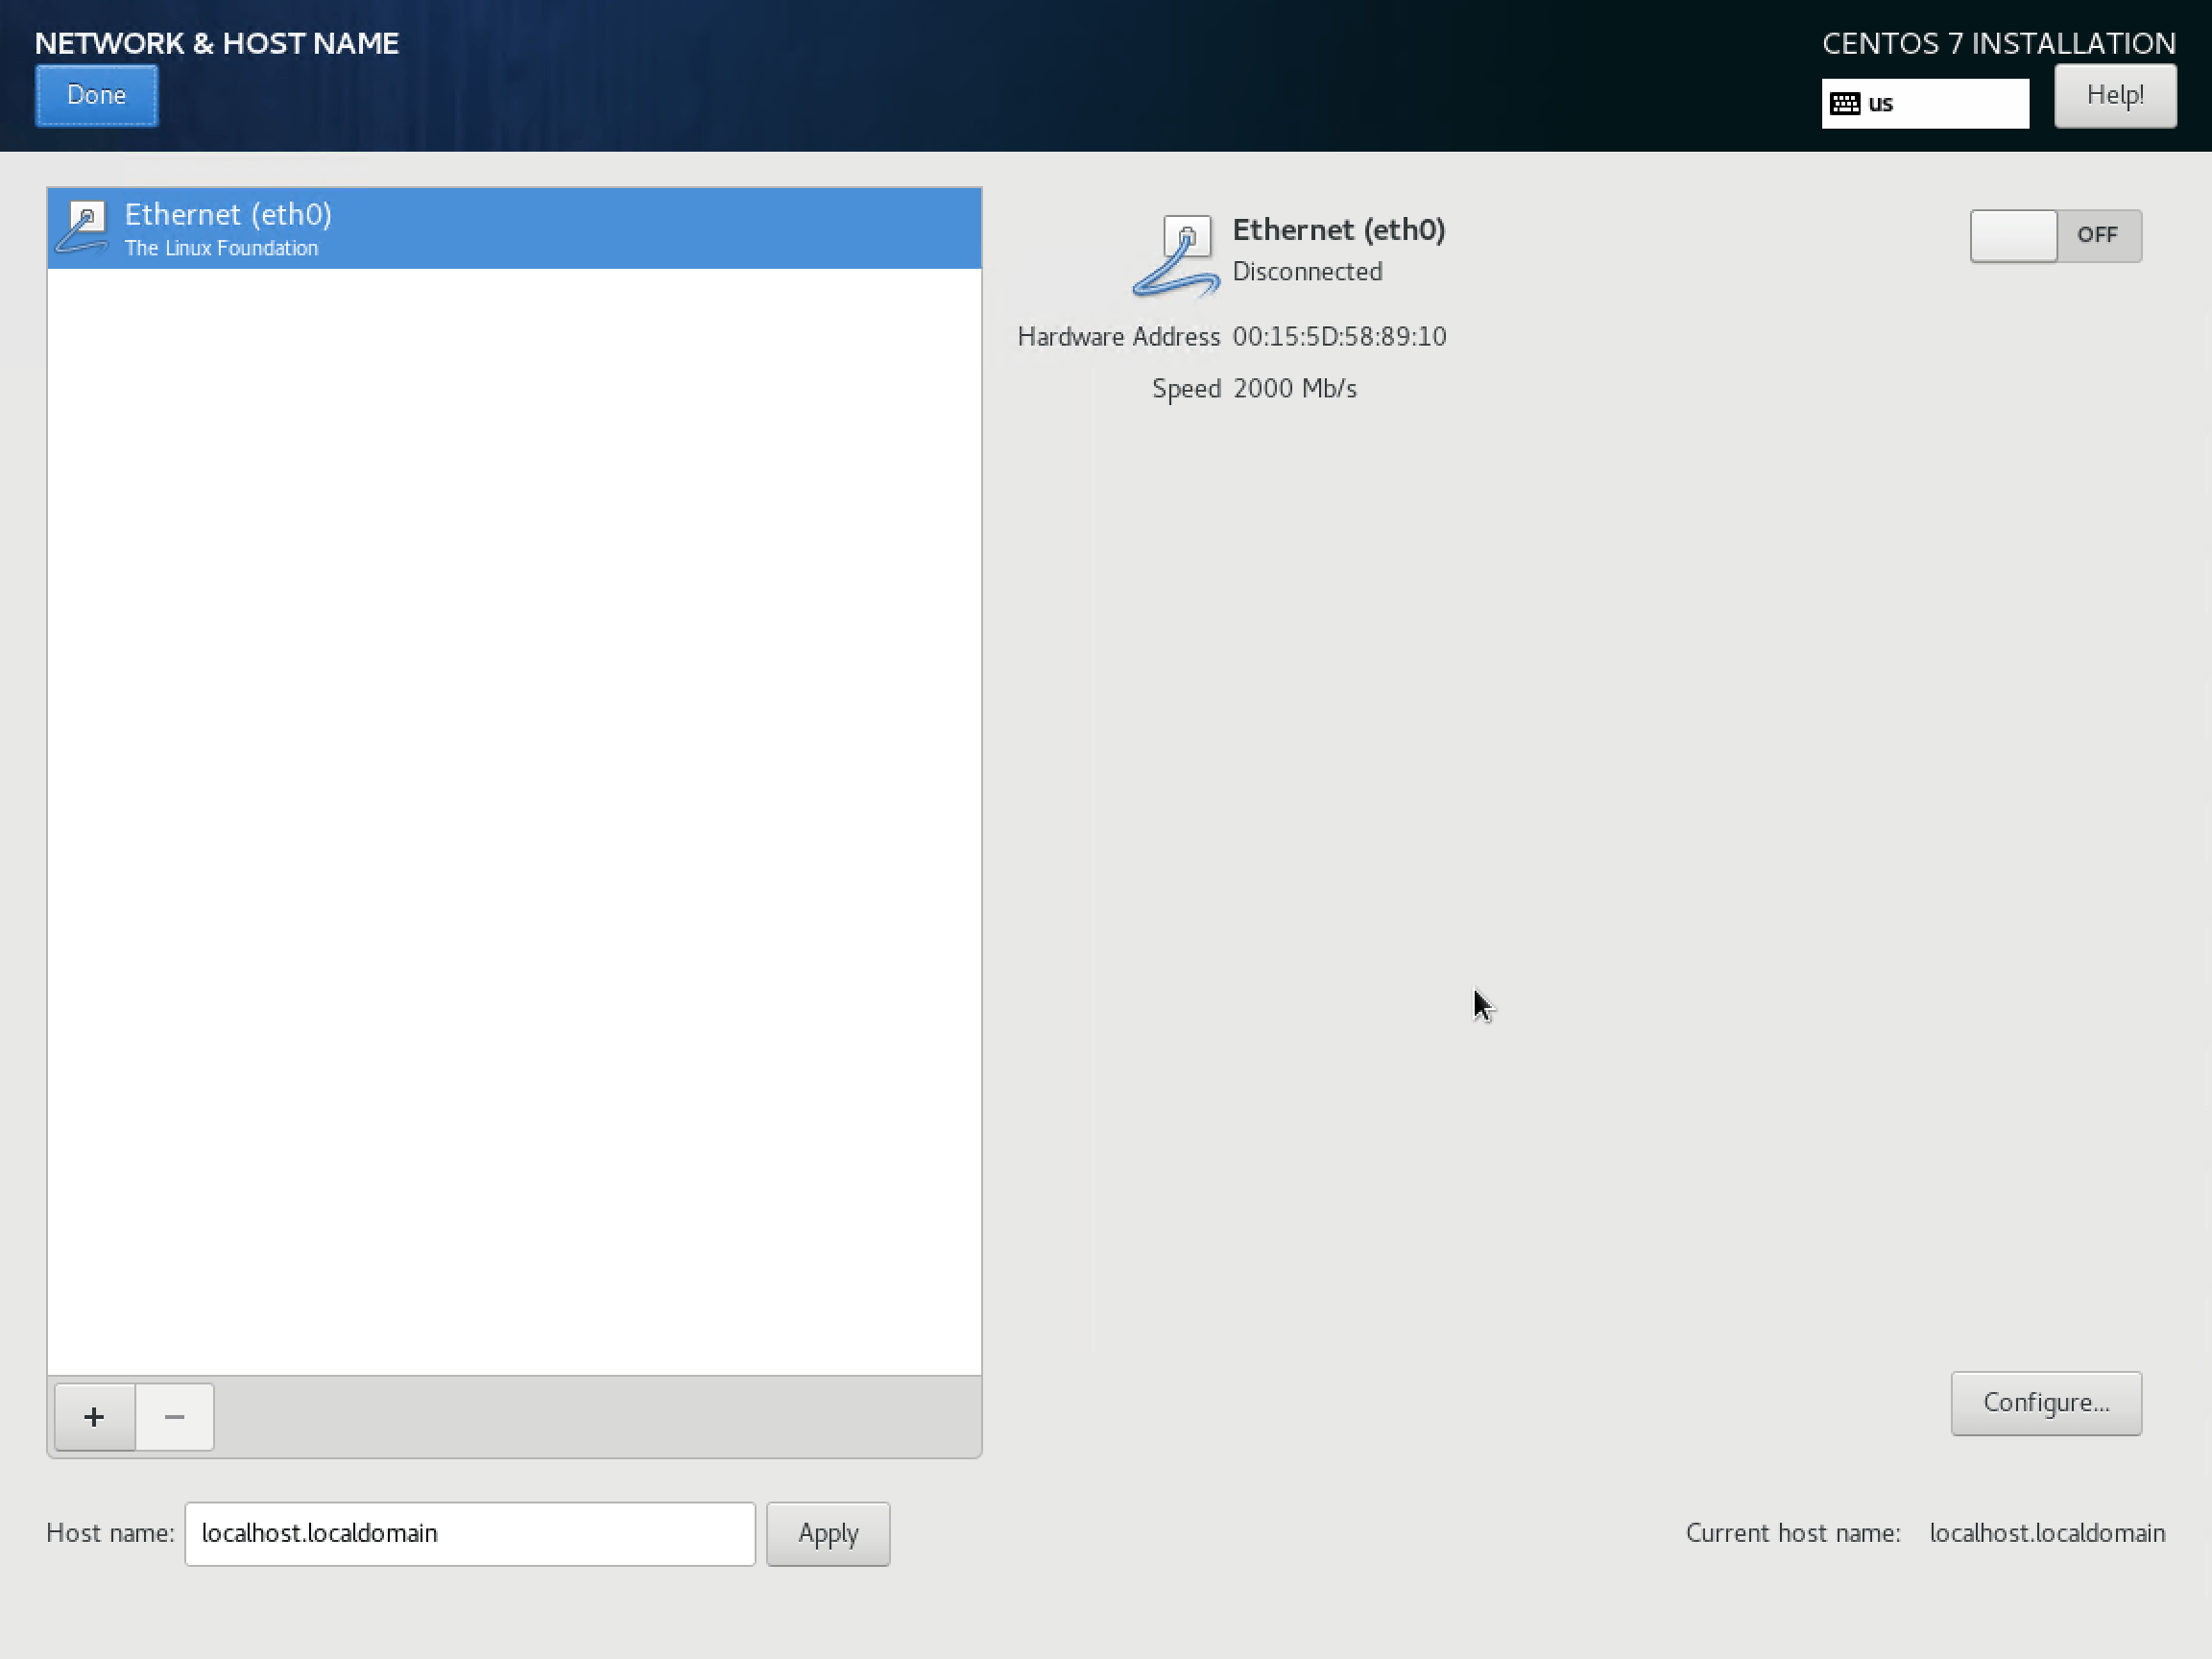
If you’ll be using DHCP, click the Off slider button at the top right for it to attempt to get an IP. If that works, it will automatically switch to On and display the acquired IP address. For static or advanced configuration, click the Configure. I’ve shown the IPv4 Settings tab. You can type out the full octet mask instead of the CIDR shortcut, if you prefer. Fill out this tab, and/or the others, as necessary.
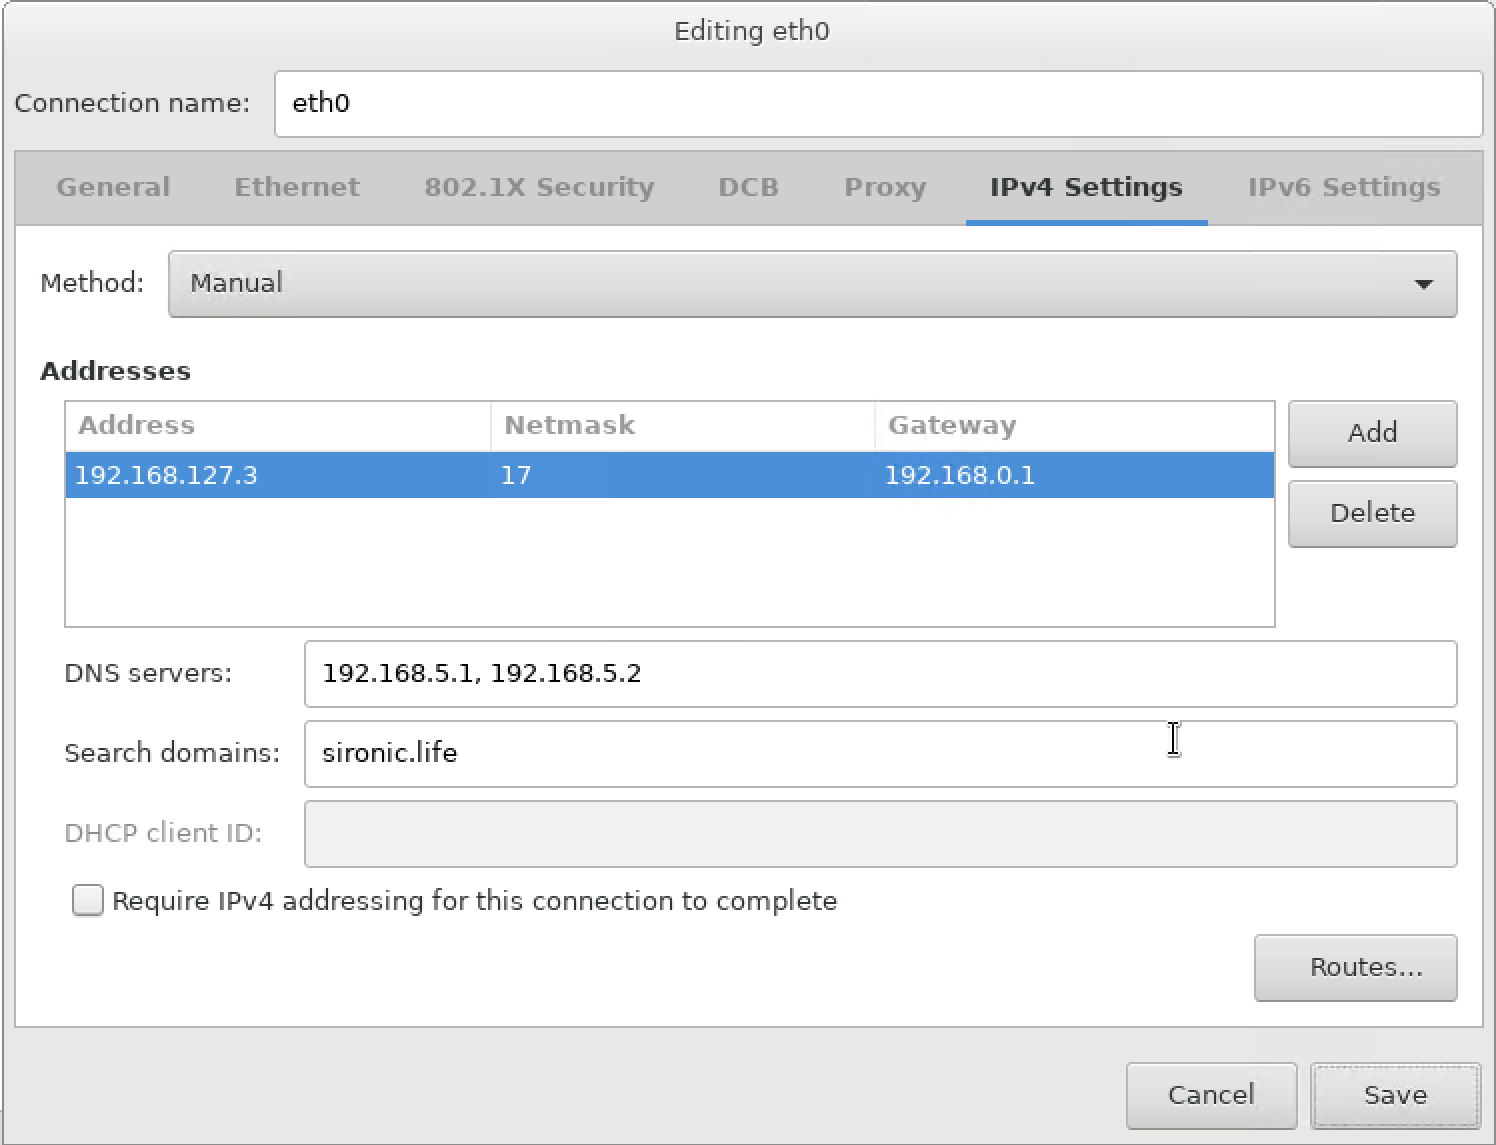
Don’t forget to change the host name at the lower left of the networking screen and Apply it before clicking Done to leave this screen.
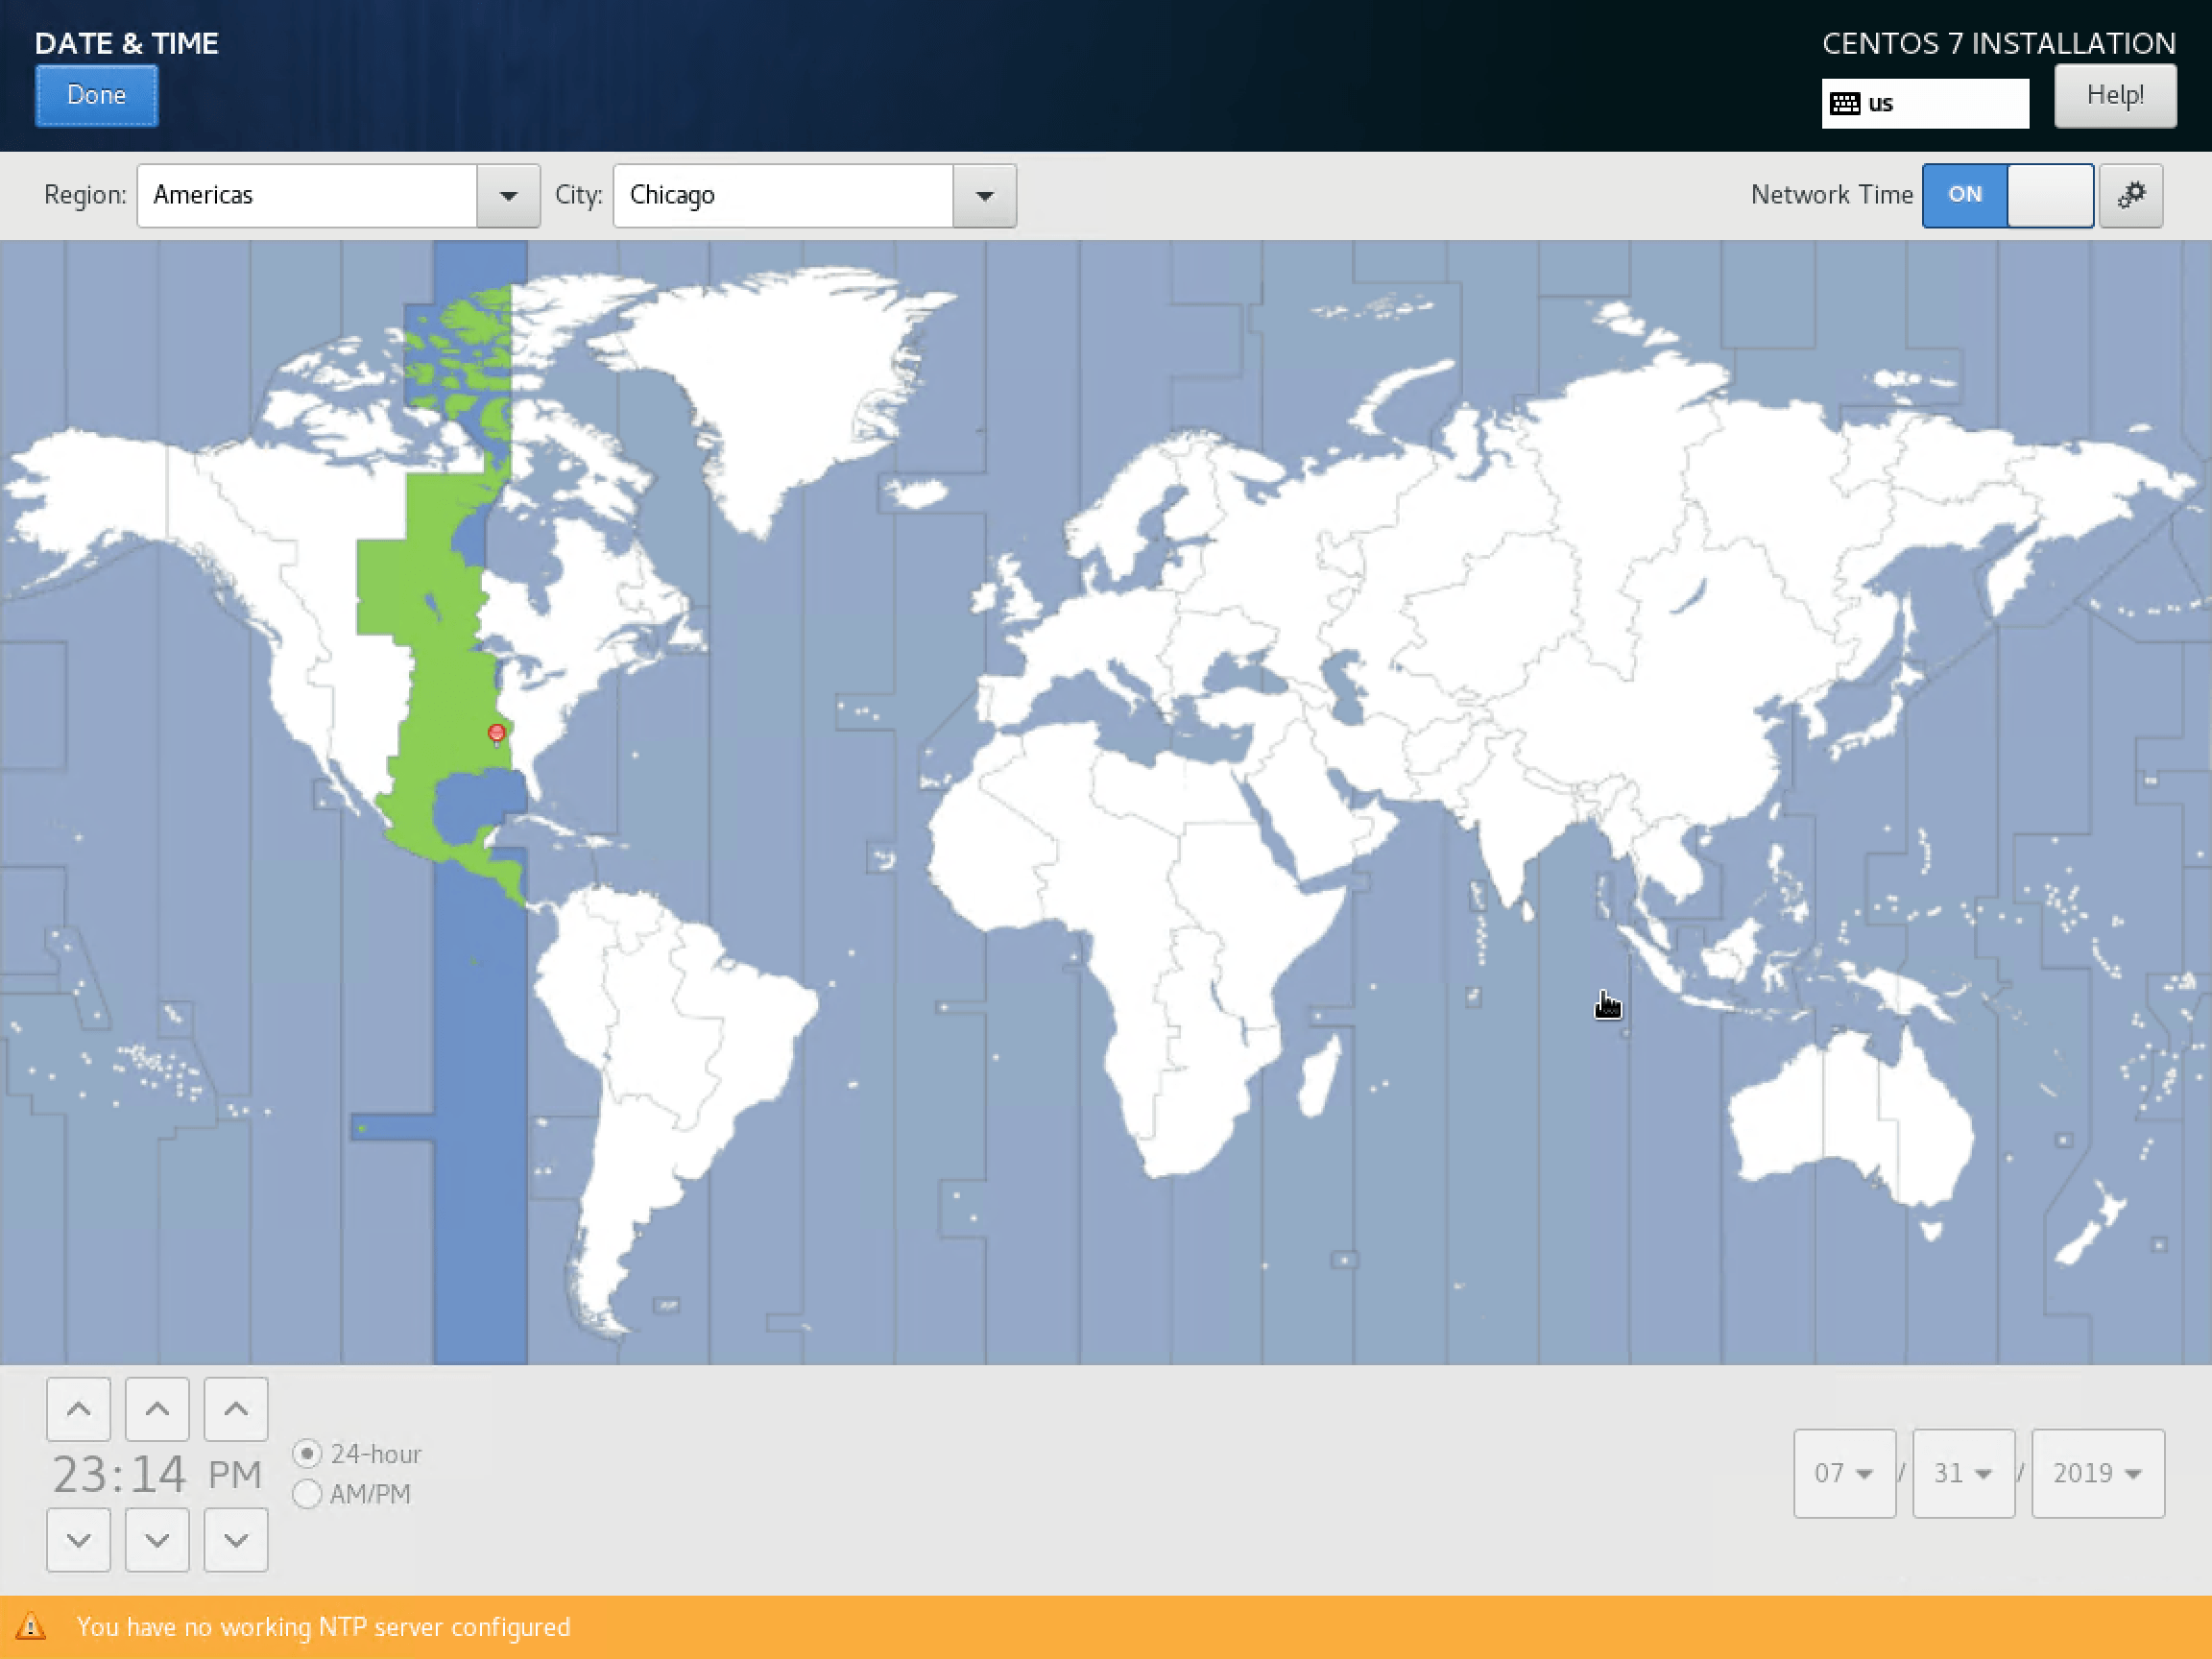
After you’ve set up networking, set the DATE & TIME. If it can detect a network connection, you’ll be allowed to set the Network Time slider to On. Configure as desired.
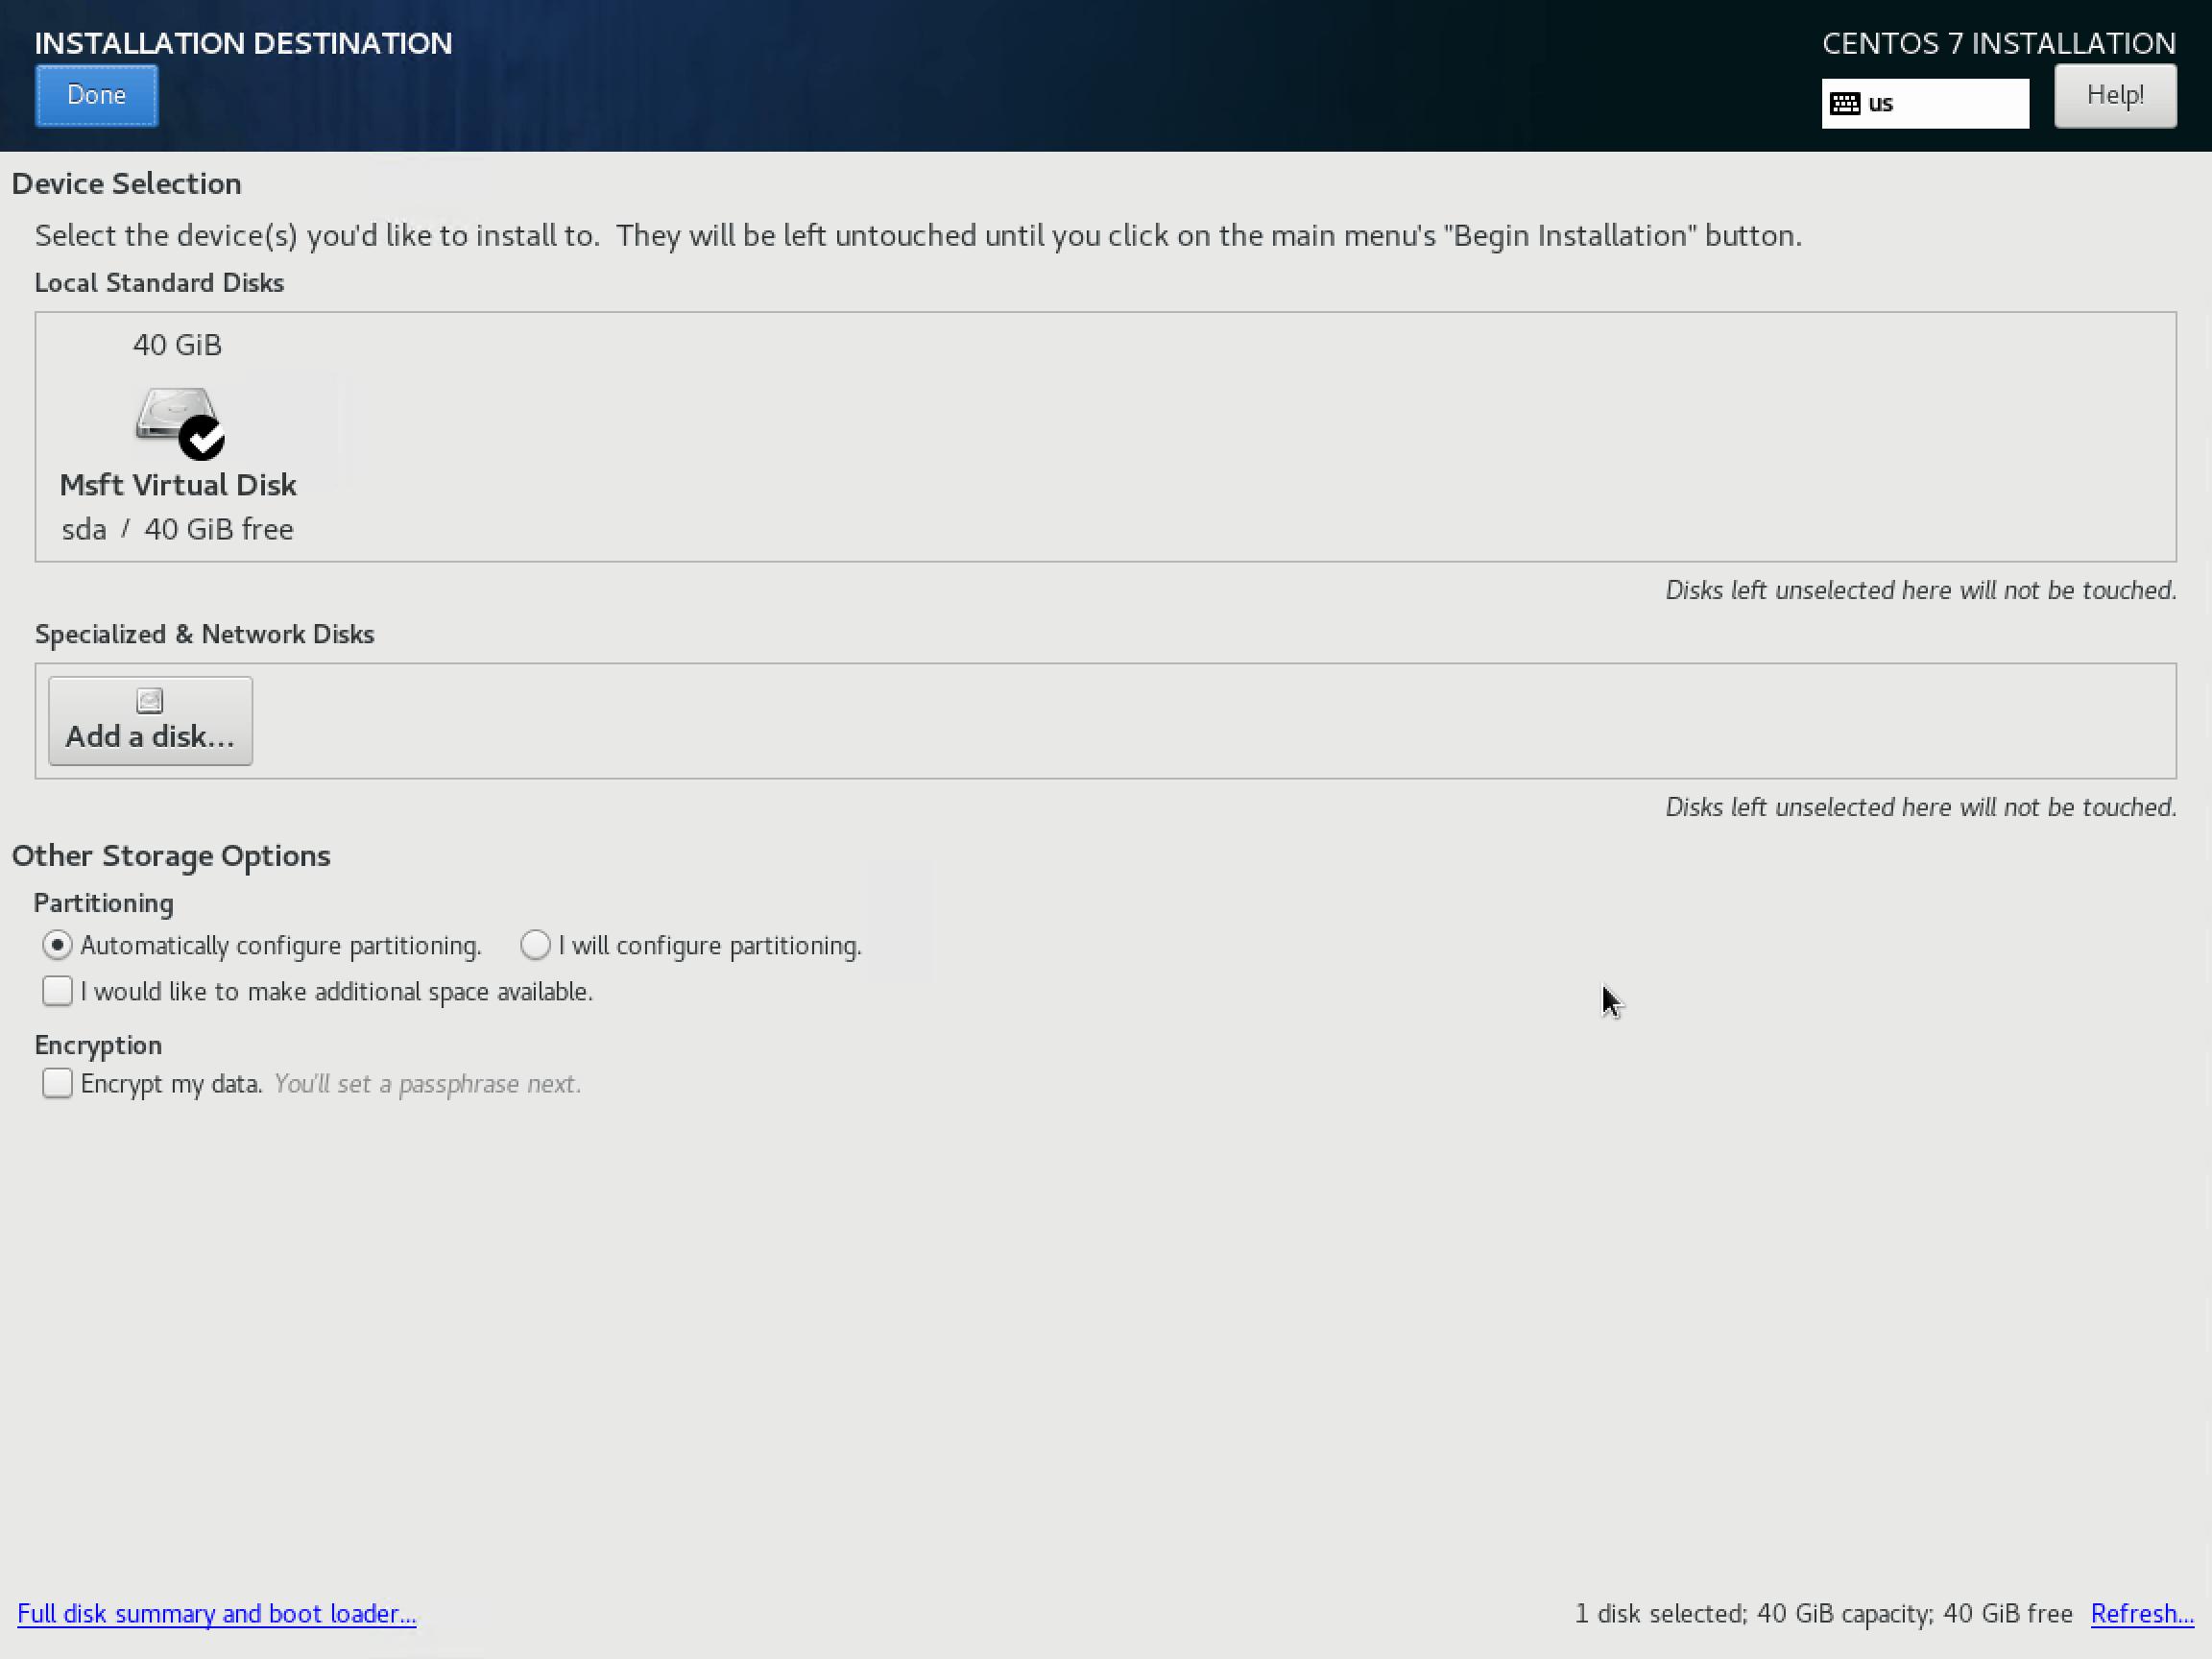
You must click into the Installation Destination screen or the installer will not allow you to proceed. By default, it will select the entirety of the first hard drive for installation. It will automatically figure out the best way to divide storage. You can override it if you like. If you’re OK with defaults, just click Done.
Explore the other screens as you desire. I don’t set anything else on my systems. At this point, you have handled all the required and can click Begin Installation.
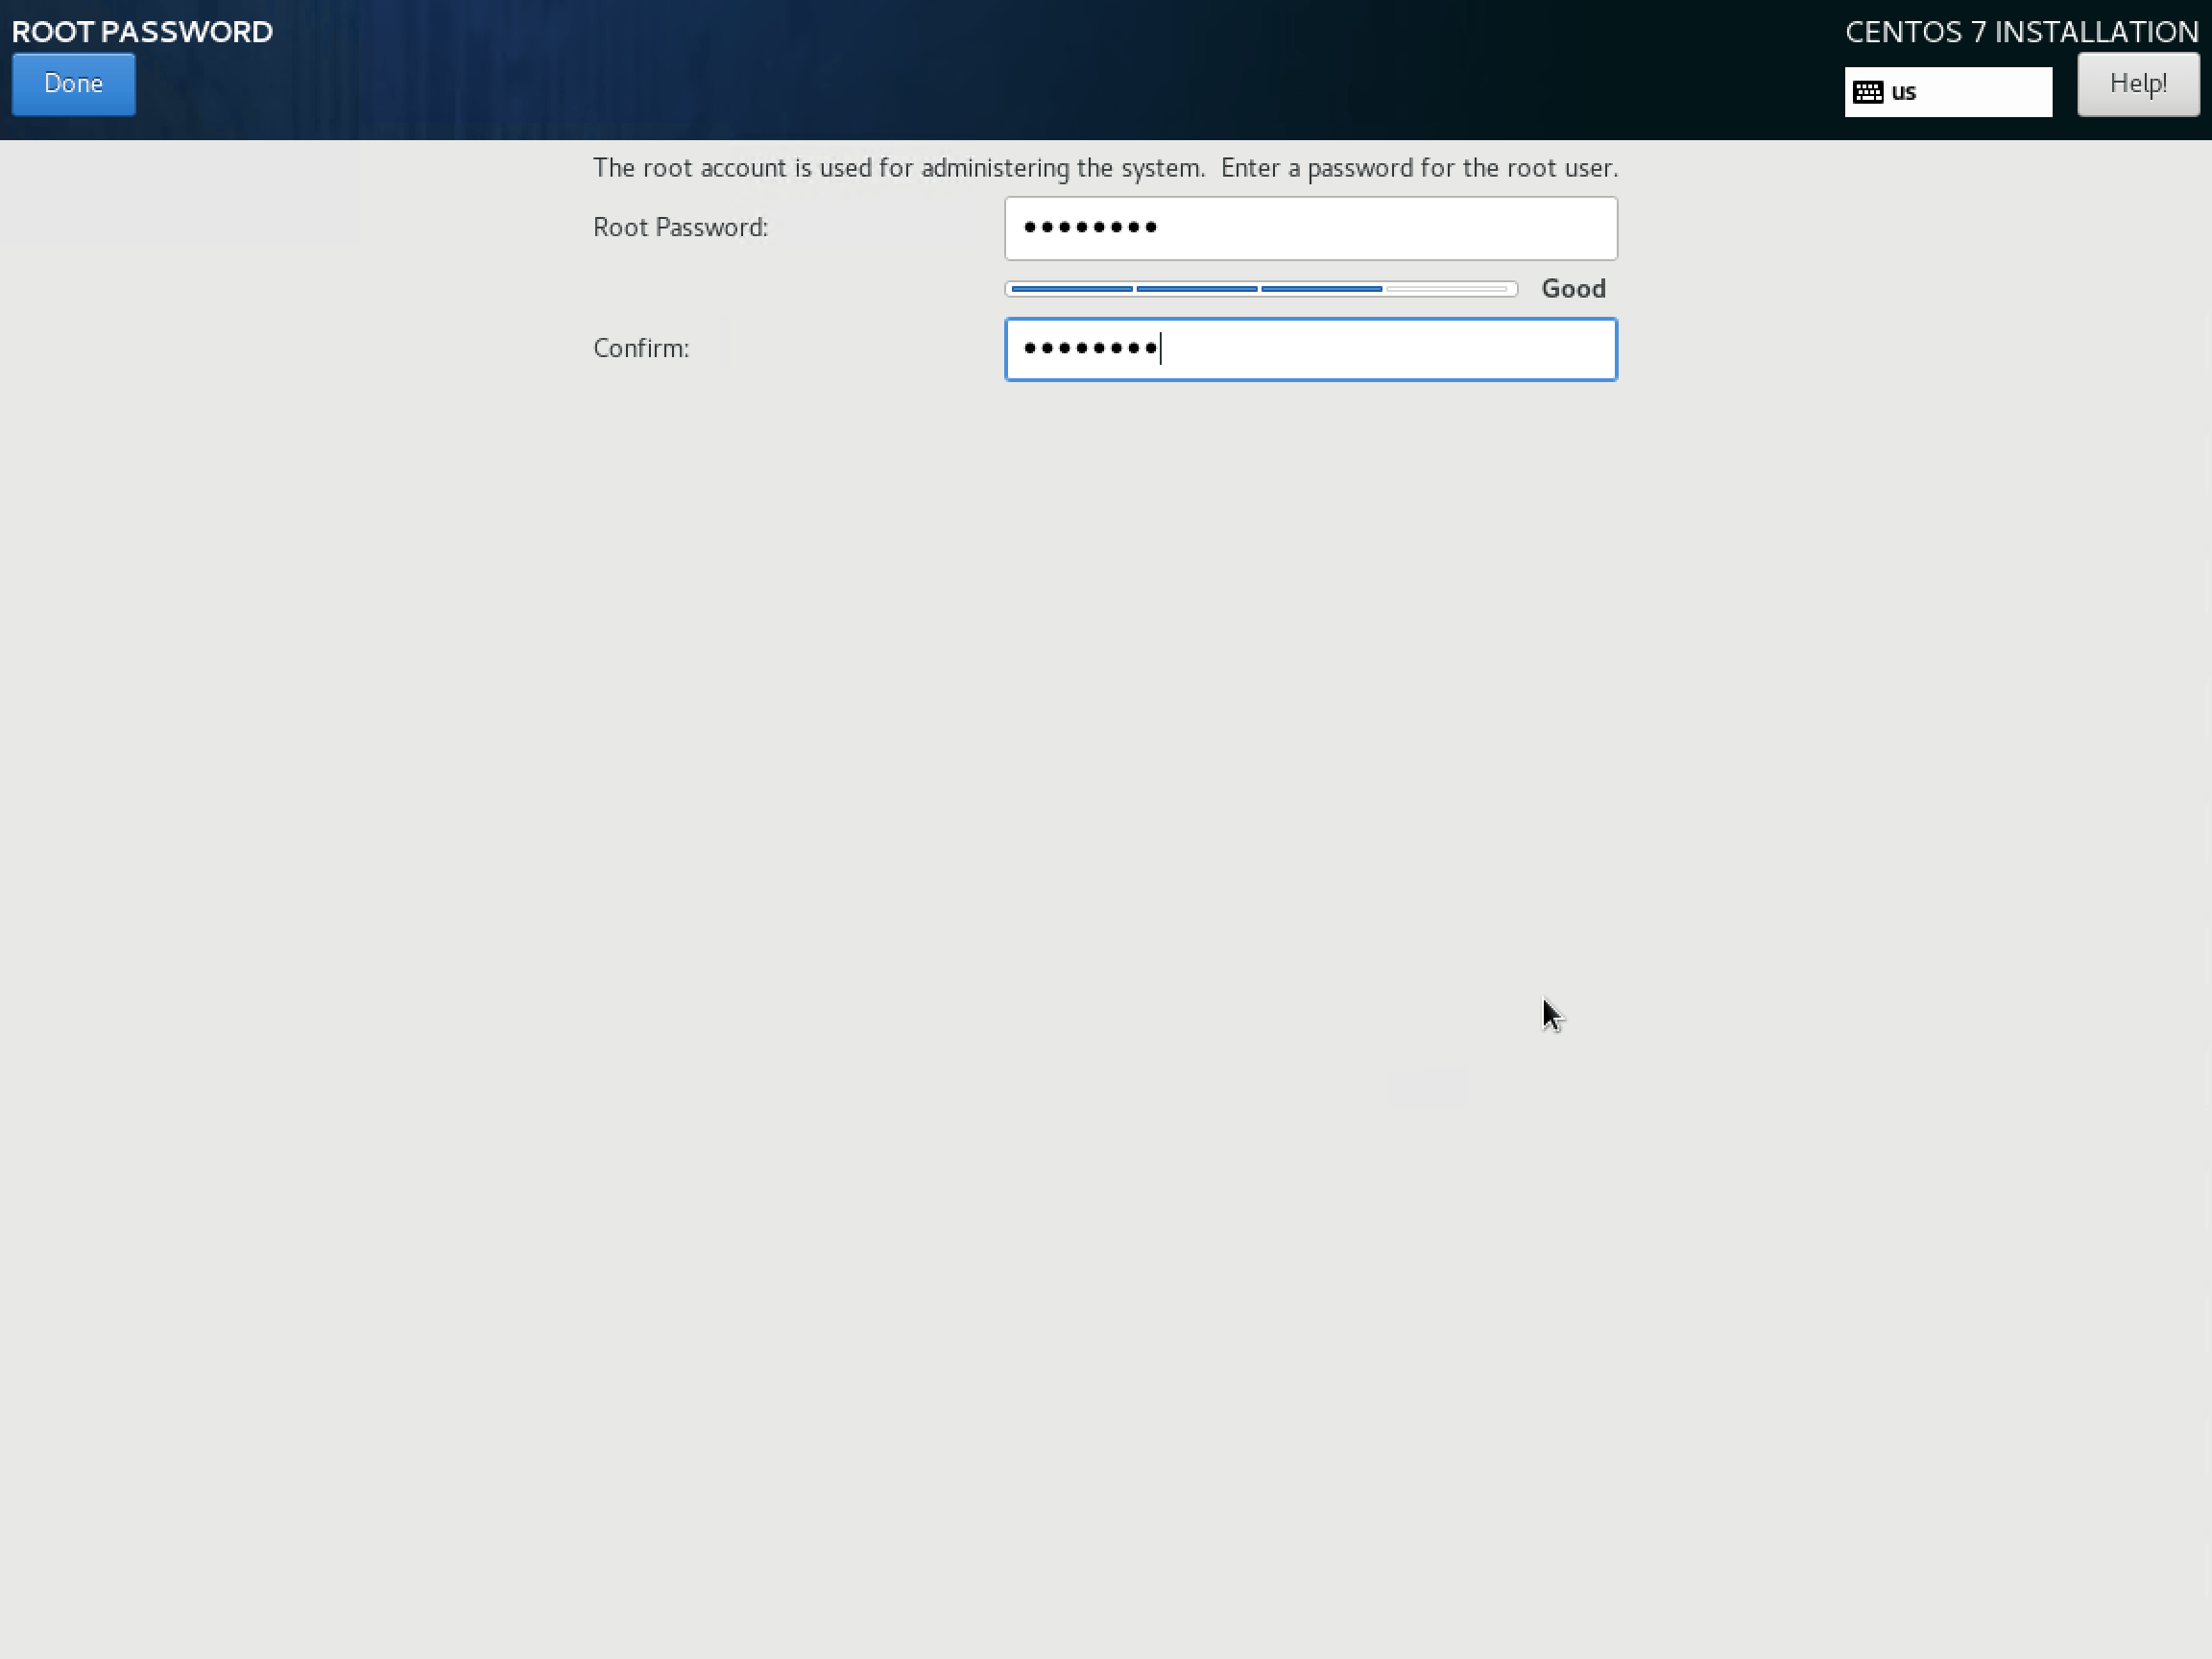
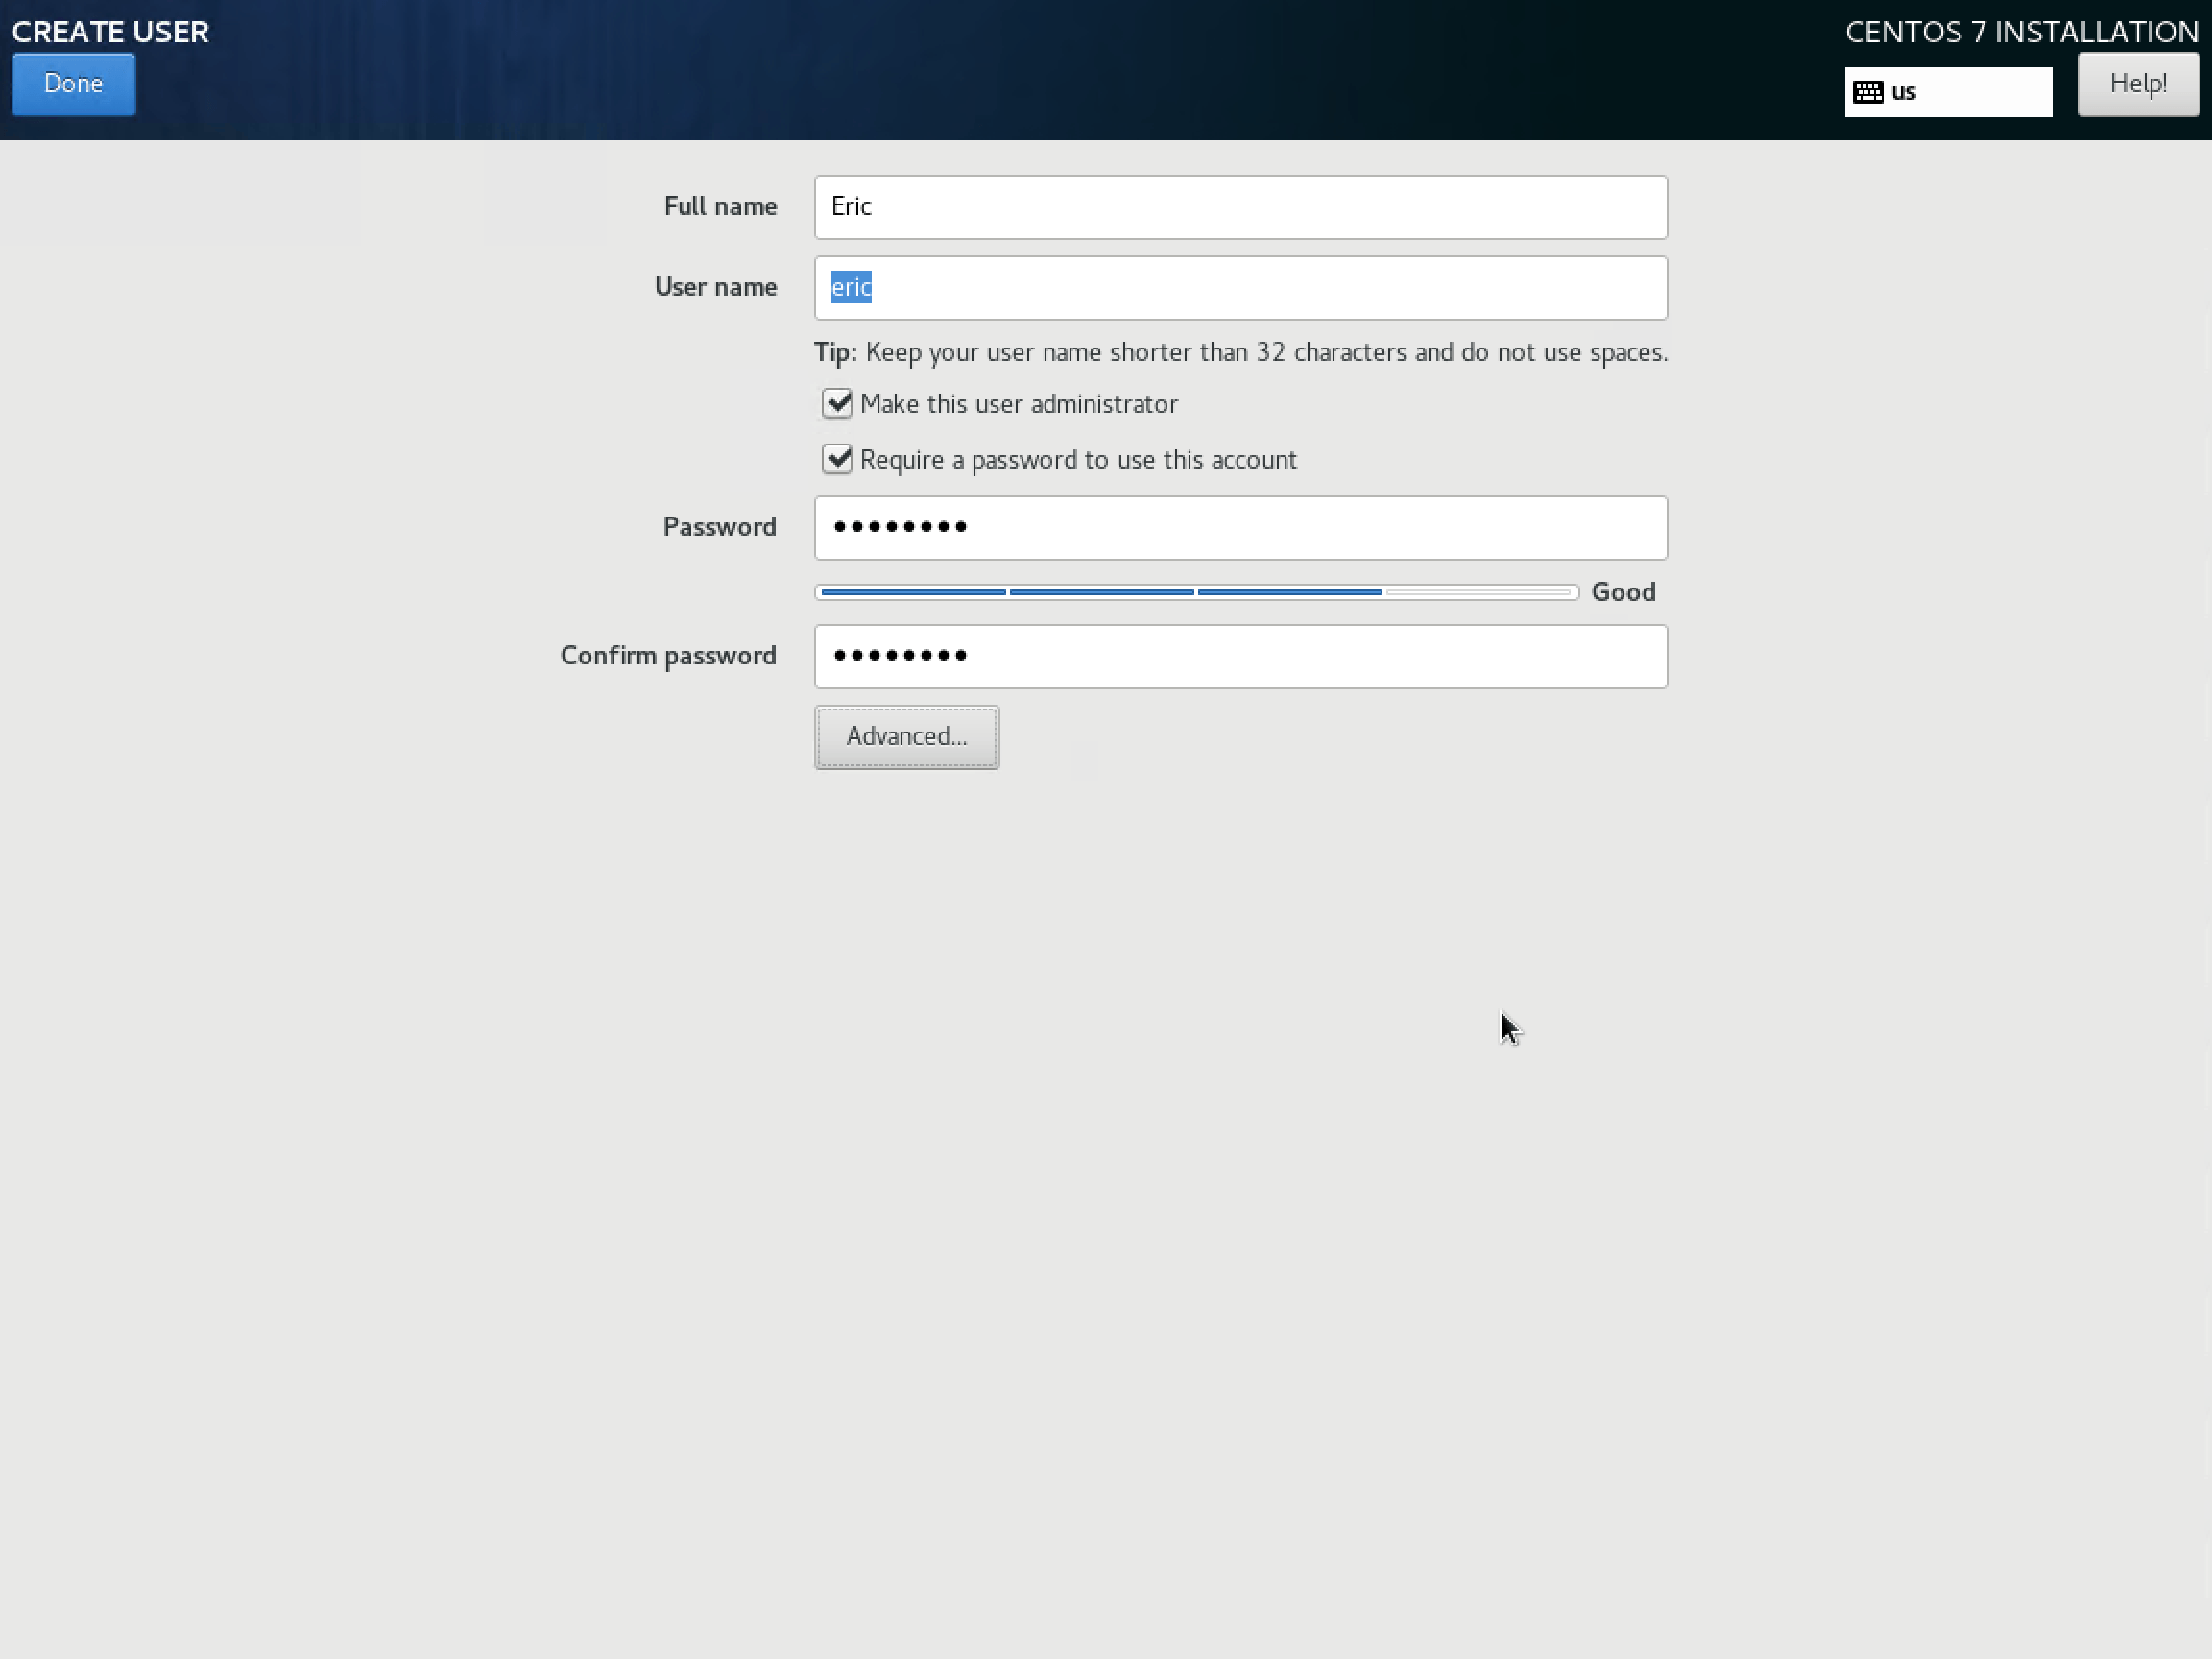
While the system installs, you’ll be allowed to set the root password and create the initial user.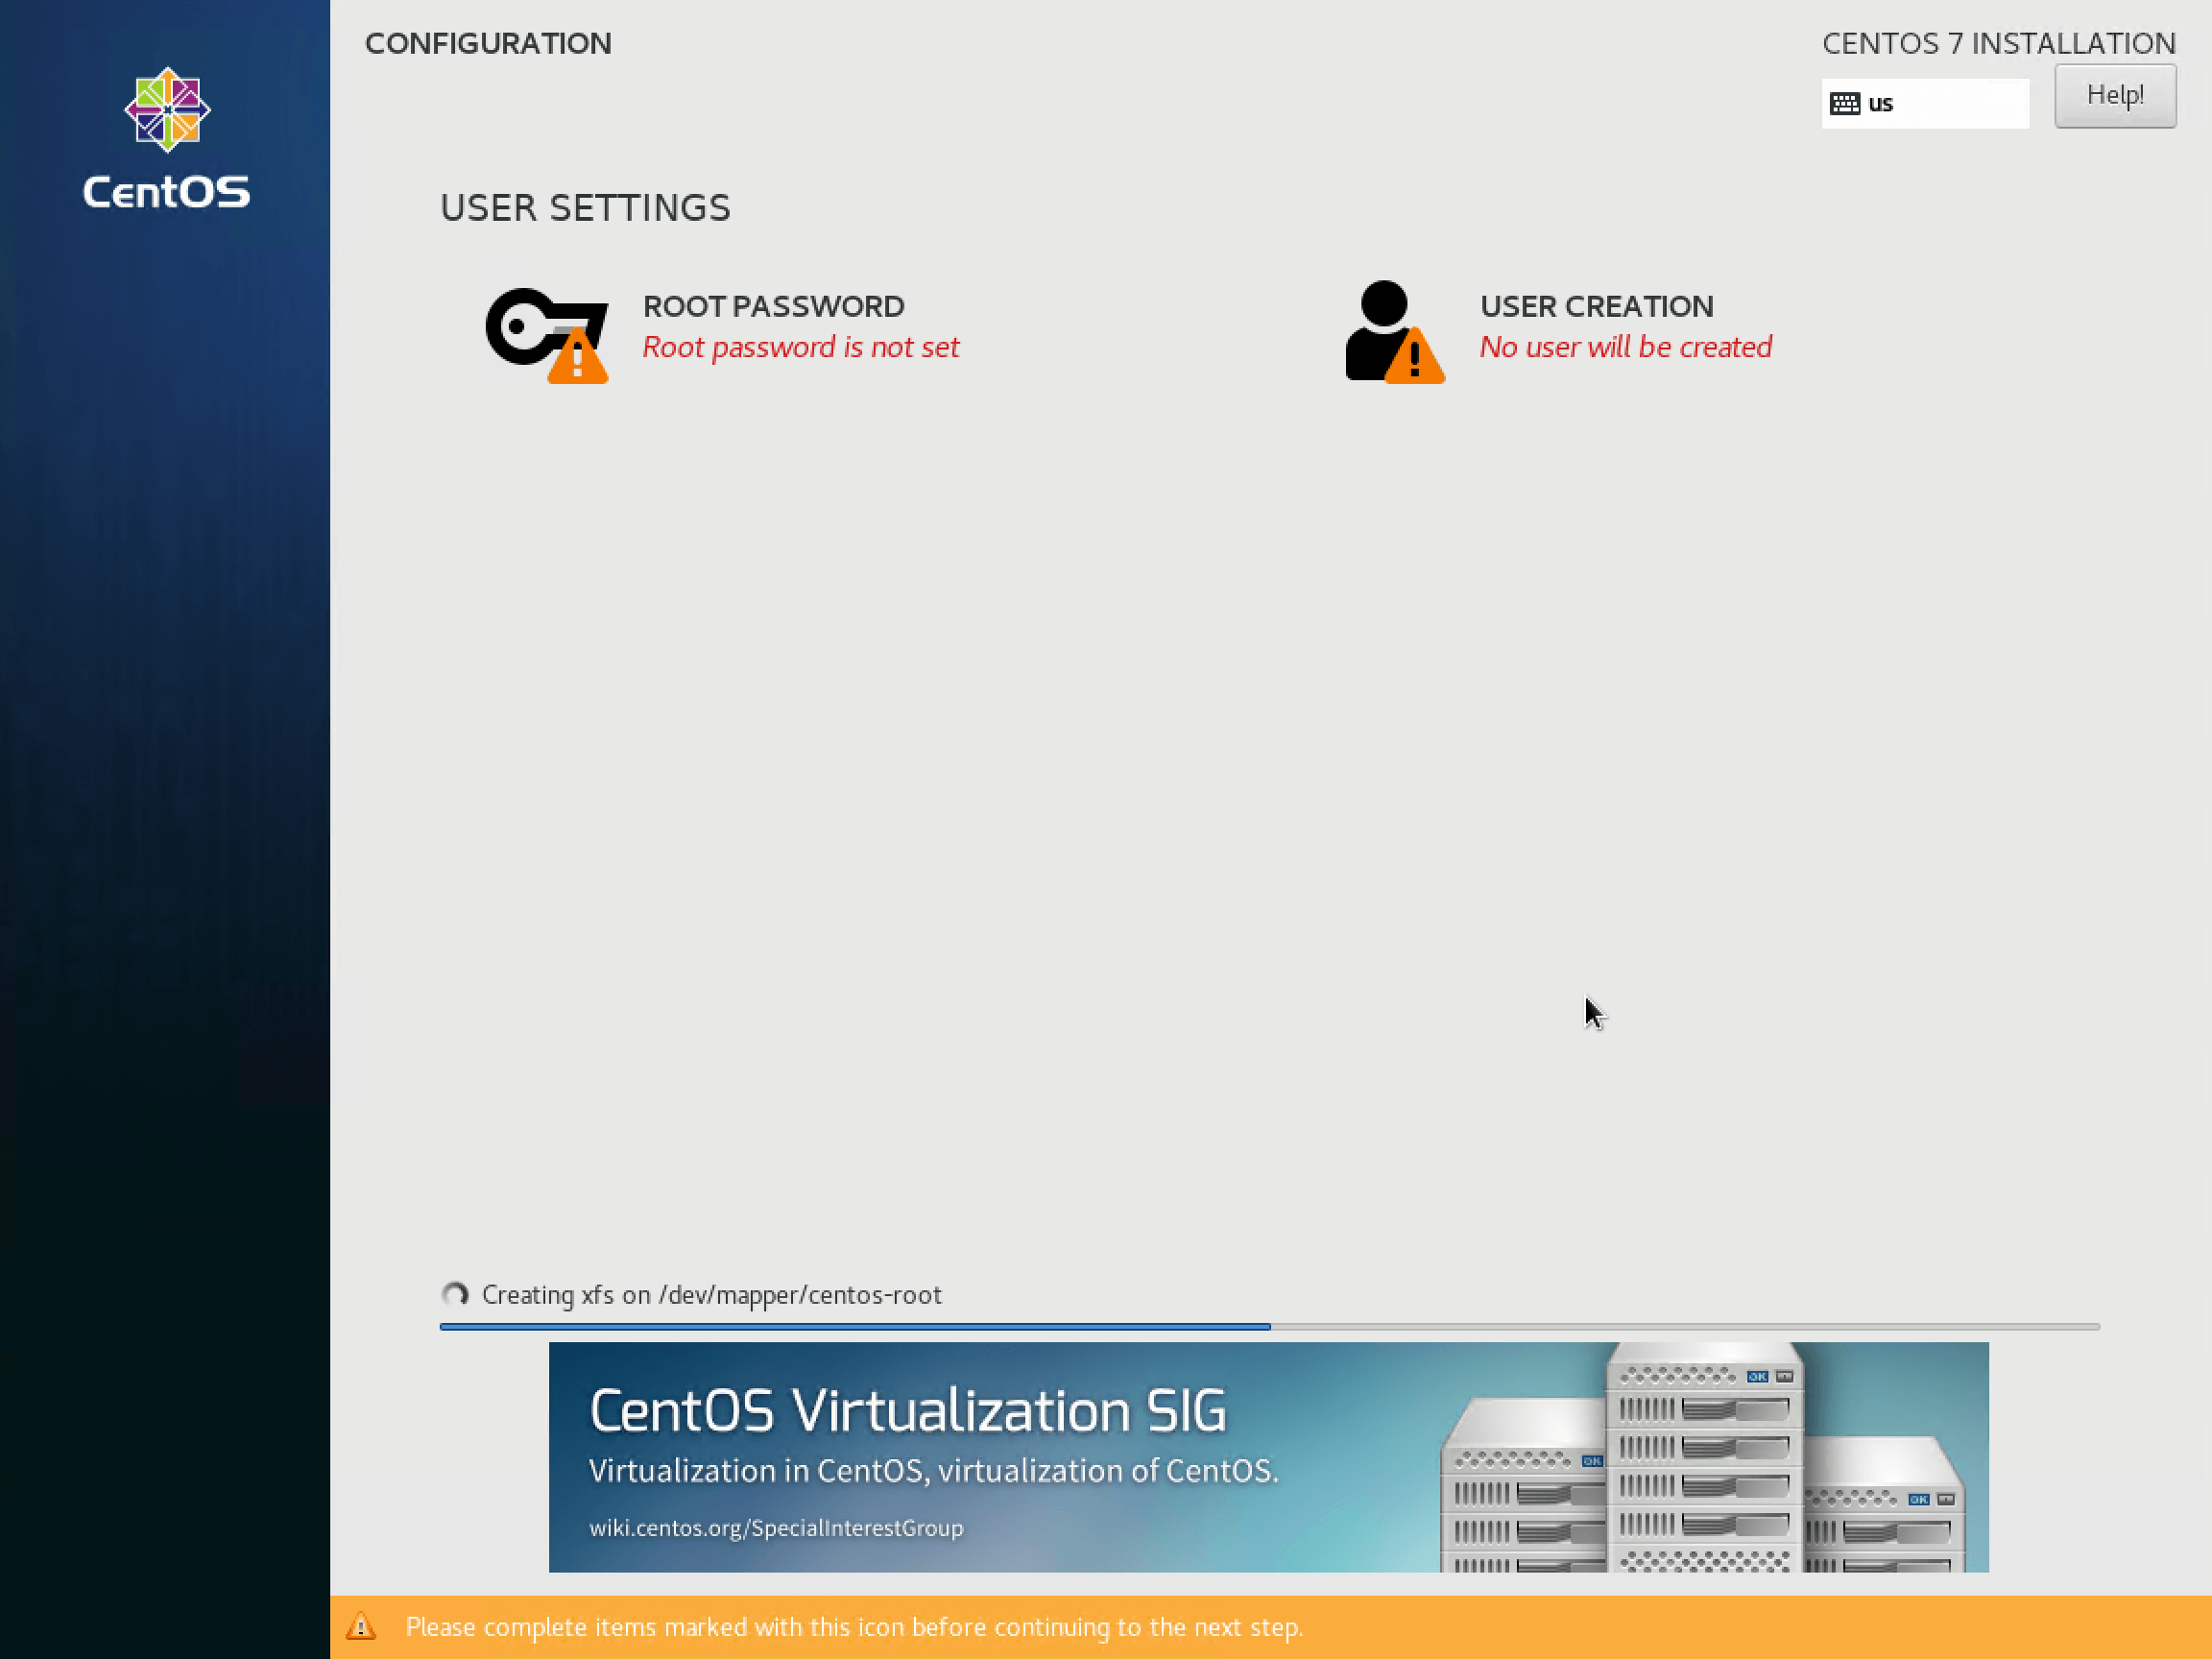
As you enter the password for root, the system will evaluate its strength. If it decides that the password you chose isn’t strong enough, you’ll be forced to click Done twice to confirm. The root account is the rough equivalent of the Administrator account on Windows, so do take appropriate steps to secure it with a strong password and exercise care in the keeping of that password.
The user creation screen is straightforward. It has the same password-strength behavior as the root screen.
Now just wait for the installation to complete. Click Finish Configuration if prompted. Once the installation completes, it will present a Reboot button. Click when ready.
The system will restart and bring you to the login screen of a completely installed CentOS virtual machine:
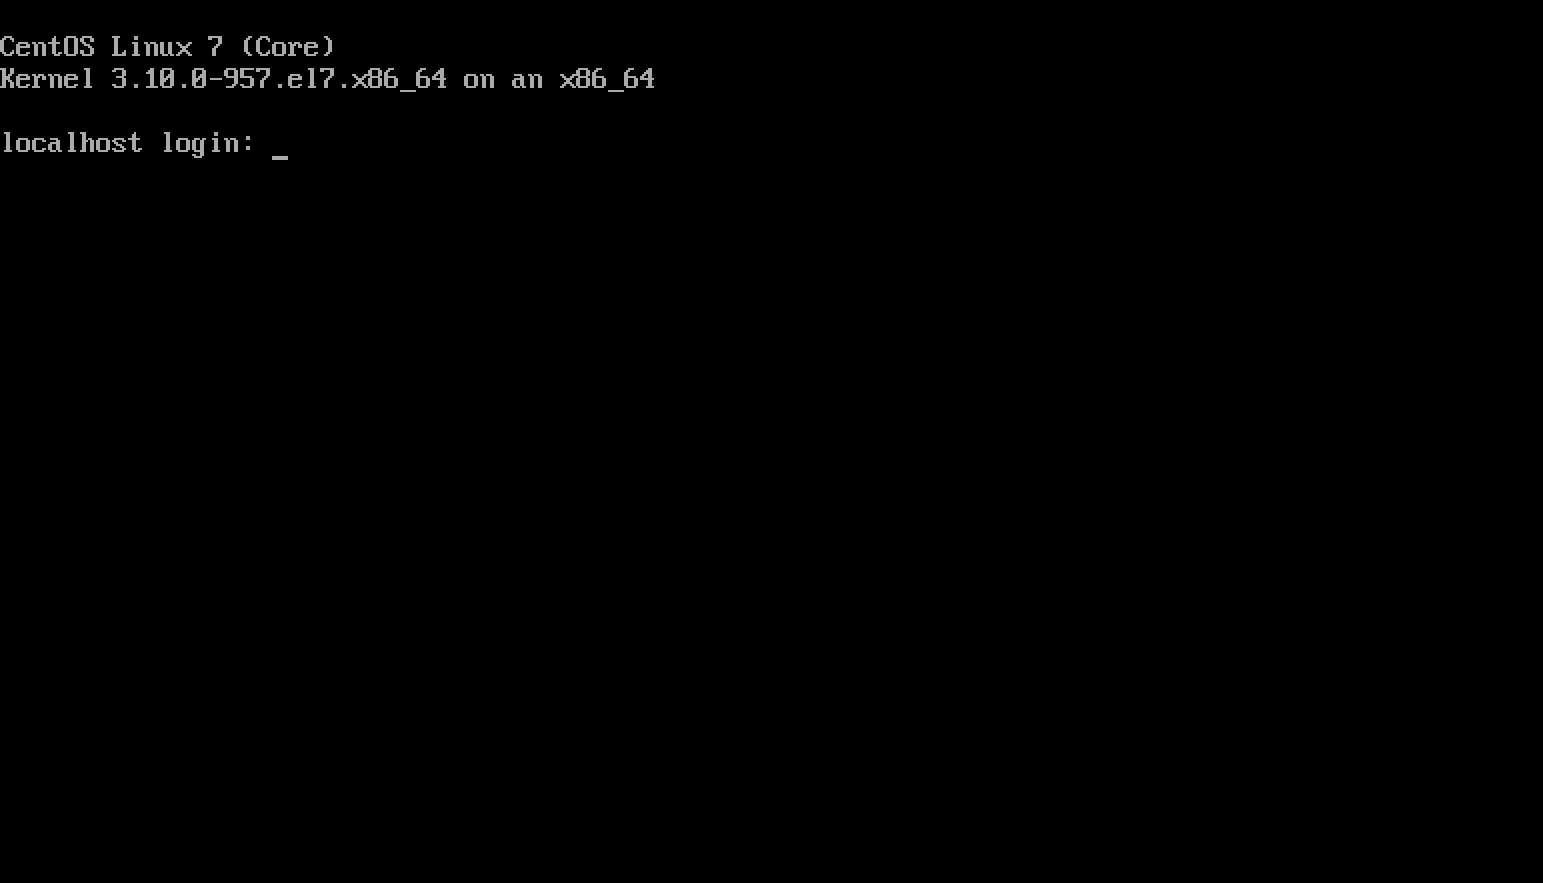
Assuming that you created a named user for yourself and made it administrator, log in with that account. Otherwise, you can log in as root. It’s poor practice to use the root account directly, and even worse to leave the root account logged in.
CentOS Post-Install Wrap-Up for Hyper-V
I have a bit of a chicken-and-egg problem here. You need to do a handful of things to wrap-up, but to do that easily, it helps to know some things about Linux. If you already know about Linux, this will be no problem. Otherwise, just follow along blindly. I’ll explain more afterward. CentOS doesn’t need much, fortunately.
To make this a bit easier, you might want to wait until you’ve met PuTTY. It allows for simple copy/paste actions. Otherwise, you’ll need to type things manually or use the Paste Clipboard feature in the Hyper-V VMCONNECT window. Whatever you choose, just make sure that you follow these steps sooner rather than later.
1. Install Nano
Editing text files is a huge part of the Linux world. It’s also one of the most controversial, bordering on zealotry. “vi” is the editor of choice for a great many. Its power is unrivaled; so is its complexity. I find using vi to be one of the more miserable experiences in all of computing, and I refuse to do it when given any choice. Conversely, the nano editor is about as simple as a text-editing tool can be in a character mode world and I will happily use it for everything. Install it as follows:
sudo yum install -y nano
The command is case-sensitive and you will be prompted for your password if not logged in as root.
2. Enable Dynamic Memory In-Guest
You need to enable the Hot Add feature to use Dynamic Memory with CentOS.
Start by creating a “rules” file. The location is important (/etc/udev/rules.d) but the name isn’t. I’ll just use the same one from Microsoft’s instructions:
sudo nano /etc/udev/rules.d/100-balloon.rules
You may be prompted for your password.
You’ll now be looking at an empty file in the nano editor. Type or paste the following:
SUBSYSTEM=="memory", ACTION=="add", ATTR{state}="online"
Now press [CTRL]+[X] to exit, then press [Y] to confirm and [Enter] to confirm the filename.
At next reboot, Dynamic Memory will be functional.
3. Install Extra Hyper-V Tools
Note: the daemons ship directly in 18.10, so you can probably skip this step.
Most of the tools you need to successfully run Linux on Hyper-V are built into the CentOS distribution. There are a few additional items that you might find of interest:
- VSS daemon (for online backup)
- File copy daemon so you can use PowerShell to directly transfer files in from the host
- KVP daemon for KVP transfers to and from the host
To install them:
sudo yum install -y hyperv-daemons
4. Change the Disk I/O Scheduler
By default, Linux wants to help optimize disk I/O. Hyper-V also wants to optimize disk I/O. Two optimizers are usually worse than none. Let’s disable CentOS’s.
You must be root for this.
su root
You’ll be prompted for the root password.
echo noop > /sys/block/sda/queue/scheduler
exit
The above will change the scheduler to “noop”, which means that CentOS will not attempt to optimize I/O for the primary hard disk. “exit” tells CentOS to exit from the root login back to your login.
Credit for the echo method goes to the authors at nixCraft.
10 Tips for Getting Started with CentOS Linux on Hyper-V
This section is for those with Windows backgrounds. If you already know Linux, you probably won’t get anything out of this section. I will write it from the perspective of a seasoned Windows user. Nothing here should be taken as a slight against Linux.
1. Text Acts Very Differently
Above all, remember this: Linux is CaSE-SENsiTiVe.
- yum and Yum are two different things. The first is a command. The second is a mistake.
- File and directory names must always be typed exactly.
Password fields do not echo anything to the screen.
2. Things Go the Wrong Way
In Windows, you’re used to C: drives and D: drives and SMB shares that start with \.
In Linux, everything begins with the root, which is just a single /. Absolutely everything hangs off of the root in some fashion. You don’t have a D: drive. Starting from /, you have a dev location, and drives are mounted there. For the SATA virtual drives in your Hyper-V machine, they’ll all be sda, sdb, sdc, etc. So, /dev/sdb would be the equivalent to your Windows D: drive. Usually, we use mount points instead of accessing files and folders from their hardware-based root. So, when you retrieve a listing of the root directory, the items you see could exist on more than one drive.
Partitions are just numbers appended to the drive. sda1, sda2, etc.
Directory separators are slashes (/) not backslashes (). A directory that you’ll become familiar with is usr. It lives at /usr.
Moving around the file system should be familiar, as the Windows command line uses similar commands. Linux typically uses ls where Windows uses dir, but CentOS accepts dir. cd and mkdir work as they do on Windows. Use rm to delete things. Use cp to copy things. Use mv to move things. Also use mv to rename things.
You cannot run an executable in the same folder just by typing its name and pressing [Enter], as in the Windows command processor. PowerShell behaves the same way, so that may not be strange to you. Use dot and slash to run a script or binary in the same folder:
./scriptfile
Linux doesn’t use file extensions. Instead, it uses attributes. So, if you create the equivalent of a batch file and then try to execute it, Linux won’t have any idea what you want to do. You need to mark it as executable first. Do so like this:
chmod +x ./thatscriptfileyouwanttouse
As you might expect, -x removes the executable attribute.
The default Linux shell does have tab completion, but it’s not the same as what you find on Windows. It will only work for files and directories, for starters. Second, it doesn’t cycle through possibilities the way that PowerShell does. The first tab press works if there is only one way for the completion to work. A second tab press will show you all possible options. You can use other shells with more power than the default, although I’ve never done it.
3. Quick Help is Available
Most commands and applications have a -h and/or a –-help parameter that will give you some information on running them. –help is often more detailed than -h. You can sometimes type man commandname to get other help (“man” is short for “manual”). It’s not as consistent as PowerShell help, mostly because each executable and script author must come up with their own help text. Also, PowerShell’s designers got to work with the benefits of hindsight and rigidly controlled design and distribution.
4. You Can Go Home
You’ve got your own home folder, which is the rough equivalent of the “My Documents” folder in Windows. It’s at the universal alias ~. So, cd ~ takes you to your home folder. You can reference files in it with ~/filename.
5. Boss Mode
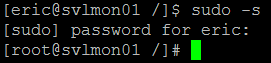
“root” is the equivalent of “Administrator” on Windows. But, the account you made has nearly the same powers — although not exactly on demand. You won’t have root powers until you specifically ask for them with “sudo”. It’s sort of like “Run as administrator” in Windows, but a lot easier. In fact, the first time you use sudo, the intro text tells you a little bit about it:

So basically, if you’re going to do something that needs admin powers, you just type “sudo” before the command, just like it says. The first time, it will ask for a password. It will remember it for a while after that. However, 99% of what I do is administrative stuff, so I pop myself into a sudo session that persists until I exit, like this:
sudo -s
You’ll have to enter your password once, and then you’ll be in sudo mode. You can tell that you’re in sudo mode because the dollar sign in te prompt will change to a hash sign:
I only use Linux for administrative work, so I always use the account with my name on it. However, even when it’s not in sudo mode, it’s still respected as an admin-level account. If you will be using a Linux system as your primary (i.e., you’ll be logged in often), create a non-administrative account to use. You can flip to your admin account or root anytime:
su eric
Always respect the power of these accounts.
6. “Exit” Means Never Having to Say Goodbye
People accustomed to GUIs with big red Xs sometimes struggle with character mode environments. “exit” works to end any session. If you’re layered in, as in with sudo or su, you may need to type “exit” a few times. “logout” works in most, but not all contexts.
7. Single-Session is for Wimps
One of the really nifty things about Linux is multiple concurrent sessions. When you first connect, you’re in terminal 1 (tty1). Press [Alt]+[Right Arrow]. Now you’re in tty2! Keep going. 6 wraps back around to 1. [Alt]+[Left Arrow] goes the other way.
You need to be logged in to determine which terminal you’re viewing. Just type tty.
8. Patches, Updates, and Installations, Oh My.
Pretty much all applications and OS components are “packages”. “yum” and “rpm” are your package managers. They’re a bit disjointed, but you can usually find what you need to know with a quick Internet search.
Have your system check to see if updates are available (more accurately, this checks the version data on download sources):
sudo yum check-update
Install package patches and upgrades:
sudo yum update
There’s also an “upgrade” option which goes a bit further. Update is safer, upgrade gets more.
Show all installed packages that yum knows about:
sudo yum list
The rpm tool shows different results, but for my uses yum is sufficient.
Find a particular installed package, in this case, “hyperv” (spelling/case counts!):
sudo yum list installed | grep hyperv
Look for available packages:
sudo yum list unzip<br>
Install something (in this case, the Apache web server):
sudo yum install httpd
9. System Control
CentOS’s equivalent to Task Manager is top. Type top at a command prompt and you’ll be taken right to it. Use the up and down arrows and page up and page down to move through the list. Type a question mark [?] to be taken to the help menu that will show you what else you can do. Type [Q] to quit.
10. OK, I’m Done Now
If you’ve used the shutdown command in Windows, then you’ll have little trouble transitioning to Linux. shutdown tells Linux to shut down gracefully with a 1-minute timer. All active sessions get a banner telling them what’s coming.
Immediate shutdown (my favorite):
shutdown now
Reboot immediately:
shutdown -r now
There’s an -H switch which, if I’m reading this right, does a hard power off. I don’t use that one.
[thrive_leads id=’17165′]
Useful Tools for CentOS Linux
Manipulating your CentOS environment from the VMConnect console will get tiring quickly. Here are some tools to make managing it much easier.
Text Editors
I already showed you nano. Just type nano at any prompt and press [Enter] and you’ll be in the nano screen. The toolbar at the bottom shows you what keypresses are necessary to do things, ex: [CTRL]+[X] to exit. Don’t forget to start it with sudo if you need to change protected files.
The remote text editing tool that I use is Notepad++. It is a little flaky — I sometimes get Access Denied errors with it that I don’t get in any other remote tool (setting it to Active mode seems to help a little). But, the price is hard to beat. If I run into real problems, I run things through my home folder. To connect Notepad++ to your host:
- In NPP, go to Plugins->NppFTP->Show NppFTP Window (only click if it’s not checked):
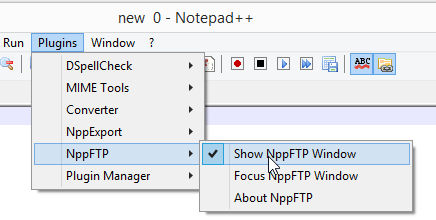
NPP FTP Window Selector
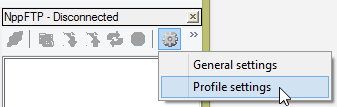
- The NppFTP window pane will appear at the far right. Click the icon that looks like a gear (which is, unfortunately, gray in color so it always looks disabled), then click Profile Settings:
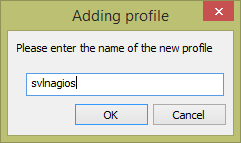
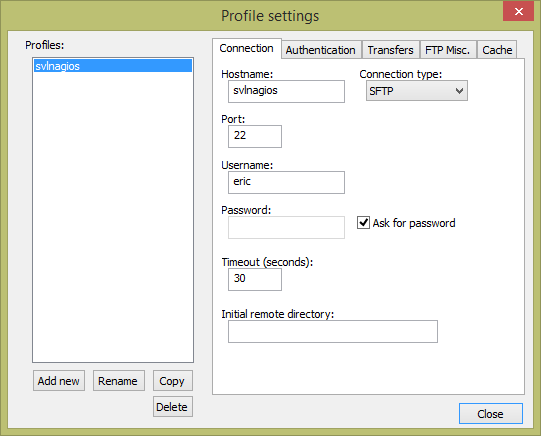
- In the Profile Settings window, click the Add New button. This will give you a small window where you can provide the name of the profile you’re creating. I normally use the name of the system.
- All the controls will now be activated.
- In the Hostname field, enter the DNS name or the IP address of the system you’re connecting to (if you’re reading straight through, you might not know this yet).
- Change the Connection type to SFTP.
- If you want, save the user name and password. I don’t know how secure this is. I usually enter my name and check Ask for password. If you don’t check that and don’t enter a password, it will assume a blank password.
NPP FTP Profile
- You can continue adding others or changing anything you like (I suggest going to the Transfers tab and setting the mode to Active). Click Close when ready.
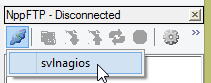
- To connect, click the Connect icon which will now be blue-ish. It will have a drop-down list where you can choose the profile to connect to.
- On your first connection, you’ll have to accept the host’s key:

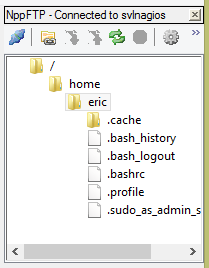
- If the connection is successful, you’ll attach to your home folder on the remote system. Double-clicking an item will attempt to load it. Using the save commands in NPP will save back to the Linux system directly.
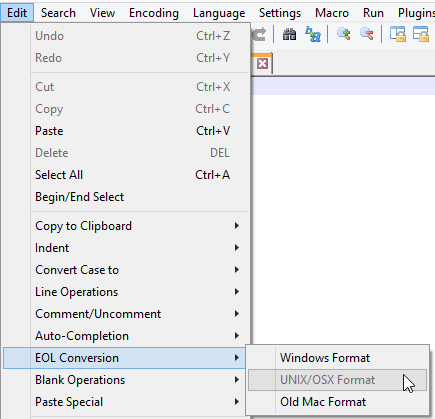
Remember that NPP is a Windows app, and as a Windows app, it wants to save files in Windows format (I know, weird, right?). Windows expects that files encoded in human-readable formats will end lines using a carriage-return character and a linefeed character (CRLF, commonly seen escaped as rn). Linux only uses the linefeed character (LF, commonly seen escaped as n). Some things in Linux will choke if they encounter a carriage return. Any time you’re using NPP to edit a Linux file, go to Edit -> EOL Conversion -> UNIX/OSX Format.
NPP EOL Conversion
WinSCP
WinSCP allows you to move files back and forth between your Windows machine and a Linux system. It doesn’t have the weird permissions barriers that Notepad++ struggles with, but it also doesn’t have its editing powers.
- Download and install WinSCP. I prefer the Commander view but do as you like.
- In the Login dialog, highlight New Site and fill in the host’s information:
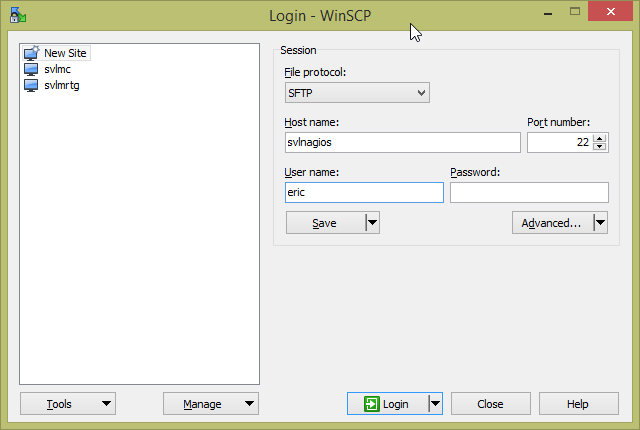
- Click Save to keep the profile. It will present a small dialog asking you to customize how it’s saved. You can change the name or create folders or whatever you like.
- With the host entry highlighted, click Login. You’ll be prompted with a key on first connect:
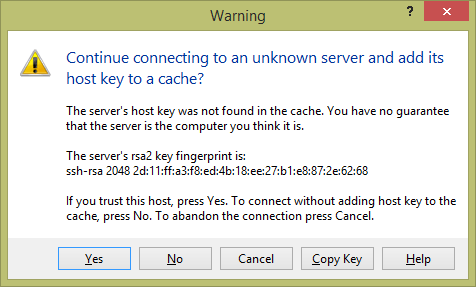
- Upon clicking Yes, you’ll be connected to the home folder. If you get a prompt that it’s listening on FTP, something went awry because the install process we followed does not include FTP. Check the information that you plugged in and try the connection again.
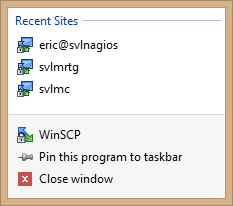
- WinSCP integrates with the taskbar for quick launching:
PuTTY
The biggest tool in your Linux-controlling arsenal will be PuTTY. This gem is an SSH client for Windows. SSH (secure shell) is how you remote control Linux systems. Use it instead of Hyper-V’s virtual machine connection. It’s really just a remote console. PuTTY, however, adds functionality on top of that. It can keep sessions and it gives you dead-simple copy/paste functionality. Highlight text, and it’s copied. Right-click the window, and it’s pasted at the cursor location.
- Download PuTTY. I use the installer package myself but do as you like.
- Type in the host name or IP address in that field.
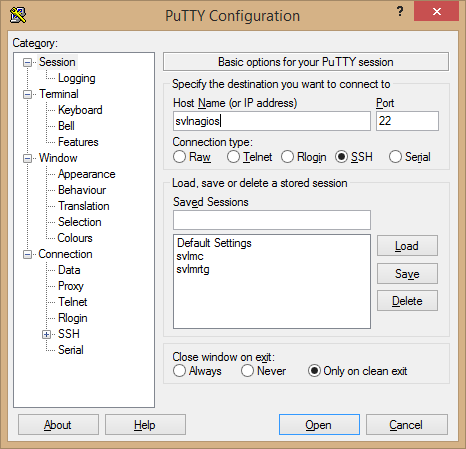
- PuTTY doesn’t let you save credentials. But, you can save the session. Type a name for it in the Saved Sessions field and then click Save to add it to the list. Clicking Load on an item, or double-clicking it, will populate the connection field with the saved details.
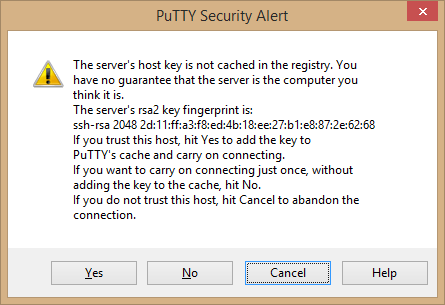
- Click Open when ready. On the first connection, you’ll have to accept the host key:
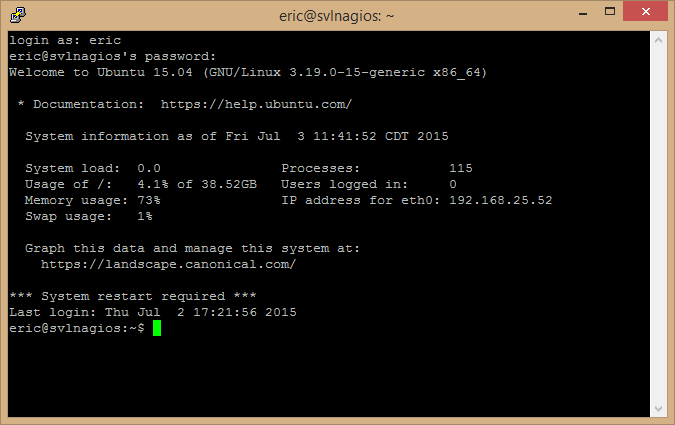
- You’ll then have to enter your login name and password. Then you’ll be brought to the same type of screen that you saw in the console:
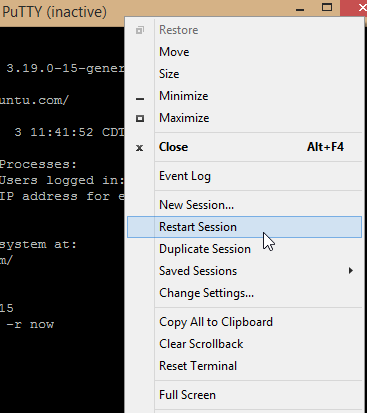
- Right-click the title bar of PuTTY for a powerful menu. The menu items change based on the session status. I have restarted the operating system for the screenshot below so that you can see the Restart Session item. This allows you to quickly reconnect to a system that you dropped from… say, because you restarted it.
- PuTTY also has taskbar integration:

- When you’re all done, remember to use “exit” to end your session.
Your Journey Has Begun
From here, I leave you to explore your fresh new Linux environment. If you’d like, we have an article on using CentOS to host a Nagios environment for monitoring your Hyper-V environment.
More in this category


About the Author

Eric Siron

